
Connecting PC’s & Users for Sharing XP, Vista, 7, 8 & 10
The Complete Guide for Home Networks and Sharing
Learn it, Master it and Enjoy it. Fast, Secure and Easy
"Revised 6-23-2018 Final"
7 Easy to Understand Detailed Steps
1. Initial Network Settings.
2. HomeGroup Use.
3. "Part 1" Accessing Network PC's and Their Shared Items.
4. "Part 2" Taking Ownership of Any Drive, Folder, File & Users/Permissions.
5. "Part 3" Sharing Any Drive, Folder or File.
6. "Part 4" Private Sharing of Any Drive, Folder or File.
7. Tips for Printer/Scanner Troubleshooting.
Windows 10 v1803: Connection Issues on the Network
*** There is a Fix for That Here ***
*** And How to Set Up Private Sharing ***
NOTE: >> "v1803" After updating numerous PC's/Laptops on many Networks, Windows version 1803 (with HomeGroup now removed). There is an issue with the Host Name Resolution preventing PC's from connecting to each other. One minute they will and they next they will not, or they just will not at all.
I have turned on about every windows service that was disabled or not running and turned on some windows features that none resolved the problem, including resetting network and adapter drivers and rebooting modems. As mentioned, There is a fix for that below.
In the meantime, you can resolve this issue without changing your Network setup, messing with your modem settings or changing to Static IP Addressing and/or having to assign them manually for connected devices. This might be accepted to some Home User, but probably would not be accepted by many Administrators or Home Users, especially on more complex Small Business or Corporate Networks, Servers and Computers. Plus it is a waste of time when you can Create Shortcuts for All PC's on one PC in 5 minutes and Distribute them to Everyone on Your Network as explained below, until Microsoft fixes this problem.
Initial Setup for your Network:
For Windows XP, Vista, 7, 8 and 10 Network Sharing.
For Windows 7, 8 and 10 HomeGroup Sharing:
(Excluding W10 v1803).
Since Windows 10 came out, it has the issue of PC icons missing in Network Folder. One minute they may appear after a restart or Windows Update and the next minute they are missing. And one PC may show them and others not.
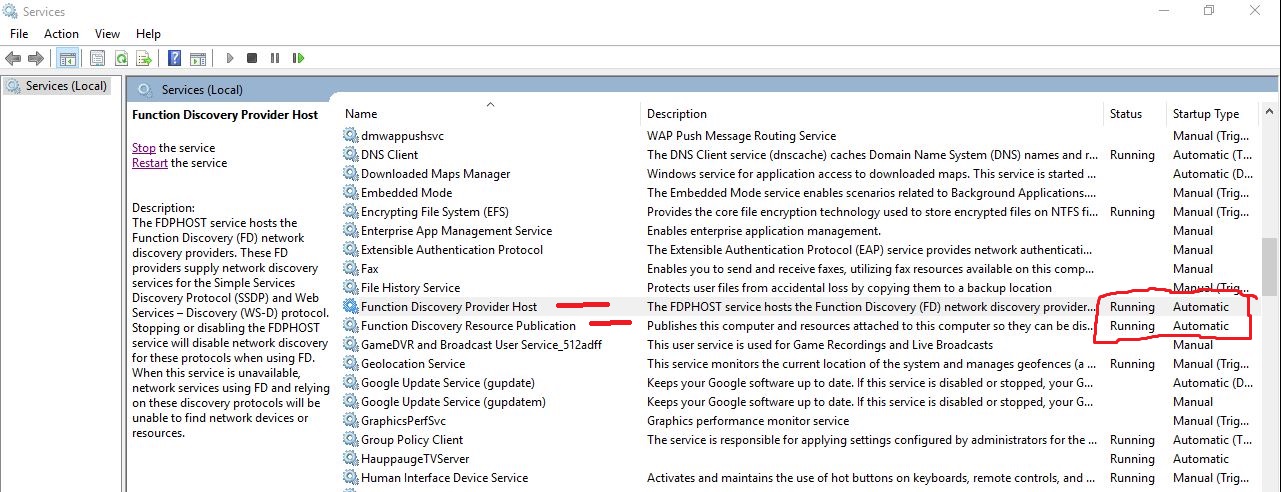
Do this on all PC's/Laptops:
Open Task Manager
Services Tab>>More Services>>
Open Services (On Bottom).
Or Control Panel\All Control Panel Items\Administrative Tools\Services
Set Both Function Discovery Services to Automatic and Start Them:
This will help discover other Devices or PC's and especially if PC ICONS are Missing in the Network Folder. This does not always work though. "IF NOT", then follow below. Also how to set up sharing between PC's and Users below.
Also make sure these 2 below will already be running as they should be:
SSDP Discovery
UPnP Device Host
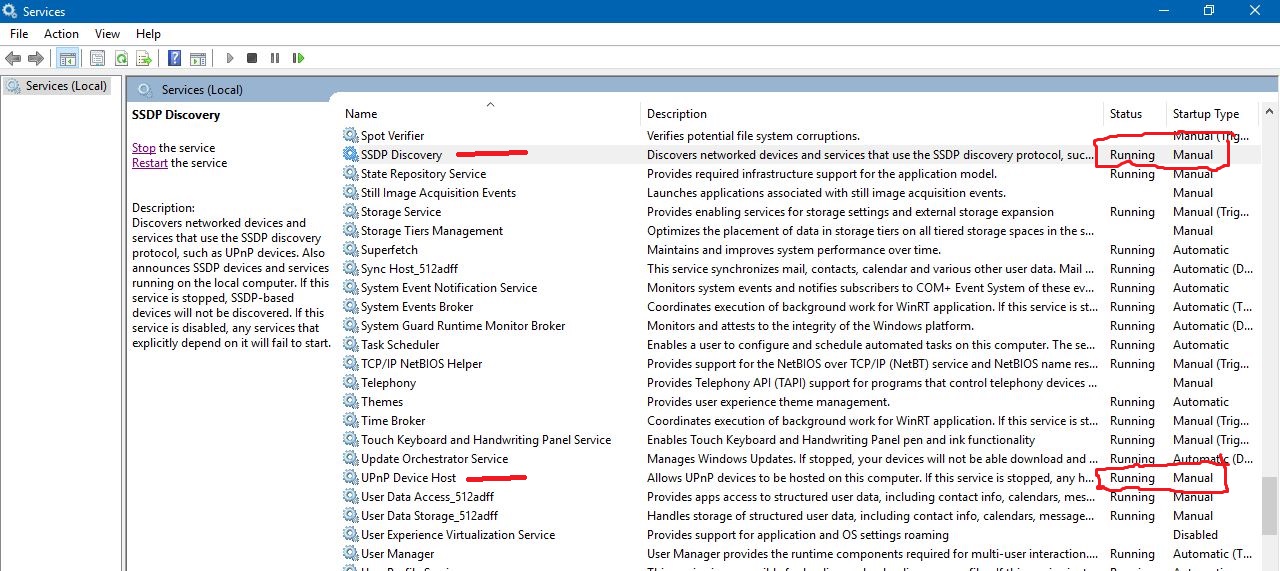
Also make sure these 2 below will already be running as they should be:
DHCP Client
DNS Client
For the 6 Services above, I highly suggest to set them as follows:
Right click on each one>>Properties
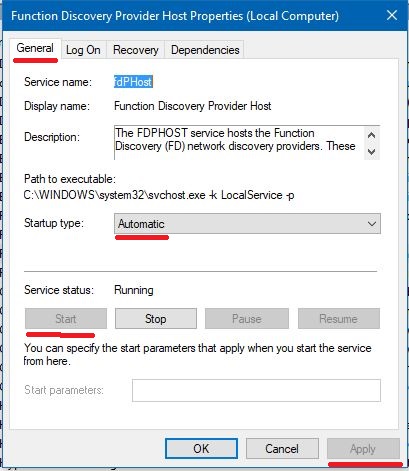
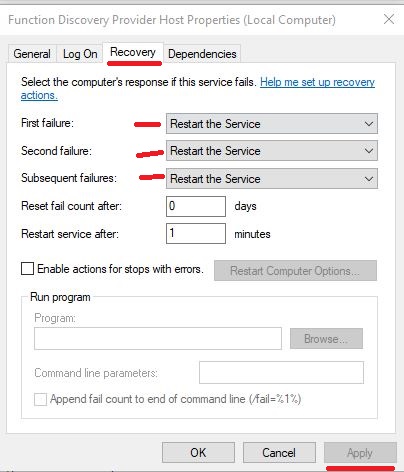
Now go to: "Optional, Depending on Your Windows Operating System"
Leave off and try it as a last resort.
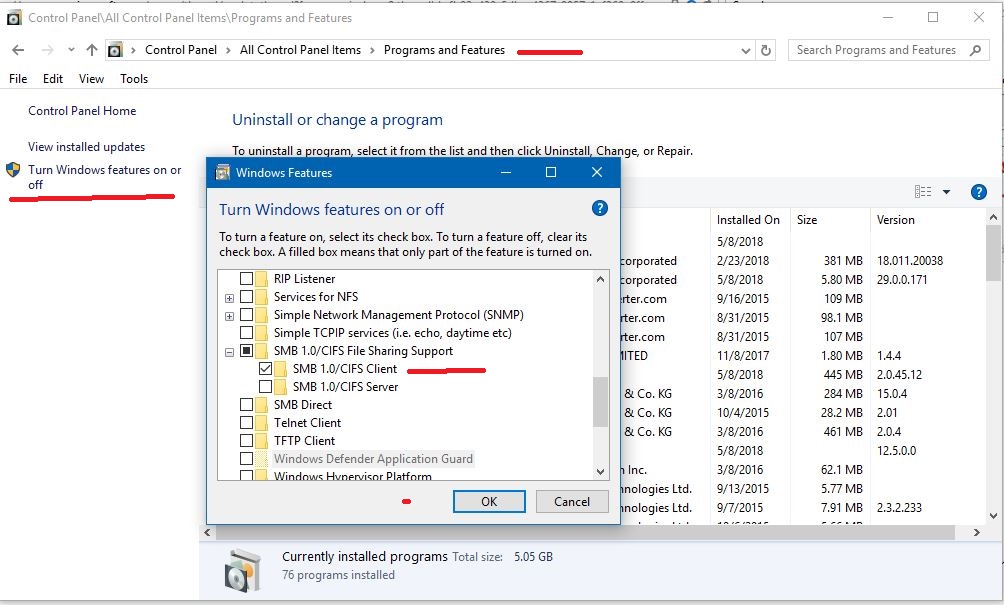
Control Panel\All Control Panel Items\Programs and Features>>
Turn Windows Features On or Off.
Find SMB 1.0 CIFS File Sharing Support (Expand)
Only Select "Tick Box", SMB 1.0 CIFS client, OK.
There is also a couple things that you "Must" do after the v1803 Update and you should always check them on any Previous Versions or Windows Operating Systems.
Go to each PC:
All Settings>>Network & Internet>>Sharing Options
or
Control Panel\All Control Panel Items\Network and Sharing Center\Advanced Sharing Settings
For All Windows OS Versions and OS's That Also Support Homegroup:
"MUST BE SET AS SHOWN BELOW"
>>Private
Turn ON Discovery
Turn ON File and Printer Sharing
>>All Networks (v1803) - Public Network (Previous)
These 2 below will be reset to Discovery OFF and Password Sharing On in v1803.
Change as follows:
Turn ON Discovery
Turn OFF Password Sharing
(Unless you want to use Password Sharing and know how to).
Not really needed on your Home Network.
If you choose to use Password Protected Sharing, leave it turned "ON".
Select the PC you want to access in the Network Folder or using IP Address - v1803 Connection Issues . When the Credentials Dialogue Box opens up, Enter Your User Name and Password and Select the Box to Remember Your Credentials. Then you need to go to the other PC you are trying to connect to and Confirm "Yes" to allow the other PC to connect to it. You only have to do this one time.
If for some reason it will not accept your User Name or Password.
Go to:
Control Panel\All Control Panel Items\Credential Manager
And Delete the Current User Name and Password you may have previously used and try again entering your current credentials.
Restart All PC's after making these changes on each of them.
HomeGroup:
NOTE: For those who are still able to use HomeGroup prior to W10 v1803:
"Private User Sharing" in Part 4.
You have to create a HomeGroup, save the password provided to you here, and join the HomeGroup on other PC's and enter the provided password.
This is done In Network Settings / (Sharing Options)>>HomeGroup.
Here you also select which of your 4 or 5 Default Personal User Folders to Share. You can add more items to share later using the method below in the Example.
Ignore Printers as they are shared through the Network anyways.
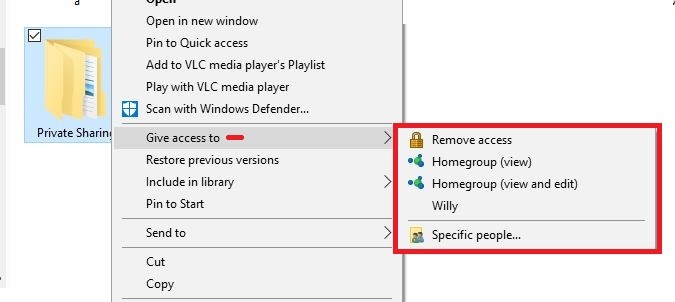
You can Right Click on the Item and Select>>Give Access To>>. Here You Can Share or Stop Sharing Any Items or Drives.
You should also be able to use this process to "Share or Stop Sharing in v1803". "Without Connection Issues Between PC's"
Still having connection issues, reboot your modem and restart all PC's on your Network.
Still having connection issues, then check it out below to get connected and start sharing.
****************************
*** I want to notify you of a Windows Security Breach to Your User Account Folder that I have seen on numerous PC's, including my own on Vista, 7, 8 and 10 ***
Open the Network Folder and select your PC. You will probably see "Public" and "Users". Now go to another PC on your Home Network, Select your PC and open the "Users" Folder.
If you are Denied Access, then all is good. If you can access anything other than "Public" Folder, then this is the Security Breach.
So you can go to your C:\ Drive (System)
Right Click on Users Folder
Properties>>Sharing>>Advanced
And Select the Box to NOT SHARE the
"Users" Folder>>Apply, OK. This will end this problem.
Then Open C:\Users Folder,
Right Click on Public Folder
Properties>>Sharing>>Advanced
And Select the Box to SHARE the
"Public" Folder with FULL Permissions
for User "Everyone">>Apply, OK., Apply, OK.
If it is already Shared with Full Permissions, then all is good.
Then on "Your User Account" Folder, Do the same thing.
Verify the Advanced Sharing is NOT turned ON.
****************************
"Part 1" - Accessing Network PC's and Their Shared Items:
This Covers Setting Up Access to Your Network PC's, with or without the v1803 Connections Issues Between PC's:
"Private User Sharing" in Part 4.
You need to know you can get FALSE POSITIVES. What I mean is, that it will connect and seem fixed. And then 1 minute or hours later it is back to not connecting.
If you cannot Connect to other PC's on your Network because of Windows 10 v1803, which also no longer has the HomeGroup, then Create Shortcuts for "ALL PC's" on your Network using PC IP Address.
There is no altering anything and creating a possible bigger mess for a temporary problem that will most likely be fixed in a Cumulative Update soon or the next Creators Update. What is the difference from connecting to all PC's in the "Network" by the PC Names >> \\PC NAMES << or by the "Network Temp" Folder" >>\\PC IP ADDRESSES << that I am about to explain.
Windows 10 v1803 Connection Issues Between PC's. And this might fix this type of issue on other Versions or Windows Operating Systems.
Create 1 shortcut for all of the PC's on your Network.
Then Create a Folder called "Network Temp" and place all of the shortcuts you create into the "Network Temp" Folder.
And then "COPY & PASTE"
("Not Copy & Paste Shortcut")
The "Network Temp" Folder to all of the other PC's Public Folders. Then each PC's User can access them all from there or put a shortcut of that folder anywhere on their PC or Pin to Quick Access & Start Menu, etc.
So to fix this issue, get all your PC's IP addresses located in your modem's device table or on each PC's Network Information Location.
Windows 10 >>Network & Internet>>Status>> Change Connection Properties.
To Access Most Modems, Type into Browser 192.168.0.1
Or look in your Modem Manual, Call Your ISP or Search the Web for the Access Address for Your Modems Model Number.
To Access Your Modem or Modem/Router. Enter the Modem's Access - IP Address into Your Browsers Address Bar and Press Enter.
If you still have an issue, you should reboot your modem and restart all PC's on your Network.
To Create Shortcuts with
Connection Issues Between PC's:
Example:
BOBS-PC in modem device table is:
\\192.168.0.6
Right Click on Desktop, Create New Shortcut.
In the Wizard, Type in or Copy & Paste
The following and complete the shortcut.
Location entered is:
\\192.168.0.6
You can also Create More Shortcuts or Pin to Quick Access or Start Menu from this Shortcut you just Created.
In "THIS PC" - "My Computer".
You can also
"Add a Network Location".
But you have to add Public
BOBS-PC in the Modems Device Table is:
\\192.168.0.6
Select>>"Add a Network Location".
In the Wizard, Type in or Copy & Paste
The following and complete the shortcut.
Location entered is:
\\192.168.0.6\Public
You can also Create More Shortcuts or Pin to Quick Access
or Start Menu from this Shortcut you just Created.
Now from the Two Shortcuts Created above or from the
"Network Temp" Folder.
Right Click on any PC or Shared Item and Create
a Shortcut or Pin to Quick Access or Start Menu, etc.
You can do this for Any Item you have access to that is shown in the Network PC's Shared Items.
Including All PC's Default Public Sharing Folders.
Now you "MUST" Access the Network by the Shortcuts you Created using the
\\PC IP Address and Create any New Shortcuts from this Locations
\\PC IP ADDRESS.
These created shortcuts using PC IP ADDRESSES are only for temporary use so you can connect to other PC's on your Network and Share until Microsoft fixes this issue in Version 1803.
To Create Shortcuts with Good Connection Between PC's,
Do the same as above, but enter the "PC Name" instead.
Example:
BOBS-PC
Right Click on Desktop, Create New Shortcut.
In the Wizard, Type in or Copy & Paste
And Complete the Shortcut.
Location entered is:
\\BOBS-PC
You can also Create More Shortcuts or Pin to Quick Access
or Start Menu from this Shortcut you just Created.
In "THIS PC" - "My Computer".
You can also "Add a Network Location".
But you have to add Public
Select>>"Add a Network Location".
In the Wizard, Type in or Copy & Paste
The Following and Complete the Shortcut.
Location entered is:
\\BOBS-PC\Public
You can also Create More Shortcuts and Pin to Quick Access or Start Menu from this Shortcut you just Created.
Now from the Two Shortcuts Created above or from the
"Network" Folder.
Right Click on any PC or Shared Item and Create a Shortcut or Pin to Quick Access or Start Menu, etc.
You can do this for Any Item you have access to that is shown in the Network PC's Shared Items. Including All PC's Default Public Sharing Folders.
"Part 2" - Taking Ownership of Any Drive, Folder or File:
This Covers Ownership's, Users and Permissions, with or without the v1803 Connections Issues Between PC's:
"Private User Sharing" in Part 4.
To Share any External Drives or Items in that Drive, Do the Following:
I am going to explain first on How to Prepare your External Drive's Security, and then you can start sharing.
To Take Ownership of the Drive and Get It Prepared, Do the Following:
I Would definitely "Take Ownership" of the Drive. This prevents anyone from taking ownership of it or modifying, moving, changing or deleting any content inside of it. If you assign the "Read & Write Permissions" for the User "Administrator(s)" in the Security Users List after you Take Ownership of the Drive, then you will be protected. I highly suggest to do this.
In "This PC" or "My Computer"
Right Click on the External Drive>>Properties>>Security>>Advanced
On top next to Owner, Select>>"Change"
Advanced>>Find Now>>YOUR USER NAME>> OK>>APPLY. Confirm/Yes/Continue:
Keep Clicking on "Continue", As Those System and User Account Files Are Not Applying "The Selected User" These Permissions. Which is Good, Because You Do Not Need Them Assigned to Those Files for Your Shared Items or Content.
This is Very Important. You Now "Must" be on the List and "Must Have Full Control of the Drive". Once you Take Ownership of the Drive, You "MUST IMMEDIATELY":
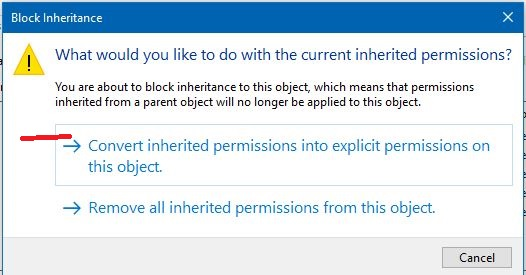
Select>>Disable Inheritance>>Convert Inherited Permissions...
>>APPLY>>Confirm/Yes/Continue.
Keep Clicking on "Continue", As Those System and User Account Files Are Not Applying "The Selected User" These Permissions. Which is Good, Because You Do Not Need Them Assigned to Those Files for Your Shared Items or Content.
Now Select>>Add>>Select a Principle>>Advanced>>Find Now
Select>>"Your User Account Name">>OK>>Set Full Control Permissions>>APPLY>>Confirm/Yes/Continue:
Keep Clicking on "Continue", As Those System and User Account Files Are Not Applying "The Selected User" These Permissions. Which is Good, Because You Do Not Need Them Assigned to Those Files for Your Shared Items or Content.
You are Now the "OWNER" of the "External Drive" with "FULL CONTROL".
If you set the User "Everyone" and/or "Administrator(s)" to "Full Control" in the Users Security List for the External Drive, then any Folder or Item that you select to share in the Advanced Sharing could be Deleted. And other Administrator(s) on the same PC can outright Delete or Modify Anything as they are not part of the Network Sharing, they are a Shared User on the Same Computer Operating Under the Rules For Local Administrators.
I go ahead and set User "Everyone" & "Administrator(s)" to "Read & Write" ONLY in the Security Settings, Just to make sure all content is protected. I suggest you do the same.
But If you prefer Setting the Users Permissions for "Everyone" and/or "Administrators(s)" to Full Control for the External Drive, then you can use the Default Advanced Sharing for the User "Everyone" and then give it "Read & Write" Permissions. Then people on the Network cannot modify, move, change or delete the Item or anything inside of it. But Administrator(s) still can, no matter what.
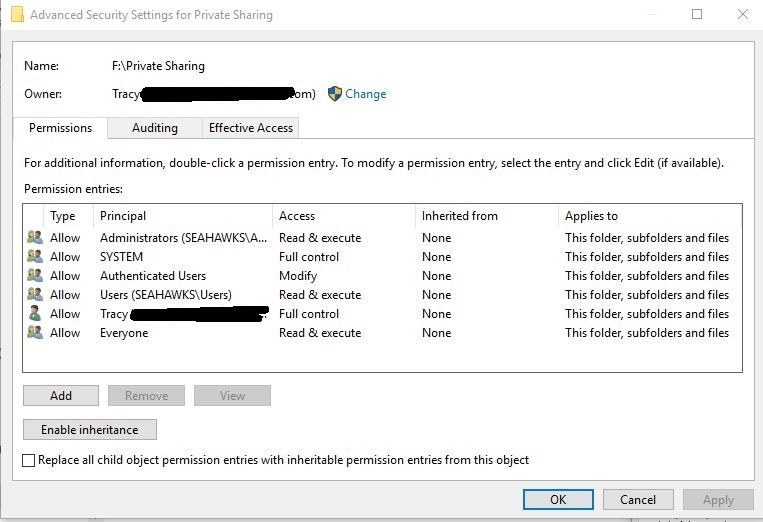
This is what it should look like for the External Drive and Also for the Private Sharing Folder as shown below.
Which will also be explained in Step 4 below.
"How to Share Privately to Specific People on Your PC & Network"
Now When You Add Any User or Want to Change Permissions for Any User or Ownership in the Security Settings for Any Drive, Folder or File, Then This is How to do This.
Add a New User to the List, Select Add>>Select a Principle>>Advanced>>Find Now
Choose the User You Want to Add>>OK.
Now the Permission Window is Next.
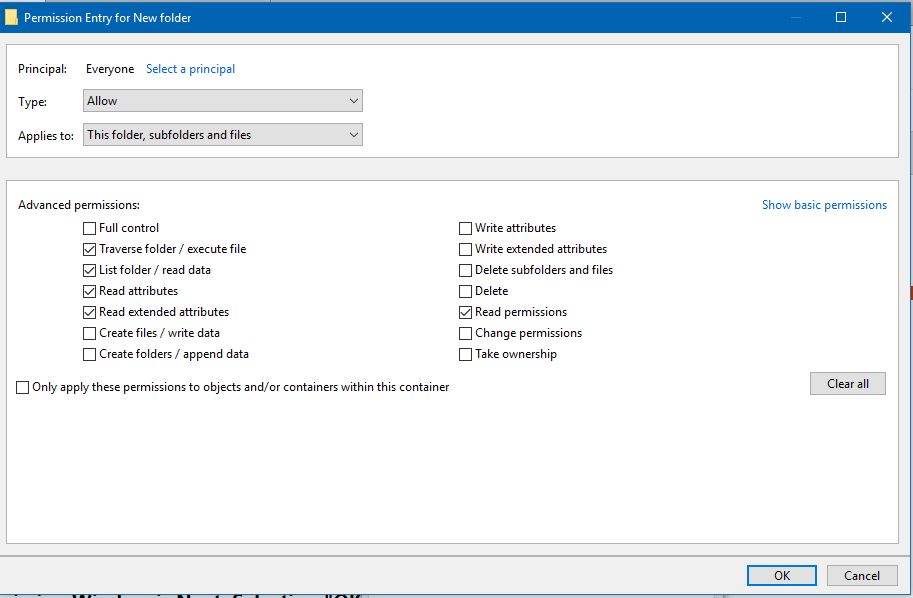
Selecting "OK" Gives the Default "Read & Write" Permissions.
Selecting "Full Control" is Just That.
Select "Show Advanced Permissions", For the Complete List of Permission Options. Select Them and Then>>OK>>Apply>>Confirm/Yes/Continue.
Keep Clicking on "Continue", As Those System and User Account Files Are Not Applying "The Selected User" These Permissions. Which is Good, Because You Do Not Need Them Assigned to Those Files for Your Shared Items or Content.
Select a Current User in the List>>Edit.
Now the Permissions Window is Displayed.
Select>>Show Advanced Permissions.
Now Choose the Permissions You are Allowing>>OK>>Apply>>Confirm/Yes/Continue. Keep Clicking on "Continue", As Those System and User Account Files Are Not Applying "The Selected User" These Permissions. Which is Good, Because You Do Not Need Them Assigned to Those Files for Your Shared Items or Content.
Here s a Photo Showing the Default "Read & Write" Permissions:
This Completes Setting Up a "Drive, Folder or File Ownership" and "Master & Child Permissions" For Any Item on Your Computer.
"Part 3" - Sharing Any Drive, Folder or File:
This Covers Sharing Any Items, with or without the v1803 Connections Issues Between PC's:
"Private User Sharing" in Part 4.
How to Share Drives, Folders and Files:
It was already explained above on how to share using HomeGroup. And you should also be able to use this same process to "Share or Stop Sharing in v1803", "Without Connection Issues Between PC's". But your Shares are Now Going to Be in The Network Folder Location or the Default C:\Users\Public Folder Location if you use that.
However, this method is not your best option and limits you on Users and Permissions Control. I will always use the Advanced Sharing Method. So below is the simple way of doing so just like the HomeGroup's Basic Sharing and Stop Sharing process.
This is the Default Network Sharing Method Since the Inception of Windows Operating Systems:
Network Folder, Default C:\Users\Public Sharing Folder and Additional Drives, Devices, Files or Folders That You Select to Share Manually.
"BEST OPTION"
When using the Default Advanced Sharing for the User "Everyone".
Give it "Read & Write Permissions Only".
Then the "Shared Items" "CANNOT" be modified, moved, changed or deleted.
To Simply Share Using Advanced Sharing, Do the Following for All Items:
Right Click on Any Item>>Properties>>Sharing Tab>>Advanced.
Select the Box to Share the Drive, Folder or File>>Apply.
Select Permissions>>And then you will see the
User "Everyone" in the List.
Select the Permissions you want to Allow for this Item>>Apply, OK, Apply, OK.
That is it.
Now it will be Discoverable in in the Network Folder within Your PC Name.
Now Anyone Has Access to It From the Network Folder Location.
Remember, If you had to create shortcuts to the PC's using the
\\PC IP Addresses to be able to connect to them,
then you Ignore the Network Folder to connect to them and access their shared content.
You Must use these Shortcuts.
Remember, These shortcuts in your
C:\Users\Public\Network Temp Folder, can be duplicated and placed anywhere.
They also can be Pinned to Quick Access & Start Menu.
This also applies to a Normal Working Connection and Using the Network Folder.
Also, when you access any PC from the Network Folder or the Shortcuts You Created for Them,
You Can Also Create Shortcuts From Any Shared item to be Placed on Your Desktop.
You Can Also Right Click on Any Item and Pin to Quick Access & Start Menu
If you want to give someone Full Permissions to any items, then just put the items in your C:\Users\Public Folders.
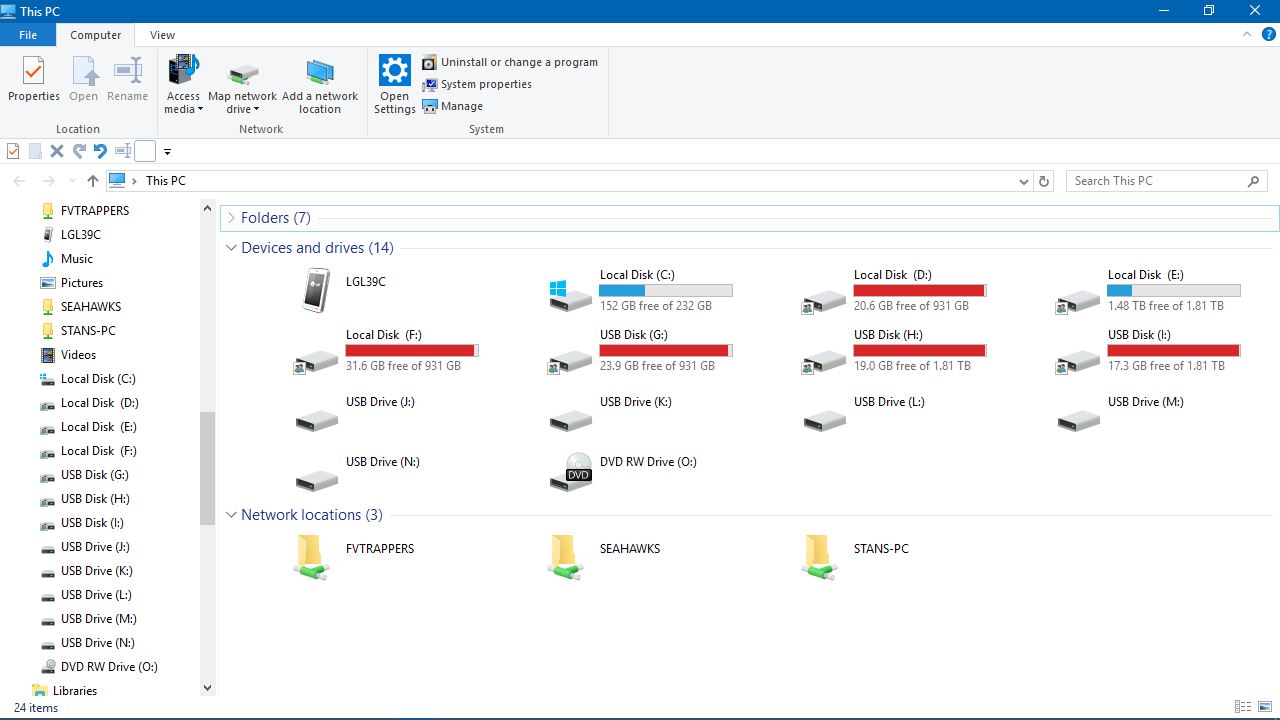
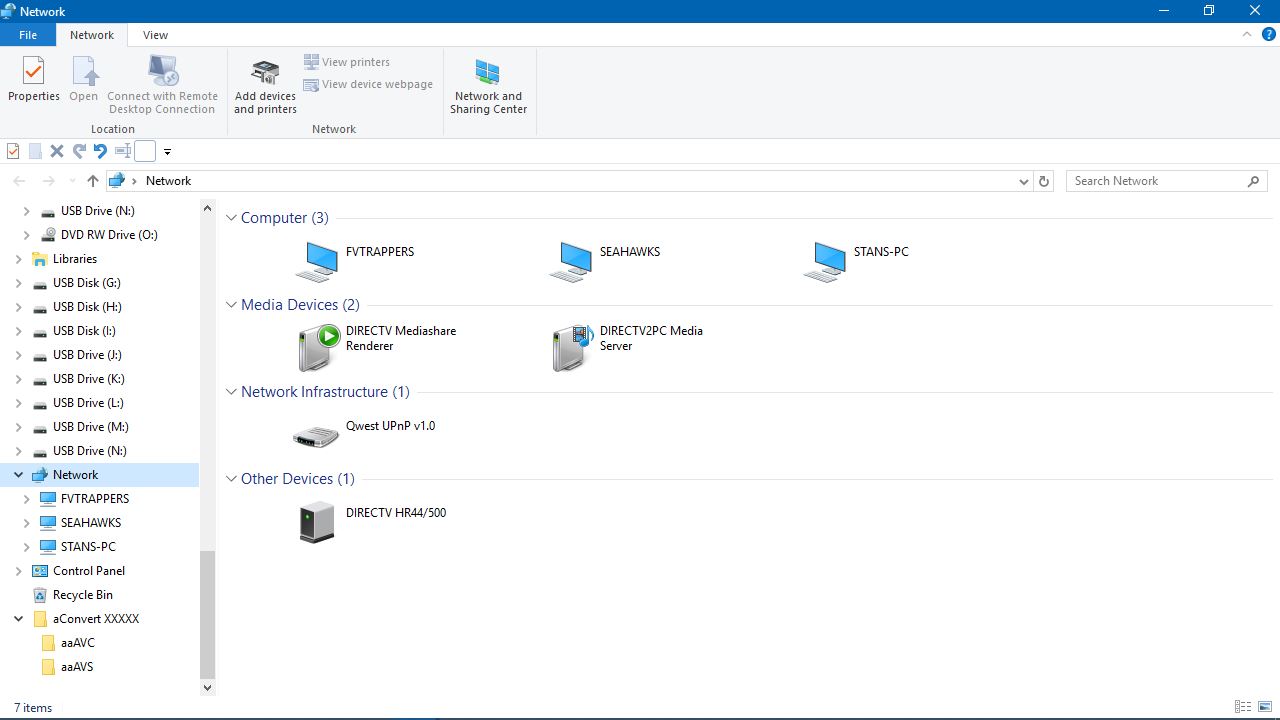
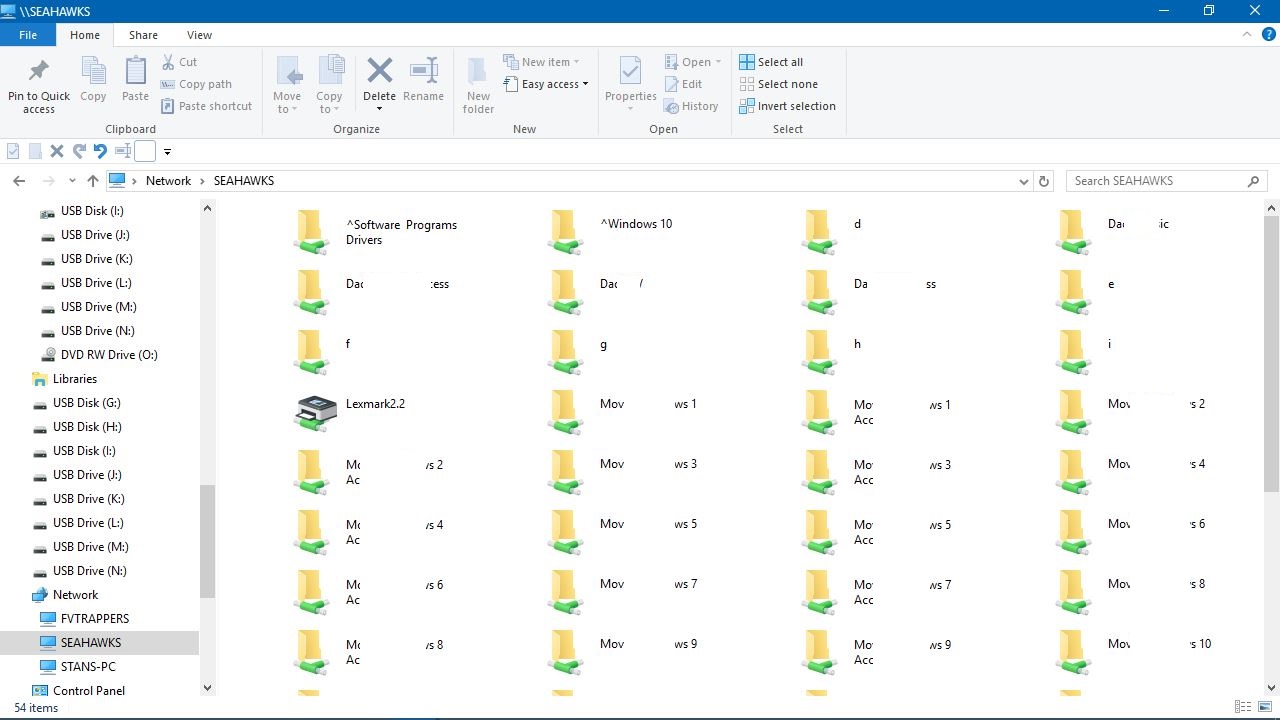
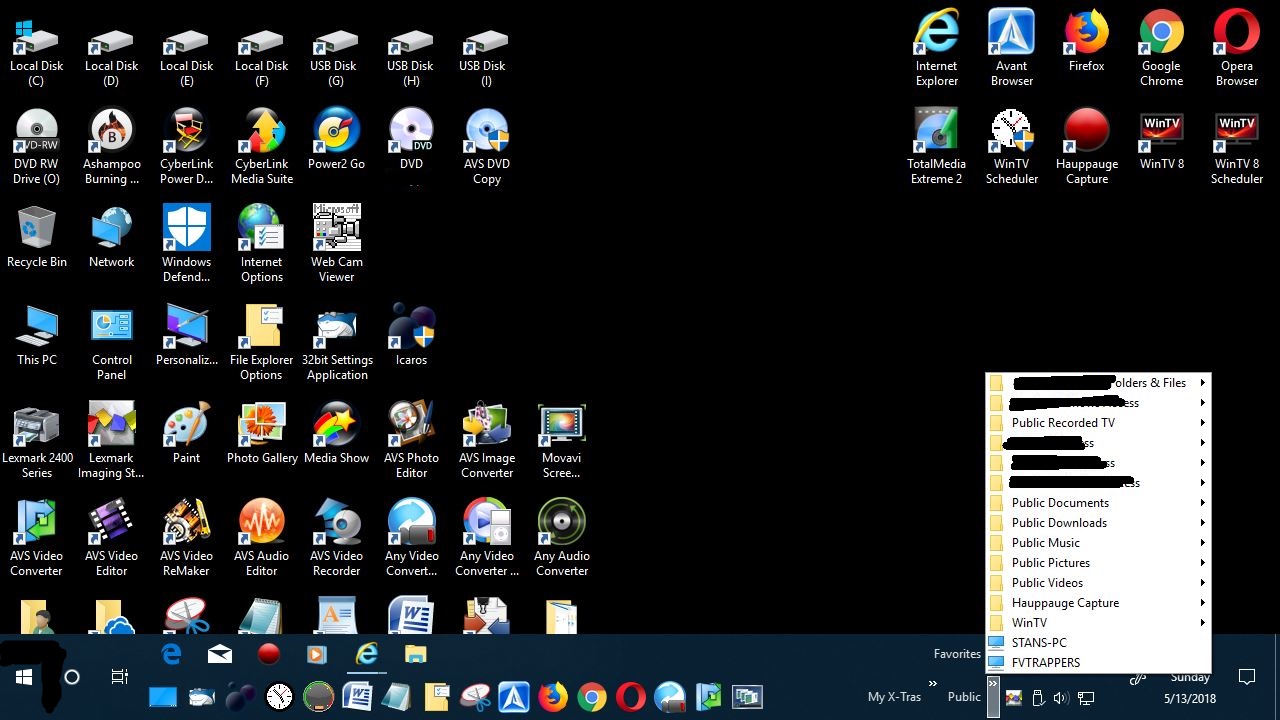
Here is an Example of SEAHAWKS PC on a Network that is Sharing 6 External Drives and All Content Within Them and the Default C:\Users\Public Folders.
\\PC NAME and \\PC NAME\Public
\\PC IP ADDRESS and \\PC IP ADDRESS\Public
"THIS PC" Location:
Network Folder Location:
Names Cut Out for Privacy:
All Shared Content From the Host PC SEAHAWKS, and the 6 External Storage Drives & the Default Public Sharing Folder:
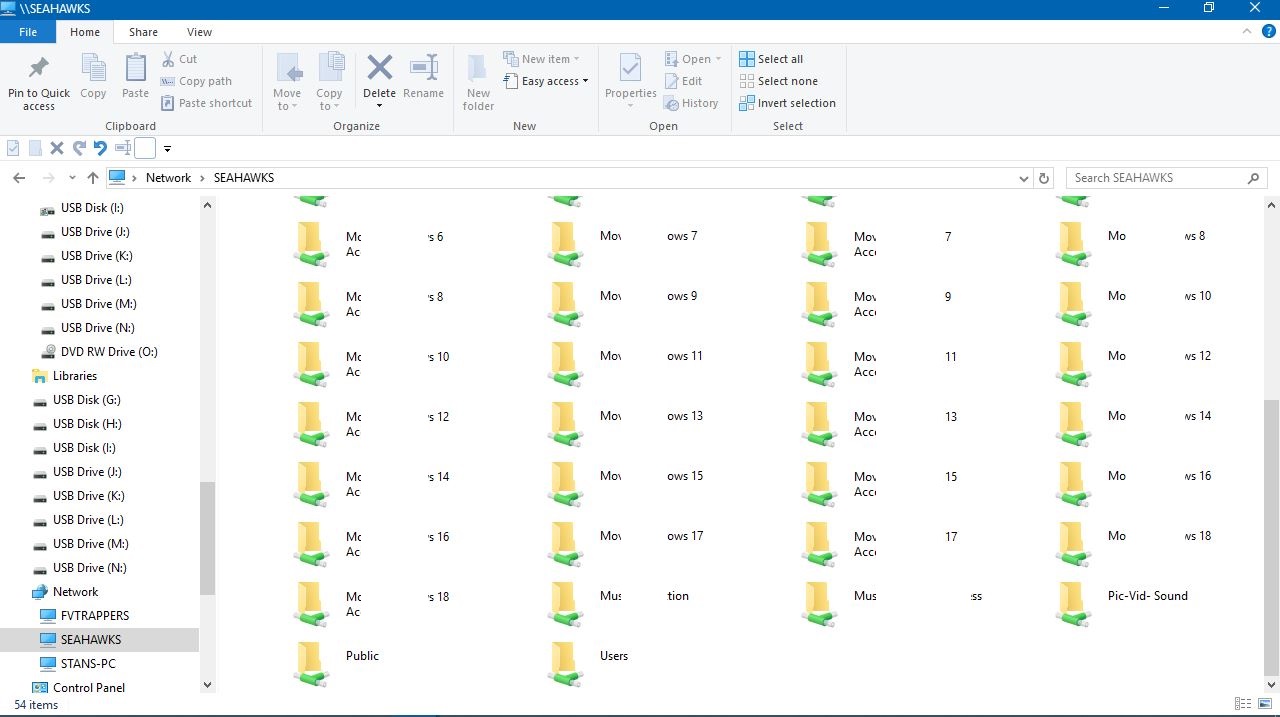
Remember, If There Is a Lot of Folders or Drives, You Can Create Shortcuts, Pin to Quick Access & Start Menu.
NETWORK\SEAHAWKS\PUBLIC Folder is the Same as My C:\USERS\PUBLIC Folder.
"FOR ALL PC's"
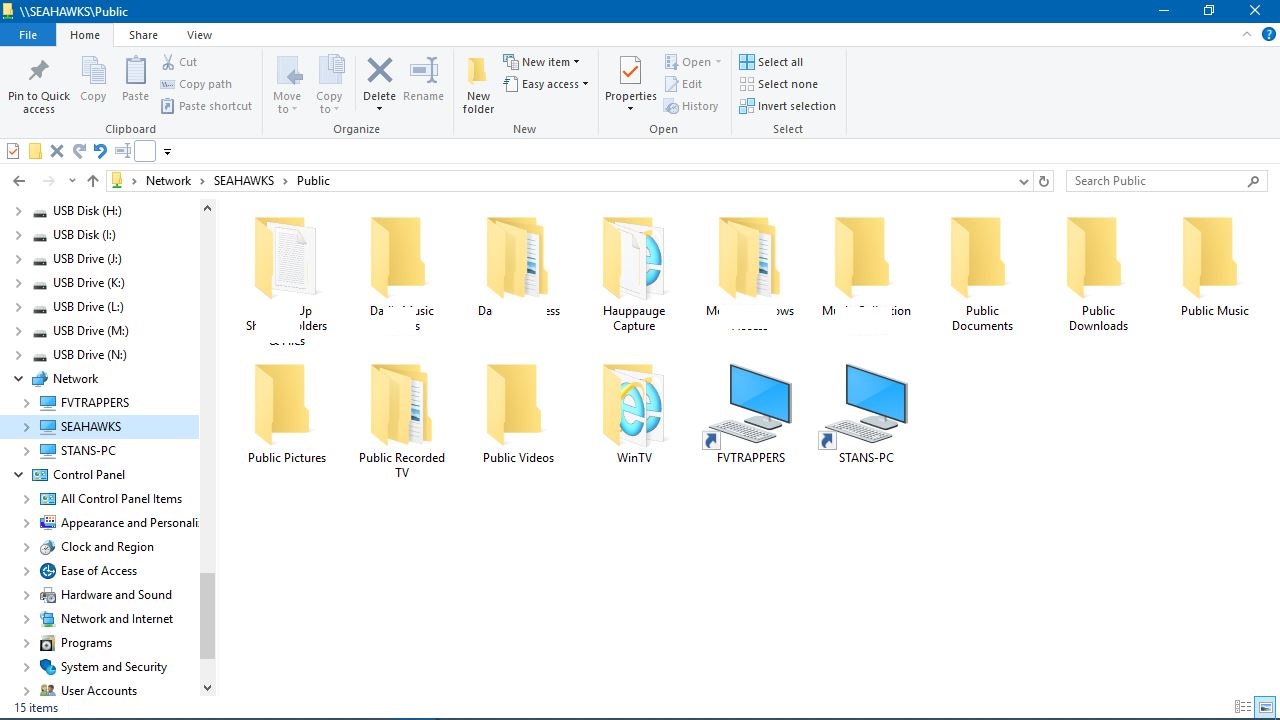
C:\USERS\PUBLIC:
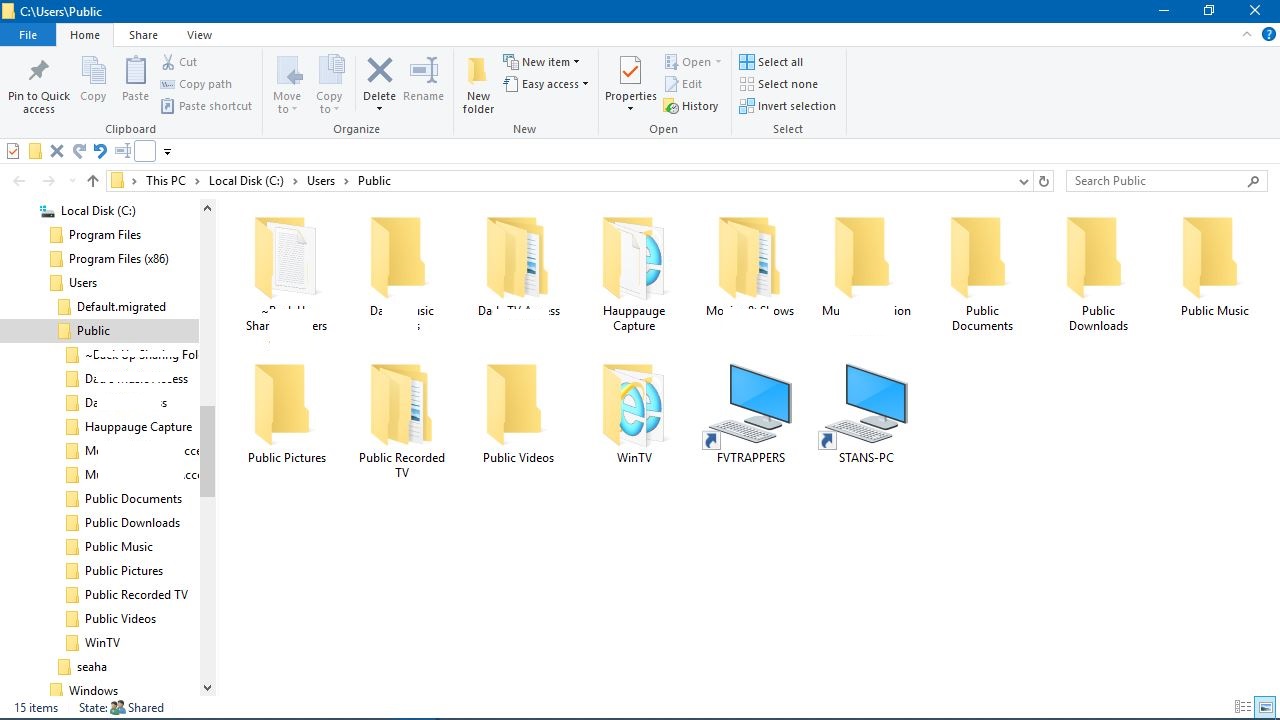
Then you notice and as shown in my Public Folder., I have created shortcuts to all PC's above as explained earlier. Super fast access to all PC's on my network from here and shortcuts in the other PC's Public Folders as well to all PC's. The best and fastest navigation through your whole network of available access and content.
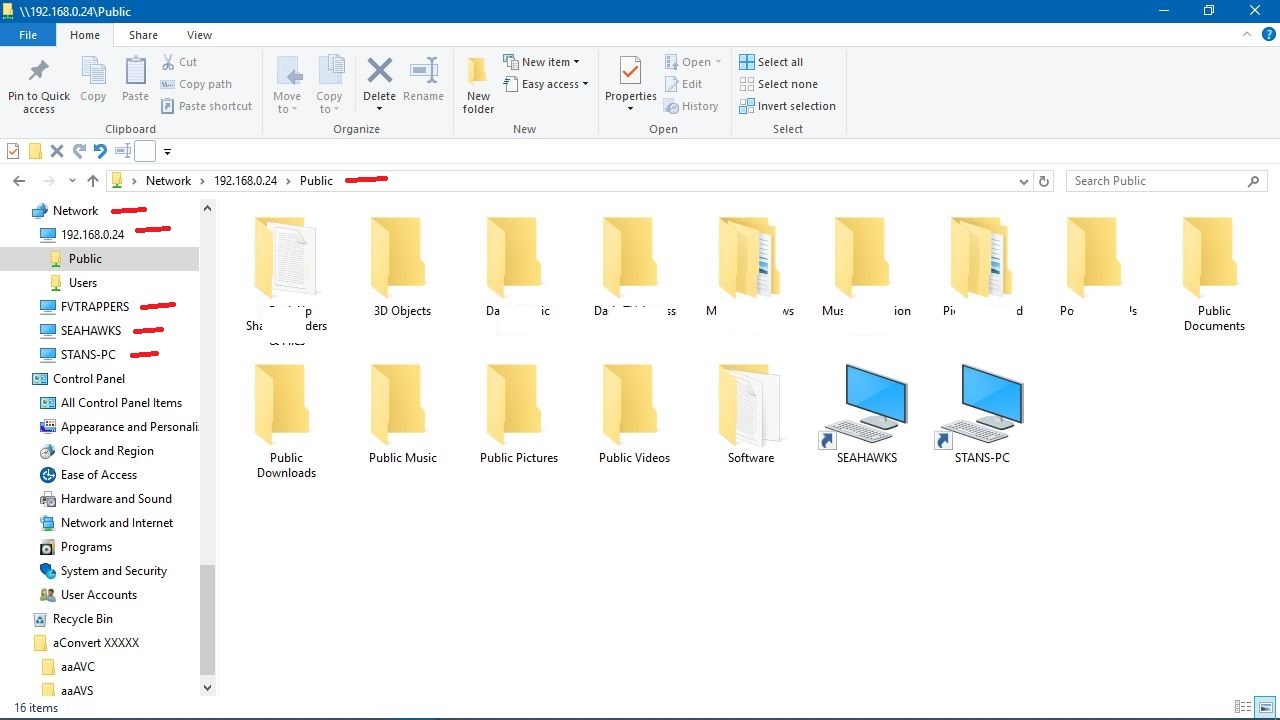
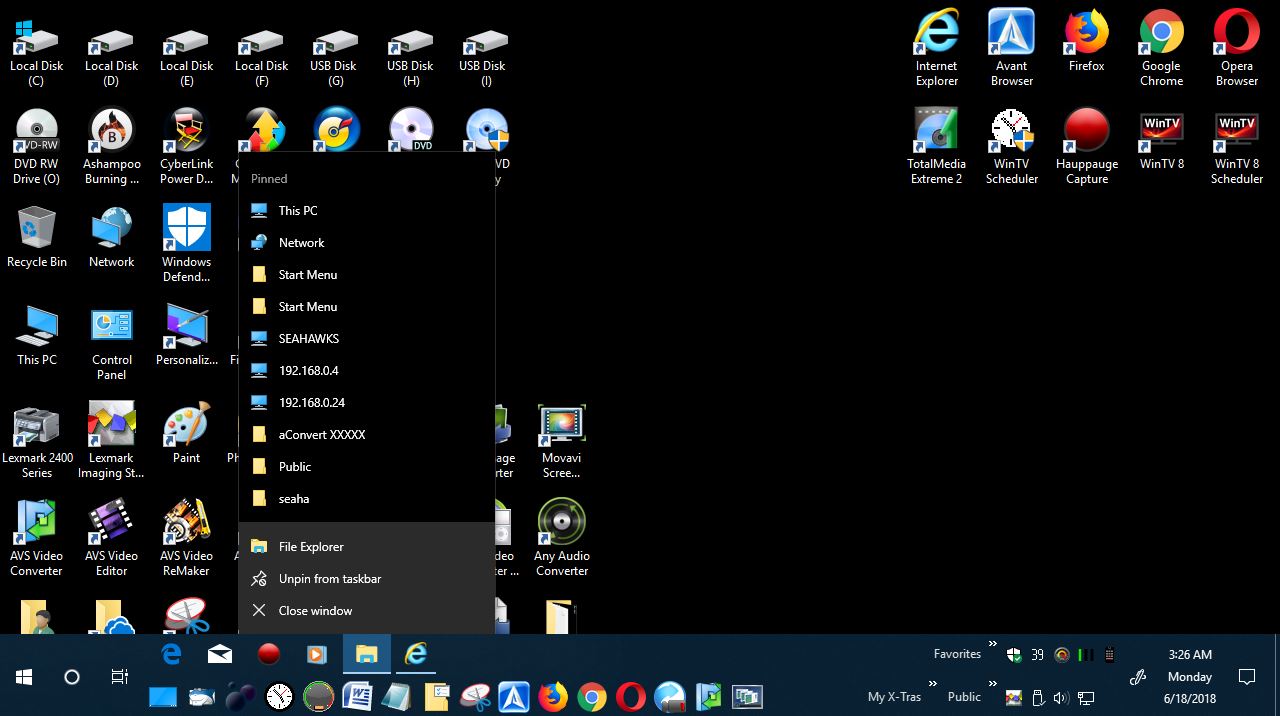
This is FVTRAPPERS PC Public Folder below I am accessing from SEAHAWKS PC.
This will show \\NETWORK\FVTRAPPERS\Public from a normal working connection.
But since I had to create shortcuts because of v1803 connection issues,
I connected using the created shortcut \\192.168.0.24
it will show \\Network\192.168.0.24\Public
This is the 23rd device connected to my home modem/router over the years. The Modem/Router Address is (192.168.0.1)
The assigned IP Address in the modem for FVTRAPPERS is \\192.168.0.24
Notice in left Navigation Pane, It shows the 3 PC's by name under Network as they are discovered but can not connect to each other. Then you see the connection I made with the shortcut I created with the IP Address and that is why it is also displayed in the Navigation Pane under Network.
Then if you right click on Taskbar
Select Toolbars>>New Toolbar
And navigate to C:\Users\Public and select Publicfor your toolbar, you will have quick access to your whole network from here as shown below.
Remember: if you have connection issues between PC's, Do not use the Network Folder Location or try and access other PC's by the
\\PC NAME. You Must use the \\PC IP ADDRESS.
"I would reboot the modem and restart all PC's when you are finished with the initial setup on all your computer in your Home Network"
"Part 4" - Private User Sharing of Any Drive, Folder or File:
This Covers Private Sharing to Specific People, with or without the v1803 Connections Issues Between PC's:
This Is Good for Sharing a Private Selected Drive, Any Folder or Item on That Drive.
Initial Setup:
Your External Storage Drive.
Your C:\Users\Public.
Now for the External Drive Setup, if you have already prepared your external drive as mentioned in Step 2 above, then continue as follows:
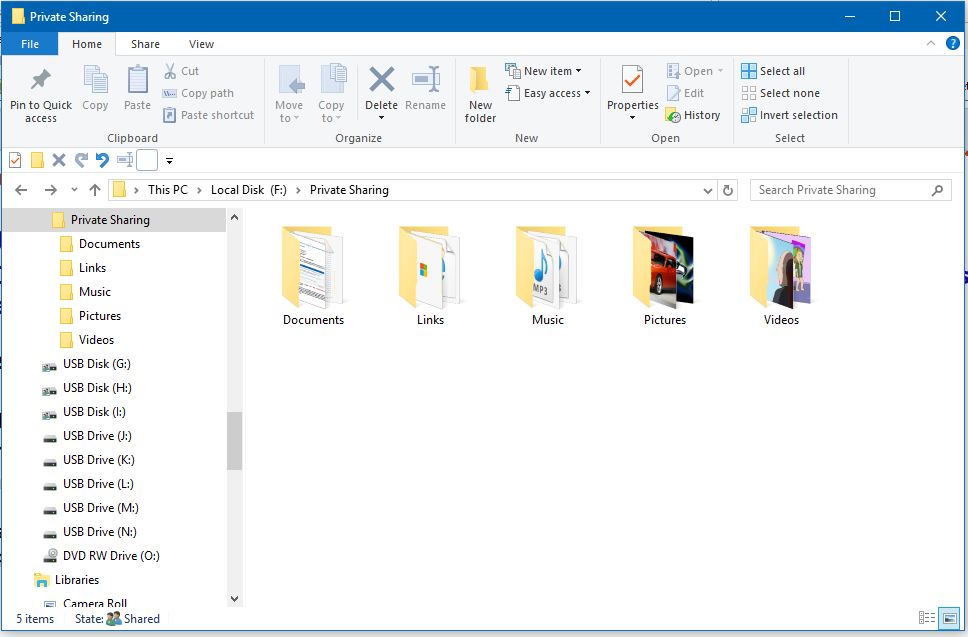
Private Sharing Folder Located on an External Drive Setup:
Example: F:\Private Sharing Folder
Create a Folder and Name it>>Private Sharing
Now Open it and Create 5 Sub Folders: Documents, Links, Music, Photos & Videos.
This will Keep Your Private Sharing Folder Organized.
The Security Settings Should Look Like This for an External Drive for the "Private Sharing" Folder as Shown Earlier:

Private Sharing Folder View:
Now Right Click on the Private Sharing Folder and Select>>
Send to>>Desktop (Create shortcut).
Now Right Click on the Private Sharing Folder>>Properties>>General Tab.
Now Select the Box in Attributes for "Hidden">>Apply
Now it is a "MUST" that in the "CONFIRM ATTRIBUTE CHANGES",
Select the Top Selection>>"Only Apply Changes to This Folder">>OK or Apply and Close Out.
NOTE: If You Hide Everything Inside the Main Folder, Then You or the Other People in This Private Sharing Folder Will "Not" be Able to See the Items Inside of it From the Shortcut Folders on the PC Desktops.
Now right click on the "Private Sharing" Shortcut on your Desktop and Select "COPY"
Go to the PC of the Person you are sharing this Private Sharing Folder to.
\\PC NAME\Public
or
\\PC IP ADDRESS\Public - For v1803 Connection Issues between PC's
And in the Public Folder, right click and Select "PASTE"
"DO NOT PASTE as a SHORTCUT"
Then Immediately go to that PC or have the Person you are Privately Sharing this Folder to, go into their C:\Users\Public Folder Location and "MOVE" the "Private Sharing" Shortcut to their Desktop. This is because all items in the Public Folders are Shared between All Users on the Network.
This shortcut on your Desktop and the shortcut for the other person on their desktop is how you will access the main folder to privately share between each other.
"NEVER" Select the Sharing Options, Give Access to, or Use the Advanced Sharing Settings for This Private Sharing Folder.
"Or it will No Longer Be a Private Share, as it will Be Discoverable in Your Network Shares, Even with It Hidden"
If for Any Reason You Need to Access the Main Private Sharing Folder to Change Ownership, Users or Permissions/Control, You Will Have to UN-HIDE IT.
Go to File Explorer Options>>View Tab
Select>>"Show hidden files, folders or drives">>APPLY
Make the changes you need and then select in File Explorer Options to
"Don't show hidden files, folders or drives">>APPLY, OK.
V1803 Connection Issues:
If the Private Sharing Shortcut placed on the other PC for the Private Share will not connect from the other PC Location, then when you copy the shortcut to their Public Folder, do the following:
Right click on Shortcut>>Properties>>Shortcut Tab
Change the "Target" Location to this:
Private Sharing Folder Located on an External Drive:
Example: F:\Private Sharing
"\\HOST-PC-NAME\F\Private Sharing"
Which is: "\\SEAHAWKS\F\Private Sharing"
"\\HOST-PC-IP-ADDRESS\F\Private Sharing"
Which is: "\\192.168.0.2\F\Private Sharing"
v1803 Connection Issues:
Enter the following into the Shortcut"TARGET"
"\\PC-IP-ADDRESS\DRIVE-LETTER\Private Sharing">>Apply.
"Be Sure QUOTATION MARKS are on BOTH ENDS of the File Path"
Remember, if the drive has the Users Administrator(s) & Everyone on Full Control/Permissions, then you can Edit them to "Read & Write Only" in the Security Settings for the Private Sharing Folder.
------
Private Sharing Folder Located on C:\ Drive (System) Setup:
Example: C:\Users\Public\Private Sharing
Do the same process for the
C:\ Drive (System) as you would for an External Drive.
V1803 Connection Issues:
If the Private Sharing Shortcut placed on the other PC for the Private Share will not connect from the other PC Location, then when you copy the shortcut to their Public Folder, do the following:
Right click on Shortcut>>Properties>>Shortcut Tab
Change the "Target" Location to this:
Private Sharing Folder Located on an C:\ Drive (System):
Example: C:\Users\Public\Private Sharing
"\\PC-NAME\Public\Private Sharing"
Which is: "\\SEAHAWKS\Public\Private Sharing"
"\\PC-IP-ADDRESS\Public\Private Sharing"
Which is: "\\192.168.0.2\Public\Private Sharing"
v1803 Connection Issues
Enter the following into the Shortcut "TARGET"
"\\HOST-PC-IP-ADDRESS\Public\Private Sharing">>Apply.
"Be Sure QUOTATION MARKS are on BOTH ENDS of the File Path"
Remember:
"NEVER" Select the Sharing Options, Give Access to, or Use the Advanced Sharing Settings for This Private Sharing Folder."Or it will No Longer Be a Private Share, as it will Be Discoverable in Your Network Shares, Even with It Hidden"
One Final Note.
Most people have the file explorer option >> Do not show hidden files and folders ON. If they change it to >>Show hidden files and folders, then they can see it if they access the Host PC's Location of the Folder. So, if you want to really hide it, bury it in a "Sub Sub Sub Folder" and create the Private Sharing Folder and Share from there.
Examples:
Instead of using F:\Private Sharing or C:\Users\Public\Private Sharing.
If you have Folders on External Drive or in your Public Folders.
Go into a Folder and as Many Sub Folders Inside That Folder.
And Then Create Your "Private Sharing" Folder.
V1803 Connection Issues:
If the Private Sharing Shortcut placed on the other PC for the Private Share will not connect from the other PC Location, then when you copy the shortcut to their Public Folder, do the following:
Right click on Shortcut>>Properties>>Shortcut Tab
Change the "Target" Location to this:
Private Sharing Folder Located on an External Drive:
Example: F:\?????-Folder\?????-Folder\?????-Folder\Private Sharing
"\\PC-NAME\F\?????-Folder\?????-Folder\?????-Folder\Private Sharing"
Which is:"\\SEAHAWKS\F\?????-Folder\?????-Folder\?????-Folder\Private Sharing"
"\\PC-IP-ADDRESS\F\?????-Folder\?????-Folder\?????-Folder\Private Sharing"
Which is: "\\192.168.0.2\F\?????-Folder\?????-Folder\?????-Folder\Private Sharing"
v1803 Connection Issues
Enter the following into the Shortcut "TARGET"
"\\PC-IP-ADDRESS\EXTERNAL-DRIVE-LETTER\?????-Folder\?????-Folder\?????-Folder\Private Sharing">>Apply.
"Be Sure QUOTATION MARKS are on BOTH ENDS of the File Path"
------
V1803 Connection Issues:
If the Private Sharing Shortcut placed on the other PC for the Private Share will not connect from the other PC Location, then when you copy the shortcut to their Public Folder, do the following:
Right click on Shortcut>>Properties>>Shortcut Tab
Change the "Target" Location to this:
Private Sharing Folder Located on an C:\ Drive (System):
Example: C:\Users\Public\Public Documents\?????-Folder\?????-Folder\Private Sharing
"\\PC-NAME\Public\Public Documents\?????-Folder\?????-Folder\Private Sharing"
Which is: "\\SEAHAWKS\Public\Public Documents\?????-Folder\?????-Folder\Private Sharing"
"\\PC-IP-ADDRESS\Public\Public Documents\?????-Folder\?????-Folder\Private Sharing"
Which is: "\\192.168.0.2\Public\Public Documents\?????-Folder\?????-Folder\Private Sharing"
- v1803 Connection Issues:
Enter the following into the Shortcut "TARGET"
"\\PC-IP-ADDRESS\Public\Public Documents\?????-Folder\?????-Folder\Private Sharing">>Apply.
"Be Sure QUOTATION MARKS are on BOTH ENDS of the File Path"
Restart All PC's on your Network.
Have Fun!
Tips for Printer/Scanner Troubleshooting.
Initial Setup and Check Points:
After initial setup and you have Printer problems, you can go to:
Control Panel\All Control Panel Items\Devices and Printers
on your other PC's and select to add a printer.
It will scan and find the printer.
Then it should install the driver and you are all good to go.
If it can not find a driver, look in the list for a similar driver or use the CD or the Temp folder usually located in C:\ on the main PC the printer was installed on and locate the driver and copy the driver from main PC Temp folder to other PC's public folder to install the needed driver.
For wireless, you can connect to the printer by the network icon in taskbar tray. Find it in the discovered list, enter the encryption key and select to auto connect.
(WPS) uses a PIN# that is located on bottom of Modem/Router or Router.
Scanner Issues:
If your Printer/Scanner is installed and your Printer works but your scanner does not by the software provided or manually on the scanner, then try this.
Go to Control Panel>>Devices and Printers
Right click on the printer
There should be scan properties, scan profiles and scan
Check all those out and see if you can get it working or scan from there.
You can also right click on printer and select Open to access printer and scanner utilities.
You can also Right click on Printer and create a shortcut to your desktop and access the scan features mentioned above for convenience.
You can also select to ADD A DEVICE and also try and Browse to locate the scanner drivers.
Try the C:\Windows\twain_32 or C:\Windows\System32 locations.
Also, you should use your software for scanning. Usually you have programs in the Start Menu>>Apps or Programs with all your Printer and scanning software. If you can not scan by pressing buttons on the scanner, then use your software.
If Your Printer Says it is Offline or Other Problems:
Check the 'Offline' Setting:
On Windows computers, there is a setting called Use Printer Offline. If this settings is enabled that would cause your computer to think it is disconnected, even though it is connected and ready to work. To verify that your computer is not enabling the Use Printer Offline setting, follow this below.
Go to Control Panel\All Control Panel Items\Devices and Printers
Right click on your Printer
Left click on See What's Printing
At the top of this window you will see Printer-Document-View
Left click on the Printer tab
Make sure that "Use Printer Offline" is not checked. If it is, click on "Use Printer Offline" and this (Will Uncheck It) and will disable it.
Go to Control Panel>>Devices and Printers
You can also right click on printer and select Open to access printer and scanner utilities.
You can also check your Printer property settings and drivers here.
Restart PC
Printer Offline or Error Code 0x000007D1 or Invalid Print Driver:
This works for some people.
Go to C:\Windows
Right Click on >> Regedit.exe
Run as Administrator
View Tab >>Address Bar
Copy and paste the following in to address bar and press enter.
HKEY_LOCAL_MACHINE\SYSTEM\CurrentControlSet\Control\Print
If the following key exists >> PostSPUpgrade
Right click on it and select>> DELETE
Close Registry Editor
Restart PC
Log on PC and Open Task Manager>>Services>>More Services
And make sure Spool or Spooler service is running.
Firmware:
Your Printer/Scanner might have a firmware update for it that could help to fix an issue with them not working.
The firmware is not the drivers and software for your PC. It is for the Printer/Scanner itself.
Be careful installing the update and follow any OEM's steps properly.
If You Can Not Install or Uninstall for Any Reasons, Then Follow This Below:
Unplug Printer USB or disconnect any Wireless Connections.
Uninstall any Printer software if you can.
Restart PC
Go to:
Control Panel\All Control Panel Items\Administrative Tools\Services
And stop Print Spooler or Spooler Service.
Go to:
C:\Windows\System32\spool\drivers\x64
And Delete everything inside it.
Go to:
C:\Windows\System32\spool\drivers\W32X86\3
And Delete everything inside it.
**Note: if it is not Folder 3 and is Folder 4, then Delete everything inside of 4.
Start the Spooler Service (Running)
Restart PC
Windows Defender or another Virus Programs Firewall, Incorrect Printer Port setting or incorrect configured Printer properties and improper installation of Printer/Scanner software and drivers could also cause printer/scanner problems. This includes not installing all software packages for your unit. Also, manual printing or scanning from the printer/scanner might not work, but using the installed programs for them as you should use, might then work. Wireless connections could have wrong IP Address or incorrect encryption key or (Pin# WPS) entered.
ALWAYS install using the driver and software for the printer/scanner or for any device or software, that is for the Windows Operating System/Platform it is designed for by using Compatibility Mode to install.
How to Install Devices & Software from Older Windows OS's on Newer OS's - Microsoft Community
Modem/Router "WAN" Network Setup and most commonly used in All Home Networks by ISP and Windows OS by Default:
Network Setup for Dynamic IP Addressing - Microsoft Community
More Helpful Topics and Tips:
Connecting PC’s and Users for Sharing XP, Vista, 7, 8 & 10- Microsoft Community
Network & HomeGroup Setup and Sharing XP, Vista, 7, 8 & 10 - Microsoft Community
Home Network Modem-Router & PC Security & Settings - Microsoft Community
Network Setup for Dynamic IP Addressing - Microsoft Community
Fix Homegroup Password, Joining and Unjoining Issues - Microsoft Community
How to FIX Missing Computer Icons in Network Folder - Microsoft Community
How to Install Devices & Software from Older Windows OS's on Newer OS's - Microsoft Community
Try to Fix System Problems During or After Windows Update-Upgrade - Microsoft Community
Recover Windows Hung Up on Boot or Update Installations - Microsoft Community
Fix IE & Other Browsers with Web Site Issues & Microsoft Account Access, Email, etc. - Microsoft Community
Set Up Internet Options for XP, Vista, 7, 8, and 10 - Microsoft Community
Editing Photos in Paint - Resolutions-Resizing, Adding Text and More - Microsoft Community
Add Quick Launch Toolbar To Taskbar In Windows 10 - Microsoft Community
How to Add a Pagefile to USB Thumb Drive - Microsoft Community
Stop Windows Auto Deleting Thumbnail Cache Updated - Microsoft Community
Windows Media Player - Play ALL Video & Audio Formats Easily - Microsoft Community
Specialist in PC Builds/Repairs, Windows, Networking, Audio/Video for 20 Years.
*Modified title for accuracy*
*Original title: Connecting PC’s & Users for Sharing XP, Vista, 7, 8 & 10 "Revised 6-23-2018 Final"*
