
Summary
There are many options for running Windows on your Mac. After my recent experiment trying out the Boot Camp Option, I have come to the conclusion, installing in a Virtual Machine is the most convenient method. If you are using apps that do not require intense use of components such as your video adapter, it’s more than perfect. This is especially true if you work in a business environment but only need to run a few a line of business applications. A great benefit, you don’t have to reboot into Windows 10 manually which is quite a chore. Setting it up it is quick and easy too. Let’s take a look at doing that.
Details
What you need:
-
You need a Windows license if you plan on using Windows 10 full time on your Mac. You can purchase a license at the Microsoft Store here. If you just want to evaluate what it’s like to use Windows 10 in a virtual machine, then you can download the 90 day Windows 10 Enterprise trial here. Please note, if you decide to keep Windows 10 after the 90 days, you won’t be able to activate the trial. You will need to backup then purchase a retail license such as Windows 10 Home or Pro. If you have a spare retail Windows 7 or Windows 8/8.1 product key not in use, you can use that to install and activate Windows 10.
-
Download Windows 10 ISO file, see instructions how to download the Windows 10 ISO file in OS X using the Microsoft TechBench website.
Download and Install Oracle VirtualBox
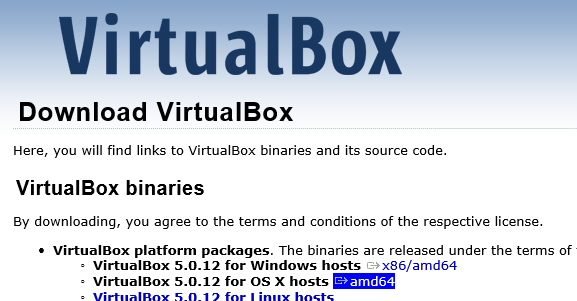
There are many popular virtual machine utilities for OS X, but I am going to assume you are on a budget. Oracle VirtualBox which is free is easy to download and setup. Just go to VirtualBox Download webpagethen click the amd64 link beside VirtualBox 5.0.12 for OS X Host.
When the download is complete, open the Finder > Downloads then double click the VirtualBox DMG file.

Double click the VirtualBox.pkg file

Click Continue

Click Continue again

Click Install

Enter your password

Wait while VirtualBox is installed.

Click Close

Create a New Virtual Machine
Launch VirtualBox in Finder > Applications

Click New

Type Windows 10 or select it from the Version list box. Choose 32 or 64 bit depending on the type of applications you need to use. If you need to install legacy applications that are not 64 bit compatible, then 32 bit is the best option. Also, it uses less resources. For my purposes, I will go with 64 bit. Click Continue

Determine the amount of memory you would like allocate to Windows 10. The default 2 GBs might not be enough, but since I only have 8 GBs installed, I would go with that. I do not want to affect the host OS (OS X) performance either. For 64 bit, I normally would recommend 4 GB, but since this Mac has an SSD, it should be enough. Click Continue

Select the option Create a virtual hard disk now then click Create

Select VDI, if you plan to switch to another virtual machine utility in the future such as VMDK (VMWare) or VHD (Microsoft Hyper-V), then choose appropriately, it will make migration easier. Click Continue

You need to determine how much disk space you will give to Windows 10. Factors include performance, applications and data that you will install and store on it. If you plan to keep Windows 10 for a long time, then you should go with dynamic, since this will not use up immediate disk space, it is a bit slower though. Because I want the Virtual Machine to remain fast, I will choose a fixed size. Click Continue

Make your adjustments by dragging the knob or enter an amount then click Create. I settled for the default 32 GBs, but if you plan to install a lot of programs, go with 50 GBs or more. Remember to take into consideration operating system updates and app updates.

Wait while the Virtual Machine is created.

Install Windows 10
Select Windows 10 in the Virtual Machine manager then click Start

Browse to the Windows 10 ISO (see earlier instructions for obtaining Windows ISO image using the Microsoft TechBench website). Click Open then click Start.

Windows 10 setup will start. Click Next

Click Install now

Click Custom then select the partition the click New then click Apply.
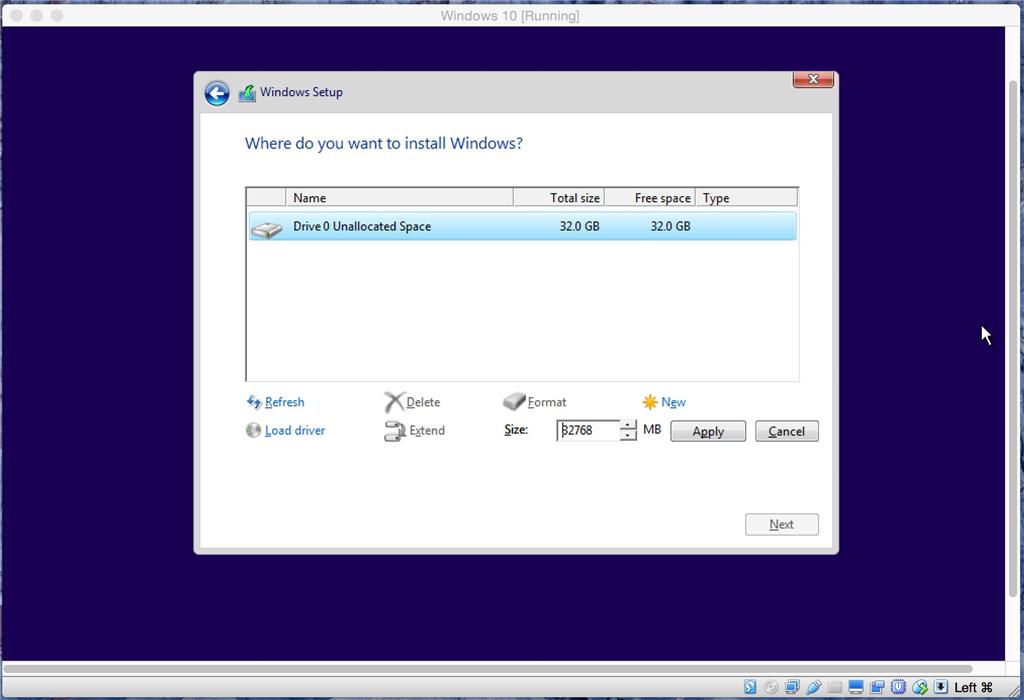
Select the Primary partition then click Next.

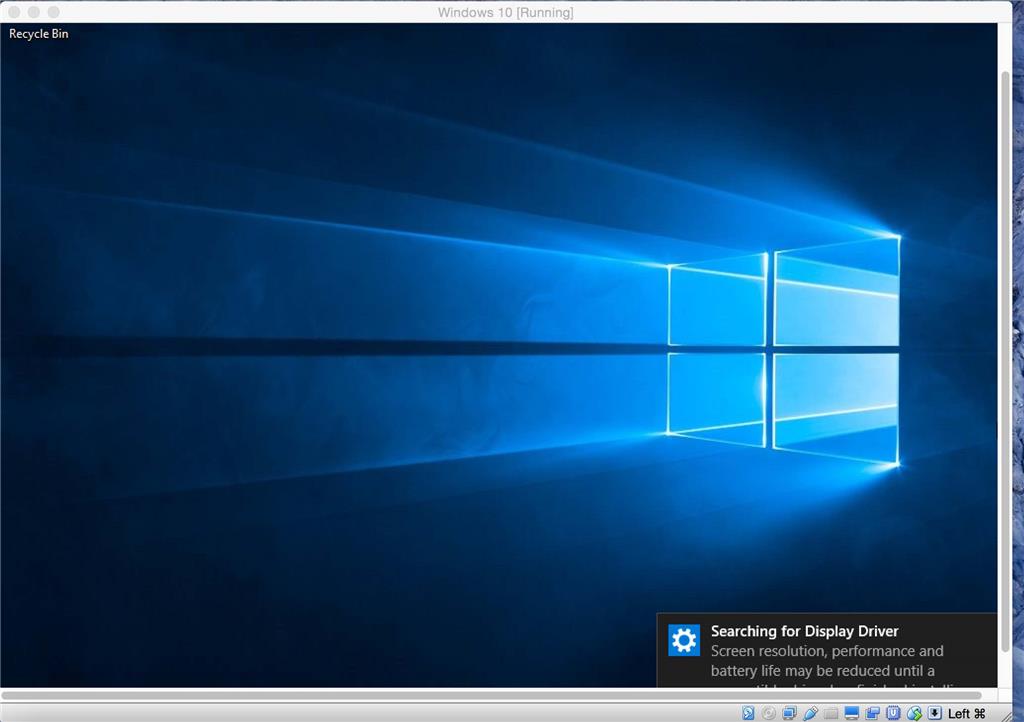
Wait while Windows 10 installs. Windows Setup will restart multiple times. When complete, proceed to create a user account and password then log in.

See: How to: Complete the Windows 10 Out of Box Experience
Install Virtual Machine Additions
Items on screen might appear quite large. This means you need to install the Windows 10 VirtualBox guest additions.
Click Devices menu > Install Guest Additions. Inside the Virtual Machine click Start > File Explorer > This PC launch the VirtualBox additions icon then click Next to begin the installation. Restart when complete. You will now notice everything fits on screen nicely.

If items are too small on screen, click the Maximize button Click Switch, when you want to exit Full screen mode, press Command + F

Now you can have the best of both worlds.
Related:
How to Install Windows 10 On Mac OS X Using Boot Camp
How to: install the latest Windows 10 Build in Oracle VirtualBox
How to setup a virtual machine using Hyper-V
Installation
- How to: install Windows 10 from within Windows 8.1 or Windows 7 using Windows Update
- How to download official Windows 10 ISO files
- How to: upgrade from previous versions of Windows using Windows 10 ISO file
- How to verify if you downloaded or installed the Windows 10 November Update
- How to install and activate Windows 10 using your Windows 7 or Windows 8 product key
- Force Windows 10 Update to Deliver the November Update
- How to install the November Update on Windows 10 Enterprise edition
- How to: Perform a custom installation of Windows
- How to: Perform a clean install of Windows 10
- How to: Upgrade a dual boot installation of Windows and Linux to Windows 10 - Part 1
- How to: setup a dual boot configuration with Windows 10 and previous versions of Windows
- How to: Switch from 32 bit versions of Windows to Windows 10 64 bit
- How to: Complete the Windows 10 Out of Box Experience
- How to Perform an Easy Upgrade in Windows 10
- How to upgrade from the Windows 10 Insider Preview to Windows 10 RTM build
- How to: Create a Recovery Drive for reinstalling Windows 10