Hi Ian. I'm Greg, an installation specialist and 9 year Windows MVP here to help you.
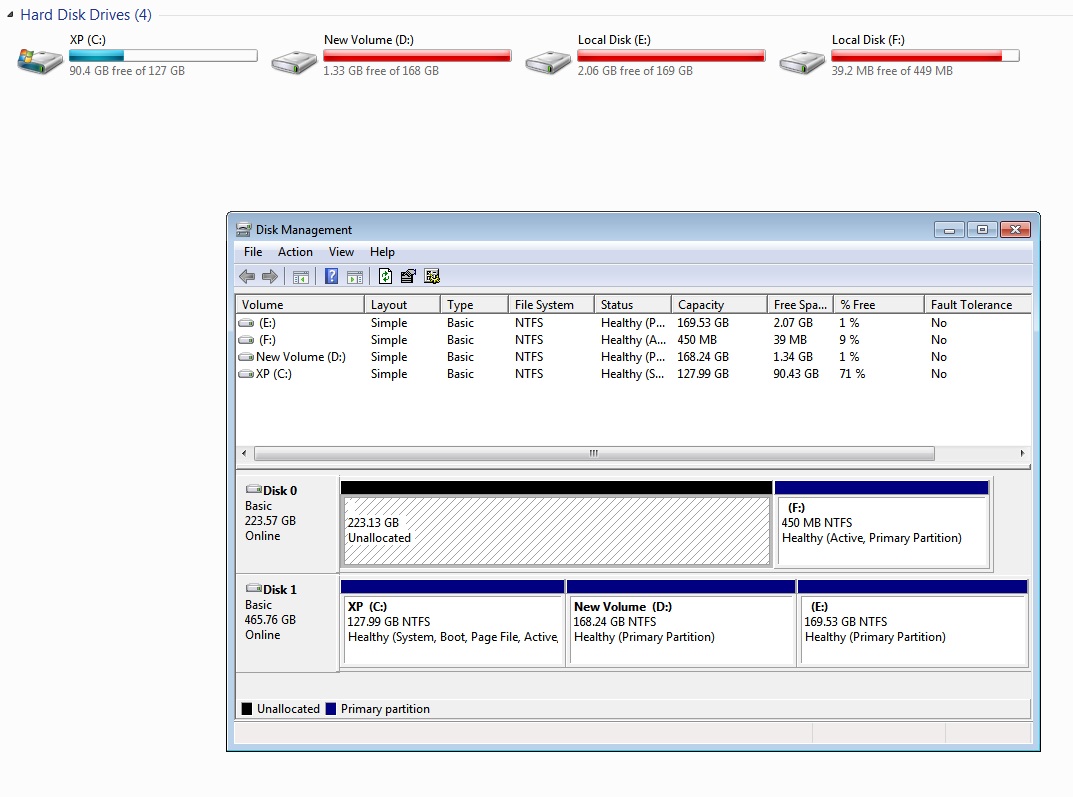
You have a mess there. Why is F marked Active when only the partition booting Windows is to be marked Active on the old Legacy BIOS? Is the partition labeled XP actually the new Windows 7 install you did? There was no reason to install Windows 7 as you want to reinstall Windows 10 to replace it, correct?
Rescue any files off of F onto C so they're backed up against it failing or to do the Reinstall.
So to have a partition disappear like that requires that you test the hard drive to be certain if it's failing or not. Test the hard drive with diagnostics:
https://www.lifewire.com/free-hard-drive-testin.... Best is Seatools bootable Long Test which works on all models:
http://blog.nowherelan.com/2013/04/04/boot-seat....
https://www.seagate.com/manuals/software/seatoo...
Follow that up with a full Disk Check, from the Command Prompt if necessary:
https://www.groovypost.com/howto/check-hard-dri...
If it passes both tests then unplug the other hard drive, boot into the Windows 10 installation media I'll provide, delete all partitions off of the drive and do this gold standard Clean Install following the illustrated steps in this link which compile the best possible Install of Windows which will stay that way as long as you stick with the tools and methods given, has zero reported problems, and is better than any amount of money could buy:
http://answers.microsoft.com/en-us/windows/wiki...
To create Windows 10 Installation Media (if necessary on another PC) install the Media Creation Tool and follow the directions here:
http://windows.microsoft.com/en-us/windows-10/m.... Uncheck the box for Recommended Settings to choose the exact version and bit rate for the target PC only.
Insert media, boot it by powering up PC while pressing the BIOS Boot Menu Key here:
https://www.sysnative.com/forums/hardware-tutor...
If the media won't boot you may need to enter BIOS/UEFI Setup (pressing key given in chart in link above) to turn off Fast Boot or Fast Startup first.
Choose the boot device as a UEFI device if offered, skip the Product Key screen and choose your licensed version only if offered. On second screen choose Install Now, then Custom Install, then at the drive selection screen delete all partitions down to Unallocated Space to get it cleanest, click Next to let it create needed partitions and start install - this makes it foolproof.
You will get and keep the best possible install to the exact extent you stick with the steps, tools and methods in the linked tutorial. It's a better install than any amount of money could buy and a great learning experience that will make you the master of your PC because you will learn everything that works best and how to apply it with your own hands.
If you have files that aren't backed up you can use the same bootable media to try to rescue your files using this method:
http://answers.microsoft.com/en-us/windows/wiki...
I hope this helps. Feel free to ask back any questions and keep me posted. If you'll wait to rate whether my post helped you, I will keep working with you until it's resolved.
________________________________________________________
Standard Disclaimer: There are links to non-Microsoft websites. The pages appear to be providing accurate, safe information. Watch out for ads on the sites that may advertise products frequently classified as a PUP (Potentially Unwanted Products). Thoroughly research any product advertised on the sites before you decide to download and install it.