Technical Level : Intermediate
Summary
These steps will attempt to repair the OS using Advanced Startup Options for Windows 10 or How to access Advanced Startup Options on Windows 11 . It does not cover hardware problems which might be indicated if these steps fail to run and can be tested using Memtest86+ to Test RAM for 5-6 passes, and Hard Drive Testing Tools or Tools to Check SSD Health followed by HDD Disk Check from Advanced Startup Options Command Line, after checking that HD is detected in BIOS setup or UEFI firmware. HP & Dell have hardware diagnostics by triggering ESC or F12 respectively at Startup.
**BE AWARE that if the drive is failing and you stress it with the following repairs, it could fail with data loss, so if you have data that needs rescue I'd do that first following Rescue Files when Windows Won't Start, and if you suspect the drive is failing you may want to do the above HDD/SSD tests first.
Details
Unplug all USB devices and disconnect if possible all other hard drives. Then unplug power and remove battery, press and hold Power button down for 30 seconds, plug back in power cable and try starting again.
Follow whichever method will work here for Advanced Startup Options. Note that Method 1 will sometimes work pressing Ctrl+Alt-Del to access Power icon in corner, then press Shift + click Restart.
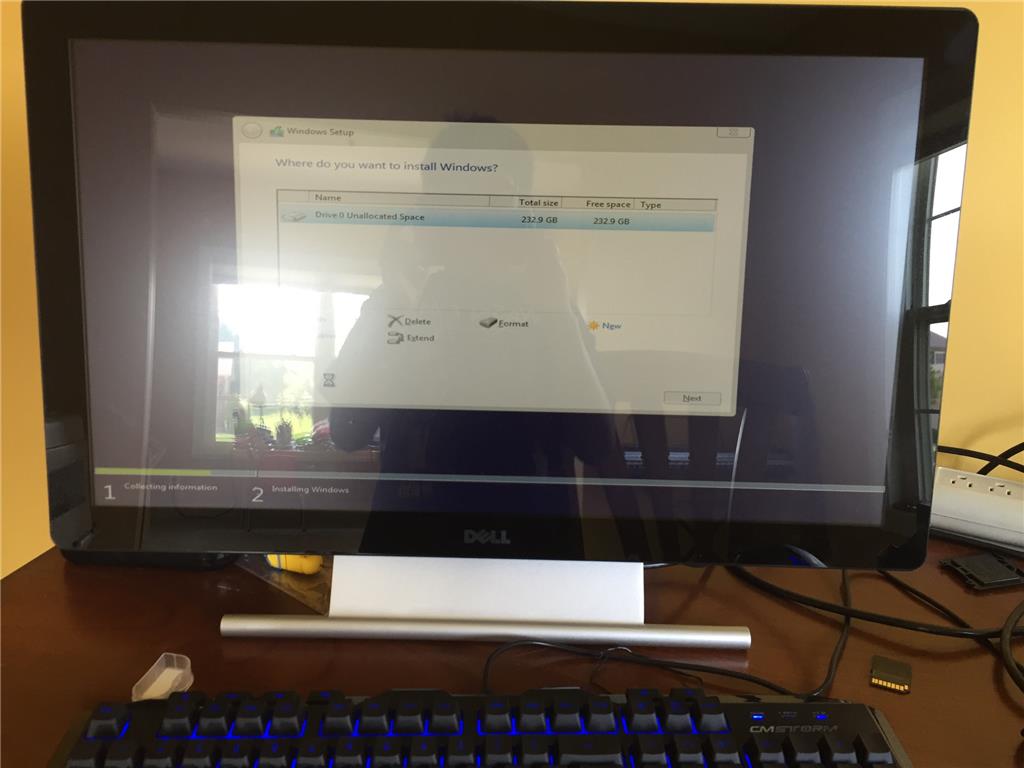
But without access to the OS you may need to Create Windows 10 , or Windows 11 installation media on another PC,
If you think you might be infected you may want to stop here to go to another PC to create a bootable antivirus tool from this list:
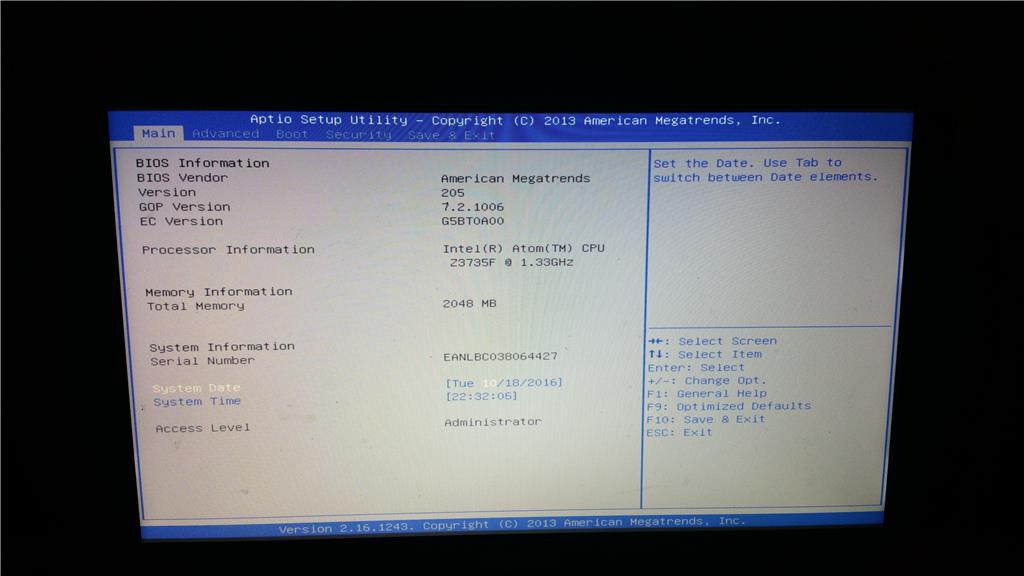
Boot by powering up while pressing the BIOS Boot Menu Key, choose the boot device as a UEFI device if offered, then on second screen choose Repair Your Computer.
From the Troubleshoot options first try (in this order) automated Startup Repair, System Restore (working backward), Uninstall Updates (working backward), then if necessary from Startup Settings try to get into Safe Mode with Networking.
If Startup Repair won't work after several tries in the Advanced Troubleshoot options access a Command Prompt to run these commands which should take care of corrupted boot records and blinking cursor problems:
Bootrec /Fixboot
Bootrec /Fixmbr
Bootsect /nt60 all /MBR
Reboot to see if it starts and if not run the additional commands in How to Rebuild the BCD in Windows to export and then rebuild the BCD. Note that it is often necessary to export the BCD first as detailed in the link, and the drive letter referenced may not be C. To determine the boot partition's drive letter run:
If you receive the “Total identified Windows installations: 0” message instead of “Total identified Windows installations: 1” message, try fixes here.
DISKPART
LIST VOLUME
Now look for the System partition. If it doesn't have a letter run:
SELECT VOL # (replace # with Volume number for System Partition)
ASSIGN (to assign a drive letter, now detected by List Volume).
These repairs are automated along with all other necessary repairs in the enhanced Easy Recovery Essentials disks available from NeoSmart, makers of EasyBCD and the world's top boot experts.
If nothing else works and Startup Settings are not available, you can try forcing the PC to restart into the legacy F8 Advanced Boot Options which is hidden in Windows 10, to choose Safe Mode with Networking.
You'll need to first turn off Fast Boot in UEFI firmware settings and/or Fast Startup at Control Panel\All Control Panel Items\Power Options\System Settings. Then via Advanced Startup Options in Windows 10 access the Command Prompt to type:
c:
(enter)
bcdedit /set {default} bootmenupolicy legacy
(enter)
exit
(enter)
Restart computer and repeatedly hit F8 F8 F8 to get menu for Safe Mode with Networking.
From Safe Mode w/Networking type Update in Start Search box to Check For and expedite Updates that may be critical but are taking their time to install, right click Start button to open Device Manager, import any missing or erroring drivers from the PC or Device's Support Downloads webpage. How to: Install and Update drivers in Windows 10 - Microsoft Community
If Safe Mode is stable the problem is most likely drivers, but could also need disinfection, System file repair or repair of the image. Most of the Upgrade problems seen are corruption passed from the old OS.
Download, install, decline trial version, update, then run full scans with Malwarebytes and AdwCleaner.
There are bootable antiviruses to use here.
Uninstall any bloatware anti-virus like Norton, McAfee, AVG or Avast, enable built-in Defender to test performance. Use the special Uninstallers (removal tools) for common antivirus software - ESET Knowledgebase.
Right click the Task Bar to open Task Manager, on Startup tab disable everything until your install stabilizes, then only restore those you know for sure you absolutely need starting with Windows – none of them really need to unless you want them.
From the Advanced Options Command Prompt, or within Safe Mode accessing an Elevated Command Prompt, Copy and Paste or type each of these commands, each followed by Enter:
sfc /scannow
Dism /Online /Cleanup-Image /RestoreHealth
If it prompts for Sources file, mount or insert Windows 10 installation media, locate install.wim or .esd file in Sources folder, substitute it’s path in the following command (for example: Dism /Online /Cleanup-Image /RestoreHealth /Source:wim:H:\Sources\Install.wim:1)
Dism /Online /Cleanup-Image /RestoreHealth /Source:wim:Full Path to install.wim file:1
(or) Dism /Online /Cleanup-Image /RestoreHealth /Source:esd:Full Path to install.esd file:1
sfc/ scannow
Exit
If at any time you are returned enough functionality but still have problems with an app then Troubleshoot problems with an app - Windows Help .
If Safe Mode doesn’t help stabilize things then return to Advanced Startup Options in Windows 8 or 10. Next try Command Prompt to run above repair commands including sfc /scannow. If these fail or you want to skip further repairs then choose Windows 10 or 11 Reset. Choose a deep clean Reset with cloud option so it sets up your account again (in case it's corrupted) and downloads fresh installation files from the cloud to avoid it choking on corrupted onboard files.
Better yet do the vastly superior Clean Install Windows 10 or How to do a clean installation of Windows 11 which will reactivate with your Product Key, automatically from embedded Product Key if a factory install, or after connecting to the internet if free Upgrade was already activated.
**One last resort to save the old install while doing the new one is to shrink the C partition using a bootable Partition manager like free Easeus, install to the shrink space which should configure a Dual Boot menu from which the old install may well start up. If so you can post back a screenshot of Disk Management here and I will show you how to remove the rescue install and recover it's space (using Delete and Extend in Disk Management as long as the new partition is not marked System Active), or if the old install will not start up you can set up the new one and copy over the files, I'll show you how to remove the old one and recover its space.
At any time you can Rescue Files when Windows Won’t Start, or use a Linux disk, or boot Paragon Rescue Kit Free Edition File Recovery Wizard to copy files to USB flash stick or an external or another hard drive.
If these fail and/or you decide to go back to your previous install you can try to run Factory Recovery from it’s hotkey at boot; find yours by googling the “PC make/model + Run Factory Recovery.”
Factory Recovery methods
Feel free to ask back any questions and keep us posted on how it goes.