
So, you're experiencing issues with Windows 10, eh? Gone are the days of simply wiping a disk and doing a fresh install. My problem was that the Windows networking stack corrupted, and I was unable to launch wifi settings, and upon further investigation found that I couldn't even run an ipconfig command.
Whatever your reason is, I'll save you the hours of frustration of trying to reinstall Windows on an NVME by telling you exactly how. Wiping an NVME is not as simple as one would hope. You can only modify it while booted into it. That's right, no GParted in Linux, no DBAN, and running your reinstallation disk won't allow you to simply reinstall Windows. Windows 10 knows that there is already Windows on the drive, and will do everything possible to prevent you from nuking it. I would recommend first trying the "Reset Windows" option, and even running "Startup Repair", but if all else fails, or if Windows is corrupted, read on. The reason resetting your system or restoring to a previous version may not work is if Windows 10 itself is corrupted. You can mess around with sfc /scannow , but in the end if Windows is corrupted, you may not have a choice. This is the complete nuclear option, the last resort to your Windows-related issues.
Disclaimer: I am not responsible for any damage caused to your files, hardware, or software. Following this advice is at your own risk.
Step 0: Back Up Your Files
I think this one goes without saying, but please back up your personal files, as by the end of this tutorial you will lose EVERYTHING.
Step 1: Download the Windows Media Creation Tool
You can find it at https://www.microsoft.com/en-us/software-download/windows10 . After downloading, open the tool. When prompted "What do you want to do?", select "Create installation media for another computer". When given the option of either directly to a usb or to a .iso file, choose an iso (the usb option is a little finicky). After the download completes, burn the iso to a usb with Rufus ( https://rufus.akeo.ie/downloads/rufus-2.18.exe ), or burn to a DVD of your choice.
Step 2: Change Motherboard Settings to Disable Intel RST RAID Storage
After creating the installation media, (and you better have already backed up those files), restart the computer and go into your BIOS settings. Depending on your specific motherboard, these settings might be different, or located elsewhere. Find "Storage
Configuration", and scroll down to "SATA Mode". (If your M.2 is not detected, this will almost certainly fix the issue.)
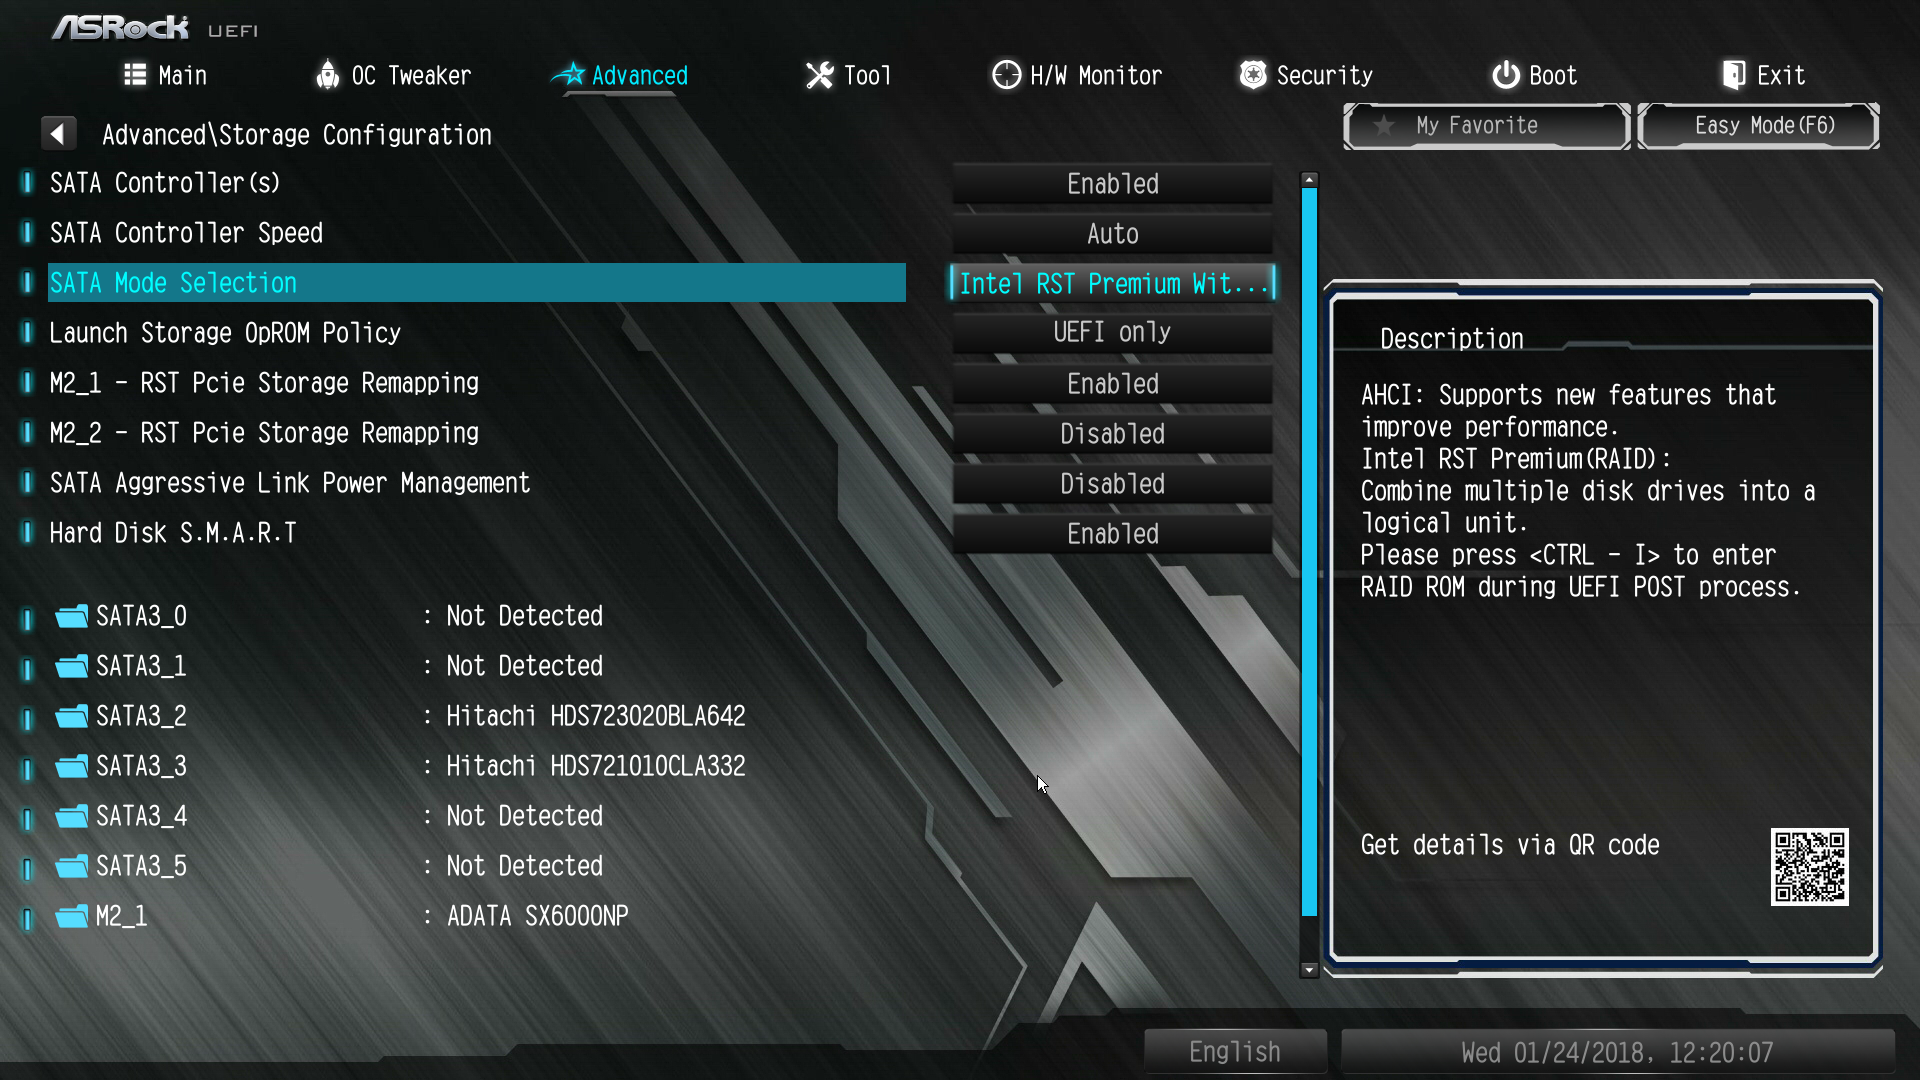
You'll want to change this to AHCI. Your M.2 should now be recognized. Save your changes and exit.


Step 3: Wipe the SSD
If you have any auxiliary storage drives, either unplug them or make a note of their capacities. You DO NOT want to accidentally wipe the wrong drive.
From here, boot into Windows as normal, and while holding shift, click the power button on the Start menu, and select "Restart". Continue holding shift until you have successfully rebooted into Windows Advanced Boot Options. From here, click "Advanced Options" and select "Command Prompt".
We will be using the DISKPART commands to wipe the drive. Ignore the quotation marks, as these are the commands inside.
Type "DISKPART"
DISKPART will launch. Next, type "LIST DISK".
Find your M.2, (Mine was a 256GB Adata XPG, shown as 236GB, and was "DISK 1").
Once you have identified your drive, type "Select disk #" (Where the pound is actually your drive number).
Type "clean". Your M.2 is now wiped. This next part is important.
Type "convert GPT".
Type "exit".
Close the window. Windows is officially wiped from our M.2 drive. Shut down the computer.
Step 4: Launch Windows Install Media
Plug in that USB/DVD, and boot from the Windows Install Media. Select your version of Windows to install (most likely Windows 10 Home), and proceed. You will now be able to see the M.2 drive listed in the drives you can install on. Select the M.2 drive and click "New". Hit "OK", and proceed through with the installation. Although pretty self-explanatory, if you need more help, there are vast amounts of tutorials on the web to help you.
Congrats, you have successfully wiped your NVME M.2 and reinstalled a fresh instance of Windows 10. I hope this tutorial was helpful, and that you succeeded in wiping your NVME and your computer runs good as new.