
Summary
Don’t upgrade Windows 7 to the Windows 10 preview on a PC you depend on for everyday use. A “Dual Boot” setup a far better choice. Just reboot to switch between Windows 7 and the Windows 10 preview. It’s the best way to compare the differences between Windows 7 and Windows 10.
Details
How to protect your existing installation of Windows 7 and evaluate Windows 10 over the coming months:
Image Backup, the key to preserving your investment in Windows 7:
Dual booting with an image and data backup strategy for Windows 7 will provide a layer of protection. The object is not to lose your Windows 7 operating system, applications and data files. To quickly recover should the installation of Windows 10 preview fail and to be able to easily remove Windows 10 if and when you so choose to do so.
I’ll show you what you need to know in order to survive any catastrophes that may occur by providing a detailed look at backup strategies, recovery procedures and how to install the Windows 10 Technical Preview alongside Windows 7 to create a dual boot computer.
Understanding Disk Drive Partitions and what needs to be backed up:
There are a significant number of partition arrangements, each computer manufacture may have their own partition schemes with preinstalled versions of Windows 7. Systems upgraded from Vista or XP have yet another partition layout and finally
to home built systems and the user’s own choice of partitions.
TechNet has a good article that covers a number of BIOS and UEFI partition arrangements:
http://technet.microsoft.com/en-us/library/dd744364%28WS.10%29.aspx
For UEFI/GPT partition arrangements see:
http://technet.microsoft.com/en-us/library/hh824839.aspx
For this Wiki article I will be covering a couple of common BIOS / Master Boot Record based drive partition arrangements with respect to creating an Image Backup strategy and implementing it.
Image Backup concepts:
All backups will be made from the Windows 7 environment and backup restoration / drive recovery will be made from a bootable recovery disk.
One such backup would be an image of the entire hard drive before you start preparing the drive prior to installing Windows 10. Note that a number of computers with Windows 7 preinstalled include a recovery partition (which may or may not have a drive letter assigned) and may also have a Utility partition (not shown in the example below) and a 100MB or larger System Partition located at the very front/beginning of the drive. The recovery/utility partitions can vary in size from one manufacture to another, as small as 10GB or as large as 50GB.

Another type of backup would be just the System and Windows 7 partition, usually called a “system backup” as it only includes the System and Windows 7 partition.

Yet another backup would only include the Windows 7 partition, more typically performed prior to when you install or remove software when in the Windows 7. You can also create a scheduled backup of the Windows 7 (C:) partition. An example would be to schedule a “Full” backup of the Windows partition every Monday (or any other day of the week) as the basis for creating “Incremental” backups (backups up only changed files on the C: partition) on Tuesday through Sunday at the time of day you select. Just remember to turn on your external USB prior to the scheduled time.

These 3 types of backups will allow you to revert to your pre Windows 10 drive configuration (single boot / Windows 7 only) should you choose to do so.
The choice of which backup software is yours (Windows 7 Backup and Restore is not recommended) however I suggest one of the following four products:
EaseUS Todo Backup Home V8.3
http://www.todo-backup.com/home/home-backup.htm
Free version:
http://www.todo-backup.com/products/home/free-backup-software.htm
Version comparison chart:
http://www.todo-backup.com/products/home/comparison.htm
Includes: Incremental backup, Disk/partition clone
User's Guide:
http://www.todo-backup.com/download/docs/User_Guide.pdf
(Note: Install Todo and then create an "Emergency Disk" before you start creating your first image backup)
Version 8.0 supports XP, Vista, Windows 7, 8 / 8.1 and Windows 10 (version 8.3 supports Windows 10)
Acronis True Image 2015 - has a 30 day trial version available, trial Key sent to your Email Address.
Note: Cloning and drive initialization (creating a MBR) are not supported in the trial version.
For the trial version, recovery is available only when booting from an Acronis Bootable Media CD.
Install Acronis and then create a bootable Restore/Rescue Media CD before you start creating your first image backup
http://www.acronis.com/en-us/personal/true-image-comparison/
30 day trial :
http://www.acronis.com/en-us/personal/pc-backup/
True Image User Guides and documentation:
http://www.acronis.com/en-us/support/documentation/
2015 supports XP, Vista, Windows 7, Windows 8 and 8.1
Paragon:
Free version:
http://www.paragon-software.com/home/br-free/
User'sGuide:
http://www.paragon-software.com/home/br-free/download.html
Home Version $39.95:
http://www.paragon-software.com/home/brh/
Support: http://www.paragon-software.com/support/
Macrium Reflect Free:
Free version: http://www.macrium.com/reflectfree.aspx
(no technical support available for the free version)
Macrum Reflect Standard ($49.99)
http://www.macrium.com/personal.aspx
Suport: http://www.macrium.com/ticket.aspx
Note: For users who have a Western Digital disk drive there is a free version of Acronis 2013:
http://support.wdc.com/product/downloaddetail.asp?swid=119
Release notes:
http://support.wdc.com/download/notes/ATI_WD_RN_5962.pdf
Users Guide for WD Version:
http://support.wdc.com/product/downloaddetail.asp?swid=119&type=userguide&wdc_lang=en
Image Backup strategy:
1) First a baseline image backup of the entire drive will be created.
2) A second pre-Windows 10 baseline image backup of the entire drive will be created after you have shrunk the Windows 7 partition is to create space for use when installing the Windows 10 preview, this second baseline will be used as a starting point prior to installing Windows 10.
3) Finally a backup of your dual boot PC will be created.
You should consider creating separate scheduled image backups of just the Windows 7 partition on a daily basis. You can schedule a “Full” backup once per week with a daily “Incremental” or “Differential” backup.
Document backups:
Obviously you will continue to use Windows 7 while evaluating Windows 10. This means you will day by day continuously add more data files (Documents, Photos, Music, Etc) when using Windows 7. If it’s not practical to create or schedule image backup on a daily basis there is a convenient utility named SyncToy which can make quick work of backing up your data files to an external USB drive, or you can use the ‘Data Backup’ (File backup) option available if your Image Backup software supports it. Note: SyncToy does not support Windows 8.
SyncToy: http://www.microsoft.com/en-us/download/details.aspx?id=15155
Initial Backup Baseline backup:
Prior to making any changes to your computer’s drive you need to establish a baseline backup of the entire drive in case you need to restore Windows 7 to its current state (containing all your data files and applications) for whatever reason after installing Windows 10 or you are no longer able to boot to Windows.
The screenshot below shows a typical 500GB drive with 3 partitions when using the Disk Management utility. The very first partition is a small 100MB partition (System, Reserved) which is normally hidden when using Windows Explorer and Windows relies
on its contents to boot. If this partition were to become corrupted you need a way to restore it.

The second partition contains Windows 7 and the third is your recovery partition provided by the computer manufacture as a means of restoring Windows 7 back to a “fresh out of the box, when you first turned your computer for the first time” state, note that using the built in recovery function will result in all your data being lost and any applications you have installed will need to be reinstalled.
The image backups you will create over time as you evaluate Windows 10, eliminates the need to use the recovery partition to reinstall Windows 7, your applications and data files. It’s your safety net when your evaluation of Windows 10 has been completed or the preview has expired.
After your baseline backup has complete, the next step is to shrink the existing Windows 7 partition to make room for an additional partition to be used when installing Windows 10.
How to Shrink and create space for a Windows 10 partition on your drive:
The 500GB hard drive I’m using for this article contains 3 partitions. The first is the 100MB System, Reserved partition, the second is the Windows 7 partition and the third and last partition is a Windows 7 recovery partition.

To create space on the drive for Windows 10 we must first use Windows 7’s Disk Management to “Shrink” the Windows 7 partition which results in “unallocated” space for use when installing Windows 10.
1. Open Disk Management and right click on the Windows 7 partition.
2. Select the “Shrink Volume…” option.

3. I’m going to create 200GB of “Unallocated” for Windows 10, although 100GB is more than enough for all practical purposes. So in the “Enter the amount of space to shrink in MB” box I entered a value of 204800 (200GB = 200 x 1024 or 204800), for a 100GB partition the value would be 102400.

Note that the “Size of available shrink space in MB” is the maximum amount the Windows 7 partition can be reduced by. Sometimes the use of a 3rd party utility such as Partition Wizard Home Edition or EASEUS Partition Master Home Edition may be required as the location of the Master File Table (MFT) or other locked files may limit the amount of space / value in MB that you can enter.
4. Click on the “Shrink” button after you enter the appropriate value for your hard drive. When the shrink operation has completed you should see an area of “Unallocated” space, 200GB in the screenshot shown below.

At this point you can either choose to pre-format the unallocated space (see step #5) in advance of installing Windows 10 or leave the space “Unallocated” and format during the 10 installation process. If you want to leave the space as “Unallocated” then skip to step #6.
5) Formatting the unallocated space:

Right click on the “Unallocated” space and choose the ‘New Simple Volume…’ option.
Note that if your hard drive already has 4 primary partitions you will need to create an ‘Extended’ partition with a single logical drive.
If you want to check the hard drive’s partition for bad sectors remove the check mark from the ‘Perform a quick format’ option, it takes longer to format but it’s the safest formatting method. Solid State Drive users should only perform a quick format.
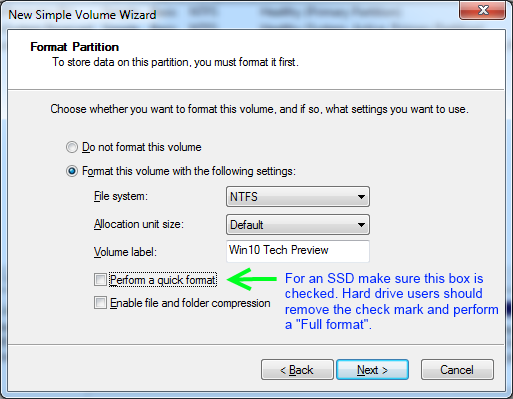
Give the Volume label an easy to recognize name as this will make it easier to spot which partition you want to install Windows 10 on during the installation process.

6) At this point it’s time to create your second baseline backup.
This is the backup you can use to reset /restore your drive back to a pre Windows 10 state should the Windows 10 preview installation fail for whatever reason and you need to try installing Windows 10 again. After creating this backup you would then only need to restore 3 partitions (System, Windows 7 and the pre-formatted partition) to try installing Windows 10 again.
Now you need to create the Windows 10 installation media
How to create an Installation DVD or USB for build 10130:
http://answers.microsoft.com/en-us/insider/wiki/insider_wintp-insider_install/how-to-create-an-installation-dvd-or-usb-for-build/94ed9bb0-e638-4d7e-9678-7f45c8666013
Installing the Windows 10 preview:
First you need to verify and if necessary change the boot order in the BIOS settings so that your PC will boot from the DVD drive (or USB device if you created a bootable USB Flash drive). You can do this by making the DVD drive / USB device the first device listed in the boot order and the hard (or SSD) drive your second device the BIOS, exit as save the BIOS changes.
From Windows 7, insert the Windows 10 DVD. If the AutoPlay windows opens, do nothing except to close it, now reboot the computer.

Press the keyboard’s space bar several times and wait for the “Windows” Logo / splash screen to be replaced (this may take some time) by the Windows 10 Language, Time and currency and the Keyboard setup screen. Make any changes (if needed) and click the ‘Next’ button.

Click on the “Install now” option located in the center of the screen.


Read and accept the License terms and click ‘Next’.

Which type of installation do you want?
Choose the “Custom: install Windows only (Advanced)” option.

1) Where do you want to install Windows?
Select / highlight the partition named (Win10 Tech Preview) or the “Unallocated” space you created by shrinking the Windows 7 partition.

Click ‘Next’ to continue.
2) Windows 10 will now start a series of installation steps, followed by a restart / reboot of your PC.
3) Series of installation screens:

Copying Windows files.
Getting files ready for installation
Installing features
Installing updates (Automatic reboot, no action required on your part)
Finishing up
Windows will now restart

From this point on, if you see a prompt like the two shown below, take no action, don’t touch the keyboard.

By default the Windows Technical Preview will continue the installation process, just wait for the timer to expire.


Again, as shown below, when you see these screens displayed, do not touch the keyboard, let the PC reboot on its own.


4) Get online, Settings and Sign in:

As shown below, I chose the “Express” option.
Note: If you choose the "Customize" option you will then have the ability to select and choose the options settings you prefer.


5) Sign in to your Microsoft account:
Enter a User Name and Password, reenter the password and enter a password hint (in case you forget your password). Then click ‘Finish’. The settings will be finalized (Your PC will be ready in just a moment) and then you will be automatically logged on and the Windows 10 desktop interface will be displayed.


6) Remove the Windows installation DVD.
That’s it; you have completed the Windows 10 Preview installation, now you can decide if Windows 10 which Microsoft worked so hard on is better or worse than Windows 7.
7) Final Image Backup:
However before you go exploring Windows 10 it’s time to make that final image backup. So reboot the computer, notice the new 'Windows Recovery' option in the boot menu. This option will allow you to roll back to a previous build of Windows 10.

Click on the Windows 7 icon to load Windows 7, then launch your backup software and create a backup of the entire drive.
After completing the image backup your USB drive should have 3 folders and look similar to that shown below.

Note: Should you need to restore Windows 7 or the Windows 10 Technical Preview you can just select the partition that you want to restore, no need to restore the entire drive.
If you are using Windows 7 for most of your work and just exploring Windows 10 then you should consider creating a “Scheduled” daily backup of the Windows 7 partition, or you can include both Windows 7 and 10 partitions if you like and have the available space on your external USB drive. Pick a time when you know the PC will be on but you’re not using it, Dinner time for example.
Other Wiki articles you may like:
How to dual boot Windows 10 and Windows 7 (Windows 10 is installed and you want to install Windows 7)
