Microsoft Print to PDF - custom paper sizes possible?

Hello,

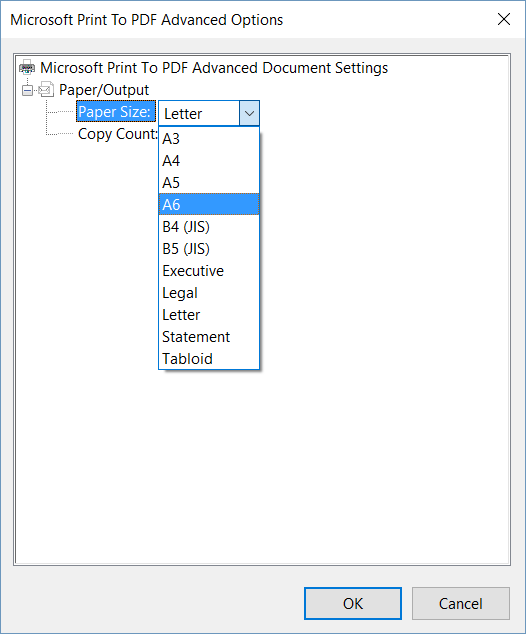
I am using Windows 10 and would like to be able to use Print to PDF to create a file with custom dimensions (i.e. one that can matches my Surface Pro screen dimensions). Is it possible to add custom paper sizes, as I can do with the XPS Printer?

Thanks,

Mike

Answer
Answer

I figured out how to add the "A6" paper size and I believe the following will work for any custom dimensions. Before I start, a nod of thanks to Craig H for his article that got me started in the right direction: Custom Page Sizes for Microsoft Print to PDF.

Disclaimer:

I'm using Windows 10 with USA locale so if you're on a different locale or version of Windows then your settings may be different. I'll try to make this straightforward but I can't promise it won't be painless. You'll need to pull up your sleeves and prepare yourself to muck around in your system internals. If this frightens you then my alternate recommendation is buying Print to PDF software such as Adobe provides.

1. Find the Driver Directory using RegEdit:

  • Run Registry Editor (open Start Menu, type "regedit", and click to run it).
  • Navigate the tree on the left to HKEY_LOCAL_MACHINE > SOFTWARE > Microsoft > Windows NT > CurrentVersion > Print > Printers > Microsoft Print to PDF
  • Find the Name "PrintQueueV4DriverDirectory" on the right-hand listing.
  • Note the Data value which is a GUID value (letters and numbers separated by dashes, i.e. "724B370D-A58D-4FFA-AE63-CA33BA0553C8").
  • Open Windows Explorer (click the folder icon on the task bar) and navigate to "C:\Windows\System32\spool\V4Dirs"

  • Open the folder with a name matching the GUID you found earlier with Registry Editor.

This is the directory containing the configuration files for Microsoft Print to PDF. Keep track of this directory because I'll be referring to it multiple times from here on. The two files we are interested in are the GPD file and the Printer Schema (pdc.xml).


2. Open the GPD File:

  • Create copies of all the files in your driver directory just in case.
  • Delete merged.gpd and any BUD files. These are unnecessary and keeping them around may be confusing (you already made copies anyway).
  • Find the GPD file that is not called merged.gpd. On my system it is named "69b8a4a.gpd" and on Craig H's it was "74e1846.gpd". You can determine this specifically by looking back in the Registry Editor under the node PrinterDriverData and the Name V4_Merged_ConfigFile_Name.
  • Run Notepad as Administrator and open the GPD file you found. To run as Administrator: open the Start Menu, type Notepad, right-click it and select "Run as administrator". This gives Notepad the ability to modify protected system files. Make sure that you select "All Files (*.*)" in the Open window so that you can see more than just *.TXT files.

By this point you have your GPD file opened in Notepad and ready to be edited. This file contains all of the printer capabilities but all we're concerned about is paper sizes.

3. Add Custom Size (A6) to GPD:

  • Find the line "*DefaultOption: LETTER" . The lines following this declare what paper sizes this "printer" can accept.
  • Add the following lines either after the default option line or after one of the closing braces of the other options:
    *Option: A6
    {
    *rcNameID: =RCID_DMPAPER_SYSTEM_NAME
    *PrintSchemaKeywordMap: "ISOA6"
    *PrintableOrigin: PAIR(0, 0)
    *PrintableArea: PAIR(1890000, 2664000)
    }
  • Save the GPD file. If you get a permissions error it's because you did not run Notepad as Administrator.

The PrintableArea you specified is the paper size as (WIDTH, HEIGHT). To get these values, multiply the centimeters of the size you want by 180,000. For example, A6 is 10.50 by 14.80. Multiplying 10.50 by 180,000 I get 1,890,000. The height of A6 is the same as the width of A5 and you'll notice those values match.

A word of warning for those adding non-standard sizes. The name of the option must be registered on your system. Craig's tutorial mentions how to add new, non-standard sizes. My tutorial is focused only around enabling standard sizes that are otherwise not shown in the Print to PDF list.

If you were to print now you'll see the option of A6 but get an error previewing or trying to go through with printing. There is one more file to modify and that's the schema ...

4. Add Custom Size (A6) to Printer Schema:

  • Run Notepad as Administrator if you closed it after the previous step.
  • Open pdc.xml with UTF-8 Encoding. This is very important otherwise you will corrupt the file. There is a drop-down list under the file name labeled "Encoding:". Set this to "UTF-8" before clicking Open.
  • Find the line <psk:PageMediaSize psf2:psftype="Feature">. Everything beneath this until </psk:PageMediaSize> is a paper size that the printer will support. Each paper size is a block of lines and the order they are here is the order in which they'll be displayed for selection.
  • Add the following block of lines. Be careful that these don't overlap other blocks of lines in a funny way.
    <psk:ISOA6 psf2:psftype="Option">
    <psk12:PortraitImageableSize psf2:psftype="Property" xsi:type="psf2:ImageableAreaType">0,0,105000,148000</psk12:PortraitImageableSize>
    <psk:MediaSizeHeight psf2:psftype="ScoredProperty" xsi:type="xsd:integer">148000</psk:MediaSizeHeight>
    <psk:MediaSizeWidth psf2:psftype="ScoredProperty" xsi:type="xsd:integer">105000</psk:MediaSizeWidth>
    </psk:ISOA6>
  • Save the file.

The important thing to note here is that the <psk:ISOA6 text matches the value you put for PrintSchemaKeywordMap in the GPD file. Also, notice that the sizes are in millimeters in the schema.

Conclusion:

That's all there is to it. Now if you go to Printing Preferences for the Microsoft Print to PDF "printer" you'll see the new paper size A6:

Again, these instructions are for adding standard sizes. I have no doubt that non-standard custom page sizes can be added but I haven't experimented with it yet.

365 people found this reply helpful

·

Was this reply helpful?

Sorry this didn't help.

Great! Thanks for your feedback.

How satisfied are you with this reply?

Thanks for your feedback, it helps us improve the site.

How satisfied are you with this reply?

Thanks for your feedback.


Question Info


Last updated May 11, 2024 Views 353,720 Applies to: