
INTRODUCTION
Just as you need a battery to start a car from which the fuel power takes over, similarly you need a firmware to start the computer and bring it to a minimal functional state from which the operating system takes over.
The firmware called BIOS is a first generation computer program in the processor's assembly language which is executed by the processor to directly control the hardware. This provides the foundation for building an advanced software platform by adding logical layers incorporating increasing functionality at each layer. The core layer is an abstraction of the hardware components into software objects which are further developed through the layers into Hardware Drivers, and finally coupled to a well-defined User interface at the peripheral layer. Once this platform called Operating System gets built, the complexity of the hardware and its I/O functions are controlled by simple software commands from the User interface. The Operating System internally translate these commands into a string of low level instructions for communicating with the processor which in effect directs the hardware devices to send or receive data.
Windows 8 has re-engineered its boot method by adopting UEFI (Unified Extensible Firmware Interface) as the new firmware standard while continuing to support the legacy BIOS (Basic Input Output System) firmware standard for machines with old hardware which are not UEFI compatible. UEFI brings in newer features in the platform firmware alongwith a newer set of policies and specifications to comply with.
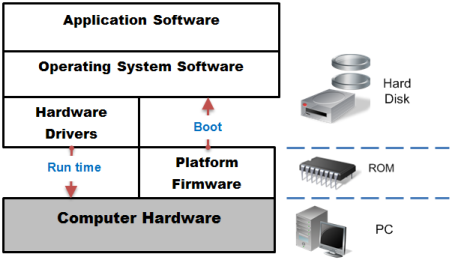
Platform Firmware provides the first set of instructions that run when the computer is switched on. After the platform firmware finishes detecting hardware and initializes the system, it passes control to the Bootloader program of the Operating System (OS). Platform Firmware is embedded in non-volatile storage like programmable read-only memory (PROM) or flash memory that's directly attached to a motherboard. Firmware also resides in hardware devices like video cards and storage controllers as a driver program contained in dedicated memory chips.
The BIOS firmware program in 16-bit assembly language are a sequence of hardware specific instructions directly executed by the processor from its 1MB addressable memory space in what is termed as Real Mode. The function of the BIOS is transient during the boot process, after which the processor's Real Mode 16-bit environment gets disintegrated and the OS establishes an advanced platform structure called Protected Mode utilising the 32/64-bit capabilities of a modern processor to access the entire system memory. In protected mode, programs run on an OS rather than directly on the platform as in Real Mode. The OS interfaces with programs as a virtual platform and undertakes the task of centrally managing the allocation of memory and other hardware resources to programs, instead of each program having to manage the memory on its own as in Real mode. The OS in effect emulates as a high performance platform for programs, by efficiently managing the entire hardware through a set of high level device drivers. Protected Mode was phrased to imply that memory is protected from erroneous over-write as is possible in Real Mode, where each program is free to write to all memory locations irrespective of its use by another program.
In the UEFI firmware, only the platform initialisation tasks are performed in Real Mode, after which the UEFI builds a rudimentary operating system on the platform to enable 64-bit Protected Mode for launching the subsequent boot / firmware program in a high level language.
UEFI originally called EFI, was developed by Intel as a modern alternative to the PC BIOS. Now it's supported by an industry consortium. UEFI in essence, is a light-weight operating system, written primarily in C language, that the computer loads at boot time. Being an operating system, UEFI interfaces the computer hardware as a virtual platform for running firmware programs. The primary function of the UEFI is to boot an operating system, but it can also be used to run pre-OS utility programs such as networking, disk management, back-up/restore hard drives, edit boot configuration parameters and execute driver programs for hardware test diagnostics.
BIOS FIRMWARE
BIOS firmware was developed using assembly language for the earliest PCs in the 1970s. Although BIOS is still the most prevalent firmware type, it is limited to a 16-bit processor level program with low level instructions directly executed by the CPU; AND one megabyte (1 MB) of addressable memory space. A modern 32/64-bit processor has to emulate in 16-bit (Real Mode) in the BIOS platform as BIOS standards were developed for 16-bit platform.
A BIOS is the very first program that is executed once the system is switched on. The function of the BIOS program is to control the hardware platform till it identifies and executes the Bootloader program. The BIOS program has three phases – Hardware Initialisation, attend to BIOS configuration change request (if any) by user, boot the Bootloader program from a Hard Drive Or boot into a maintenance environment from an Optical / USB drive.
The BIOS program is stored in a ROM which can be changed only by a BIOS Flash Update utility. The BIOS stores its hardware initialisation parameters, boot data and system date-time in a CMOS chip which permits quick change to the BIOS configuration data. The CMOS chip is an ultra-low current static RAM (NVRAM) powered by a coin cell (CR2032).
The ROM acts as a storage device for firmware programs to reside in a passive state and gets activated when they are loaded (copied) into memory for execution by the processor. In the system initialisation state, when memory is not ready for use, the processor executes the first codes directly from the ROM and this ends with an instruction to copy the ROM codes into memory (RAM). The BIOS program in RAM, Data in NVRAM, and all embedded memory locations in devices containing its driver program as a BIOS subroutine, are consolidated by mapping them to a single memory-address-map to serve as an uniform logical memory structure for the entire system. The BIOS program use the logical memory address and the memory map serves translate the logical memory address into the physical address of a memory location within a Device ROM or RAM. Normally the processor executes instructions sequentially from the logical memory. A memory reference in an instruction is used to access a subroutine on a device ROM Or transfer program control to another location in the RAM.
The BIOS program had gone through numerous revisions with almost every new version of PC until it evolved into the UEFI. The following table tries to depict the typical memory utilisation of BIOS as it reached towards its end-of-life phase.

When a system is switched on, the system memory (RAM) is empty and therefore the processor doesn't really have anything to execute. The processor is thus hard coded with the first instruction (JMP FFFF0h), which is to Jump (JMP) to the memory location (FFFF0h) mapped to the BIOS ROM to begin execution of the BIOS program.
The first routine within the BIOS ROM performs the Power-On-Self-Test (POST) and Hardware initialisation tasks. The system memory (RAM) is then initialised and loaded with the BIOS ROM program. This is followed by a second Jump instruction to shift the program execution to a location in the RAM. This process is called Shadowing and is done because execution from RAM is much faster than from a ROM resulting in reduced boot time.
The second jump instruction takes the processor to a part of the BIOS program (now in RAM) which identifies those devices which must be available for user I/O and system R/W operations - keyboards, video adapters, SATA storage controllers and Optical Disc Drives. Devices are accessed either by the memory address bus or by a dedicated I/O bus consisting of device I/O ports. These devices has a self-contained driver program in a ROM (called OptionROM) directly attached to the device. The BIOS calls those OptionROM driver programs (subroutines) to invoke the device functions.
At this stage, the processor checks for an user control signal (interrupt) sent via the keyboard which sets a flag indicating a request for change of the BIOS Configuration. If the interrupt flag is found positive, the BIOS executes the BIOS GUI program which allow an user to modify the BIOS configuration data from list-options, and save it into the CMOS RAM. The PC restarts to load the latest changes in the BIOS configuration.
The final phase of the BIOS program is to identify the Boot device from a list of boot devices, defined in descending order of priority in the boot configuration. The BIOS searches for the master boot record (MBR) in the first sector of each boot device (Cylinder 0, Head 0, Sector 1), starting from the device at highest priority, and loads the first available MBR into memory location 0000:7C00h. MBR contains three pieces of information: the master partition table, the disk signature, and the master boot code. BIOS transfers program control to the memory location 0000:7C00h and the master boot code executes, which locates the active boot partition from data in the master partition table, and loads into memory the Bootloader program (NTLDR) of the OS. At the point, when the MBR boot code loads the NTLDR Bootloader, the BIOS relinquishes control and the OS assumes control of the computer system. The NTLDR Bootloader executes to chainload or bootstrap the OS loader (winload.exe), kernel, drivers and finally complete OS program.
BIOS Vs UEFI
UEFI require hard discs in GPT partition structure, instead of the master boot record (MBR) partition structure that is used in BIOS. MBR is limited to addressing 2TB of Hard Disc Space and 4 primary partitions whereas GPT addressing space is practically unlimited and a GPT disc can have up to 128 partitions.
If Windows 8 is already installed using Legacy BIOS, it can't be converted to UEFI. A new OS installation will be required.
The BIOS is essentially a set of platform instructions (routine) in 16-bit assembly language of the processor, whereas UEFI is an Operating System that accomplishes the platform tasks through 64-bit programs in the C-language which is far more efficient than the BIOS routine.
While the startup program in both BIOS and UEFI must reside in a ROM/Flash storage, BIOS extensions are limited to device support through OptionROM, whereas UEFI extensions can be an application or device driver program which can reside on any type of storage - Hard Drive / Flash Drive / OptionROM or even a Network location.
The UEFI firmware is platform independent, and so device drivers are required to have standard commands to communicate with the device controller. The device controller electronics is responsible for translating these commands into input signals in the native format of the device. This makes it possible to test and develop standard drivers and applications irrespective of the implementation. This enables a driver to be universal type for a specific hardware, reduces the complexity of supporting new hardware, and helps computer manufacturers update and maintain firmware more rapidly.
Boot Up Time = Hardware initialisation time + Kernel initialisation time + User session initialisation time.
The processor speed is the determining factor for the Hardware and Kernel initialisation time which is nearly the same for both BIOS and UEFI. Fast boot is actually due to partial hibernation of the User session when Fast start-up is enabled in Windows (8, 10) under Power Options in Control Panel.
The BIOS starts the OS boot process at the first sector of a Hard Disc containing the MBR boot code. The MBR boot code and also the Bootloader program of the OS in the System partition are vulnerable to malware attacks during OS runtime.
The UEFI eliminates the need of a MBR boot code by triggering the OS boot process directly from the EFI SYSTEM PARTITION (ESP) of a Hard Disc. The Bootloader in the ESP is fully concealed and isolated from access by programs running during OS runtime, thus securing the Bootloader against malware attacks.
The UEFI Core firmware that comes on the motherboard ROM is open-source licensed, which allow Device and OS vendors to incorporate their own proprietary UEFI firmware as extension to the UEFI Core Firmware. This makes it possible to include at the firmware level, almost any other service that is possible by the main OS.
Another new feature that comes in UEFI is the Secure Boot process, which prevents malware from busting the firmware. Unlike an elaborate anti-malware application, Secure Boot is a simple safety measure designed for the UEFI firmware environment. Although functionally simple, it mandates some stringent compliance from all third party hardware devices and programs that must hook to the Platform Firmware. To remain flexible, Secure Boot is provided as an optional feature that can be enabled in UEFI and this is the topic of discussion in the next section.
Conclusion ! In the days of 16-bit Windows 3.1 of the early 1990's, a PC used to boot to 16-bit Disk OS (DOS). DOS used the BIOS services for all I/O operations. Windows had to be started by typing the command "WINDOWS" at the DOS prompt.
That BIOS-DOS platform concept is revived in UEFI, with UEFI performing the dual role of BIOS as a boot agent and emulates DOS by providing a pre-OS command line interface called EFI Shell, for running firmware commands and scripts. Moreover it allows 64-bit Windows to be launched from 64-bit UEFI platform rather than 16-bit BIOS.
BIOS has 3 modes of operation – Boot Mode, Setup Mode and Update Mode. The Boot Mode is used to boot an OS; the Setup Mode is used to configure the boot and other firmware settings and the Update Mode is used to update the firmware version.
In addition to the 3 modes of operation, UEFI has a fourth User Mode. In the User Mode, the EFI shell is called by an user to run firmware commands and other utility programs.
The absence of firmware utility programs in BIOS, led to the emergence of many popular third party tools distributed as "bootable CD" like the BartPE and Acronis True Image. The primary objective of these bootable CDs was to provide a repair environment in case of a System breakdown. Starting Windows Vista, Microsoft provided their own Recovery and Repair firmware shell based on Windows PE (Preinstallation Environment) on a System Reserved Partition, which could also be used to create a bootable CD through Windows Control Panel.
In UEFI based systems, firmware utility programs comes pre-installed as part of system maintenance tools built upon UEFI as extension programs, located in the EFI System Partition of the Hard Disc. In Windows 8 UEFI systems, the Recovery Shell on Windows PE continues to remain as the default repair environment. However the EFI shell can be additionally used to install and run customised diagnostic and firmware programs.
UEFI SECURE BOOT
The UEFI has implemented a Security System during boot, called "Secure Boot" which essentially comes to securing the firmware components in the boot process with a digital signature that the platform validates with a trusted key.
In most PCs today, the firmware environment is vulnerable to malware function during boot, when the original MBR bootloader has been replaced with a malicious loader called Bootkit. Bootkits own higher privileges than the OS since
it has to load the OS, and thus gains the ability to manipulate the operating system and its security measures from controlling them. Bootkits gets installed through a vulnerability in the OS or in disguise through an apparently genuine software program. Once
installed they are very difficult to detect, unless they engage in disruptive activities. They mostly work as spywares collecting user information.
In Windows XP, the function of the BIOS is to transfer control of the platform firmware to the Bootloader of the OS by executing the Master Boot Record (MBR), which is a small program located in the first sector of the computer hard disc that
tells the computer how the hard drive is partitioned, and how to load the operating system. The MBR is susceptible to boot sector viruses that can corrupt or remove the MBR, which can leave the hard drive unusable and prevent the computer from booting up.
Windows 7 confines the Bootloader program files in the first partition of the of the Hard Disc called "System Reserved" - a 100 MB primary active partition automatically created by system at the time of Windows 7 installation. The Bootloader files in this system partition are fully concealed and isolated, thus eliminating the chances of corruption by malware.
Windows 8 further extends the secure boot implementation of Windows 7, using trusted keys in Boot Manager to ensure that only properly signed and authenticated components are allowed to execute. In addition, firmware access is limited to user control without any programmatic interface.
The Secure Boot process is owned by vendors who are certified by UEFI to digitally sign their firmware files (images) which forms part of the firmware system. These trusted vendors share their trust key with the principal trust owner of the platform, generally represented by the OEM, who has to authenticate the digital signature on every image with its trust key, before allowing them to execute.
The Windows 8 boot process is secured in three phases – Secure Boot, Trusted Boot and Early Launch Anti Malware (ELAM).
Secure Boot is localised in the UEFI firmware environment, from the ROM which being write protected acts as a safety device for the resident firmware to execute freely without authentication, to locations outside the ROM where the signature of all firmware images are authenticated before allowing them to activate. Secure Boot ends with the loading of a certified Bootloader of the OS into memory.
Trusted Boot takes over from where Secure Boot leaves off, to manage the booting of Windows components using trusted certificates. The Bootloader loads a trusted Windows 8 OS loader, the OS loader loads a trusted Kernel, and the Kernel in turn loads authenticated Windows components as part of the OS boot process. At the point when Windows needs to load third party device drivers, Trusted Boot launches the Anti-Malware driver and hands over the task of malware identification to the Anti-Malware system.
Windows 8 has prioritised the loading sequence of its Anti-Malware program so that it loads before any device drivers where rootkits are located. This process is called Early Launch Anti-Malware (ELAM). Regardless of whether you are using Windows Defender or a different anti-malware product, Windows 8 has tweaked its load process so that security software runs first. By being launched first before any third-party driver, ELAM is able to detect malware in the boot process and prevent it from initializing.
UEFI is a community effort by many companies in the personal-computer industry to upgrade the pre-OS environment. The UEFI Forum is a collection of chipset, hardware, system, firmware, and operating system vendors. The forum is responsible for developing, managing and promoting UEFI specifications. Microsoft is a board member of this forum, and the forum is open to any individual or company to join free of cost.
Microsoft has further extended the UEFI security policy in Windows 8 certified systems built by OEMs, to ship systems with secure boot enabled by default, which can only be switched On/Off by direct user access, and have no programmatic interface to prevent malware from disabling secure boot. Also Firmware update in ROM is allowed only through OEM's signature validation.


| Key / db name | Owner | Description |
| Platform Key (PK) | OEM/ Platform Owner | PK enables the root trust anchor in the Platform from which the trust chain is built for Secure Boot. |
| Key Exchange Key (KEK) | OS Vendor | PK authorises KEK Vendors to provide the second stage trust anchors. |
| Authorised Database (db) | OS Vendor | db is the list of all UEFI image files anchored to the KEK. |
| Forbidden Database (dbx) | OS Vendor | A blacklist of keys, signatures, and/or hashes of binaries whose trust has been revoked. |
The UEFI Secure Boot Keys are Trust Keys consisting of a key pair – private and public. The private key is secret to the owner of the keys, and the Public Key is distributed openly. These keys have 2 separate implementation as Public Key Encryption (PKE) and Digital Signature. The purpose of PKE is to render confidentiality to a message by encrypting it with the public key and then sending it to a recipient via an open channel, who can only decrypt the message using the secret private key. The purpose of a Digital Signature is to authenticate a software object by encrypting it with the owner's private key and enclosing the public key for ready decryption of the object, and openly distributed where confidentiality is not the requirement. In actual practice, the unencrypted object is accompanied by its digital signature which is decoded at the receiving end and compared with the unencrypted object for a veracity check. However encrypting an entire object produces an unduly large Digital Signature which is therefore reduced by a hash function.
A hash is a complex algorithm which produces a unique ID from the binary of a software object. The purpose of the hash is to prove the integrity to a software object. A hash of an object's binary is further encrypted and used as a digital signature to accompany the original unencrypted object. The receiver receives the unencrypted object and the digital signature enclosed by its public key and the hash function. The receiver uses the public key to unencrypt the signature and retrieve the hash; it then uses the hash function to derive the hash of the received unencrypted object. These two hashes if found identical, confirms the identity and the integrity of the received object.
In the UEFI platform, the secure boot process is owned by an entity which could either be a Platform Vendor or an OEM or even an Enterprise. This entity is the owner of a Trust Key pair that enables the root of trust on the platform and acts as the primal trust anchor from which the secure boot trust chain in built. The owner is responsible to digitally sign the firmware files (images) in the first stage boot process located in UEFI motherboard OptionROMs with its private key. The platform is supplied with the public key and the hash function, together called the Platform Key (PK) stored in the NVRAM. Platform security is enforced by PK which validates the digital signature of each image, before allowing them to execute. The PK thus provides the foundation from which the authenticated boot process is built.
The UEFI specification mandates two additional trust databases:
• The Key Exchange Key (KEK) database
• The Allowed Signature (db) database
KEK database is comprised of vendors who provide the second stage trust anchors in the secure boot chain. The KEK database contains the Digital Certificate, issued by UEFI Org. to vendors who are approved as a Certification Authority (CA) to sign their respective firmware images. These UEFI certified OS Vendors, Hardware Driver Vendors and UEFI application vendors are trusted to sign their own firmware images located in UEFI System Partition of Hard Drive, as part of the second stage Secure Boot process.
Only PK is authorised to write the vendor's digital certificate into KEK, which acts as a reference for validating the vendor credential presented during the boot process. Vendors who are defined in the KEK are allowed to write to the Allowed Signature (db) database and Forbidden database (dbx). Like the platform security owner, these vendors maintain a pair of trust keys called Vendor's Production CA, of which the private key is used to sign its firmware images and the public key is provided in the Authorised Database (db) to authenticate the firmware images at run time. The Forbidden (dbx) database is also known as the Revoked Signature or Black List database. This database identifies the revoked keys of UEFI drivers/programs that are no longer trusted and may not be loaded.
A trust chain is established where the root trust holder PK loads trusted vendors in KEK, and the KEK vendors loads trusted firmware images authenticated by the Allowed Signature (db) database. Thus PK in effect have a trust relationship with the images in db, and alongwith the images that is directly signed by it, PK reposes its trust on the entire set of firmware images that is part of the Secure Boot process.
The Allowed Signature database contains the public keys of all images located outside the OptionROMs that are part of the UEFI Secure Boot or the Windows Trusted Boot process.
During Secure Boot, the Platform Key (PK) validates the signature of firmware images executing from Option-ROMs in the first stage, and subsequently uses the trust keys in db to validate the signature of device drivers and bootloaders which are to be loaded from UEFI System Partition in Hard Drive.
As per the UEFI Specification, the chain of trust terminates when the UEFI hands over control to an operating system. During Trusted Boot, Windows continues to use the db to validate the signature of its OS loader, Kernel and Device Drivers.
Beginning Windows 8, Microsoft provides their own proprietary UEFI in Laptops manufactured under Windows 8 logo program. In assembled PCs, Windows UEFI can be installed from the Windows 8 installation media which has to be combined with Windows OS installation.
There lies a catch however. In a PC with dual OS requirement, of which one is to be Windows 8 and another non-Windows, there can exist only a single UEFI as the platform firmware. If Windows UEFI assumes the role of platform firmware, the extent to which Windows UEFI will support the booting of other operating systems from within its own UEFI, is a policy matter that is ongoing evolution amongst OS vendors as part of the UEFI committee. One thing is clear though; PCs manufactured by OEMs under the Windows 8 logo program, will not permit dual OS.
If Dual OS is a pre-requisite for a PC, then the safest choice as of now, is to install the operating systems in Legacy BIOS mode. With some time to invest, it can be a worthwhile effort to study and investigate the compatibility of the other operating system
in Windows UEFI environment, at least after disabling Secure Boot.
THE UEFI ELEMENTS
UEFI firmware was introduced by Intel as an upgrade to the age-old BIOS which has to be customised for every other firmware type and maintained for its life time. Besides the BIOS was increasingly becoming the target of bootkits which remained generally undetectable by the Anti-malware system. The UEFI Firmware controls the computer before the OS loads and is a miniature OS itself. The UEFI Core Firmware comes embedded in the motherboard on a Flash Storage - used as a Read-Only-Memory, which is backward compatible as a BIOS firmware, the reason it is called UEFI BIOS.
The UEFI BIOS has two basic functions - launch the Bootloader to hand over platform control to the OS AND provide the Shell to manage the computer hardware. The Shell is the user environment which has a command line interface termed EFI Shell and also a graphical user interface abbreviated as GUI. The EFI Shell is used for executing platform commands, scripting, and running UEFI utility programs. The GUI is used to achieve the fundamental task of UEFI firmware settings and these parameters are stored separately in a CMOS NVRAM. To simplify the BIOS to UEFI transition, the UEFI BIOS has the same look and feel as that of a BIOS GUI.
Thus UEFI BIOS has 4 modes of operation – Boot Mode, User Mode, Setup Mode and Update Mode. The function of the Boot Mode is to boot the OS. In the User Mode, the EFI Shell is called by an user to run utility programs. The Setup Mode is used to configure the UEFI firmware parameters. The Update Mode is employed to update the version of UEFI BIOS from a USB stick while the platform is in firmware state. UEFI BIOS can also be updated from within the OS.
The UEFI Flash is structured into distinct regions for its boot module, runtime module and data module for initialising the platform hardware. These modules are stored in 5 separate Volumes of the Flash namely – UEFI Boot, Management Engine, Platform Data, Gigabit Ethernet and Flash Descriptor.
Each Firmware Volume can have multiple logical partitions for dividing the main module into smaller functional components. The UEFI Boot specification segments the Boot process into 6 phases with definitive guidelines for developing the firmware script for each phase. The UEFI Boot Manager controls the program flow across the 6 phases as described below.

Security (SEC) phase: When the system starts up, the CPU Cache is flushed and the processor executes the platform reset and initialisation routine directly from the Flash. Since the processor is in Real Mode, it operates through an Assembly Language Program specific to the firmware. Here the Power State determines whether to apply a Hard boot (Power-up from Shutdown) or a Soft boot (Resume from Sleep). On a Hard boot, the CPU Cache is initialised with codes from the Flash to enable a memory model that permits Stack based C-code to be executed with only a few limitations. The processor switches from 16-bit Real Mode to 64-bit Protected Mode and prepares hand-off to the PEI phase. The Security terminology is actually a misnomer as there is no security verification of codes executing in this phase. It is assumed that malware cannot target the Flash as the Flash update can happen only through signature verification.
Pre-EFI Initialisation (PEI) phase: The PEI tasks are performed through the Stack Program in the CPU cache. PEI determines the Hard/Soft boot carried-out by SEC. On a Hard Boot, the PEI initialises the RAM with the UEFI Program contained in the Flash ROM. RAM initialisation does not happen on a Soft boot as the OS environment is retained in the memory during Sleep State. PEI also loads certain modules to ensure that the platform has sufficient resources for the following DXE phase to operate the high level UEFI program in C-code.
Driver Execution Environment (DXE) phase: This phase is designed to be platform independent, where the Device Drivers are loaded into memory and executed. Secure Boot is enforced as the UEFI opens interface with devices to load their driver programs from locations external to the BIOS ROM. Most of the UEFI system initialisation takes place in the DXE phase.
Boot Device Selection (BDS) phase: BDS interprets the boot configuration data and decides on the Boot Policy to be employed. It further works with DXE to determine if the device drivers required signature verification. Accordingly the MBR boot code is loaded into memory for Legacy BIOS Boot Or the Bootloader program is loaded from the EFI partition for UEFI Boot. It also allows an user to enter Setup and choose the EFI Shell or an UEFI application as the Boot Device.
Transient System Load (TSL) phase: Depending on the Boot Device selected in the BDS phase, the firmware boots an OS loader or the EFI Shell or an UEFI application.
Run Time (RT) phase: Here the UEFI Program is cleared from memory and released to the OS. Run time service occupy a small amount of memory to be called by the OS as during UEFI BIOS update.
-----
The UEFI BIOS containing the EFI Shell is open-source licensed, which allow it to execute third party UEFI programs. Since an UEFI program is nothing but a UEFI firmware, it essentially means that the UEFI BIOS can support other UEFI firmware. This aids Device and OS vendors to provide their own proprietary UEFI firmware as extension to the UEFI BIOS.
These UEFI BIOS extensions reside on an EFI Drive in FAT32 format of a Storage Device, which is sequestered to prevent contamination by malware. The EFI storage device can be connected either local or external or from a network location to the UEFI computer.
The EFI Drive could be an EFI System Partition (ESP) in FAT32 format of a Hard Disc, Or an "EFI-compatible" Option ROM, Or a FAT32 Flash Drive. In Windows 8 PC, this partition is labelled as System. Going forward, the abbreviation ESP will be often seen used to refer to the System Partition.
The UEFI extensions on an EFI Drive can be an application or a device driver or a service that runs in the UEFI environment. Thus UEFI is a collective product of the Platform manufacturer, Device and OS vendors. In a Windows 8 OEM PC, the OEM does the UEFI integration.
The Bootloader manages the UEFI Boot List composed of file path of all boot programs, and boots an OS loader from the ESP of a Hard Drive automatically at system start. The EFI Shell can alternatively be called by user to run an UEFI application or a Device driver and even boot an OS loader.
To make an UEFI application bootable from a Removable drive, the drive must be in FAT32 format and the application file must be as named BOOTx64.EFI (case insensitive). Further, this file must be placed at the root of the drive in a specific directory structure as <Drive letter>\EFI\BOOT\BOOTX64.EFI .
A classic example of this is the Windows 8.1 Recovery Tool which is created on a USB Flash drive (from a PC with UEFI BIOS) has the same generic filename and boot file path - is a UEFI bootable Recovery Environment based on Windows PE OS.
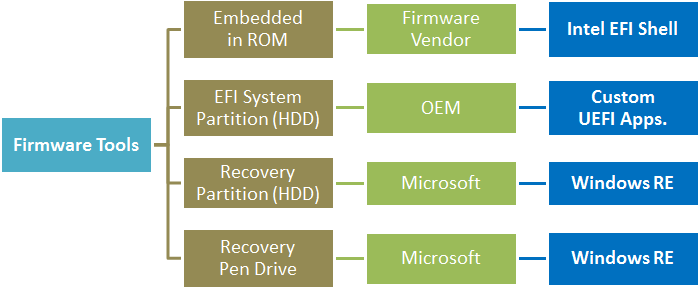
The EFI Shell is provisioned by the Firmware Vendor (FV) like Intel /Gigabyte /MSI, Or OEM like IBM /HP /Dell etc, Or an OS Vendor (OSV) like Microsoft. It comes embedded in the UEFI ROM when provided by the FV. It is installed as an UEFI extension on the ESP of the Hard Drive by an OEM or OSV. All vendors except Microsoft incorporate the standard open-source version of the EFI Shell (SHELLX64.efi) developed by Intel Corporation into its UEFI firmware.
In Windows 8.1 PCs, Microsoft provides their own Command Prompt in the Firmware environment which has a command-set different from the Intel version; and the UEFI BIOS is also customised by Microsoft – the reason it is called a Windows UEFI.
Starting Windows 8, Microsoft provide their own Recovery Shell built upon Windows PE (Preinstallation Environment) - a lightweight version of Windows OS, that can boot both from BIOS or UEFI. This Recovery Environment (Windows RE) is installed on a separate Recovery Partition and has a graphical user interface with the Command Prompt, Repair Utility Programs and UEFI BIOS setup mode represented by icons on a dashboard. Once Windows RE boots in, it takes control of the platform replacing UEFI. The Windows RE file system (albeit hidden) can also be copied to a Pendrive as a bootable application, through Control Panel > File History > Recovery (at the very bottom) > Create a Recovery Drive.
Windows 8 thus provide 2 distinct firmware environment: Recovery Shell in Recovery Partition and UEFI in ESP. Unlike Recovery, UEFI is customisable by an user to develop, install and run UEFI applications for specialised use.
An OEM can also distribute systems on the ESP of the Hard Drive, which would add additional functions to the UEFI firmware provided by the motherboard.
To develop an UEFI application, it requires knowledge of programming in C language, thorough understanding of the UEFI standard and UEFI specifications, acquaintance of UEFI Developer Tools, Libraries, Syntax, and a computer supporting the UEFI standard.
Microsoft provides UEFI application signing services for Windows 8 UEFI platform free-of-charge, subject to compliance of certain Terms and Conditions which gets revised as policies evolve. UEFI signing is a service provided by the Windows Dev Center hardware dashboard that lets you submit UEFI firmware binaries targeted to x86 or x64 computers for signing by Microsoft, so they can be more easily installed on computers running Windows 8 that use secure boot and execute code signed with the UEFI Certification Authority.
The UEFI BIOS can be configured to boot the system either in UEFI or in Legacy BIOS mode. The Legacy BIOS mode is effected by a Compatibility Support Module (CSM) within UEFI firmware, which emulates the BIOS boot process by executing the boot code from MBR. This type of UEFI came to be known as UEFI BIOS.
The Evolution of Platform Firmware are classified as:
Class 0: Pure BIOS Firmware.
Class 1: UEFI Firmware which emulates as BIOS only. No UEFI support is provided. This was used by Platform Manufacturers to transition to UEFI standard while essentially maintain a BIOS platform, as most OS of that time were not UEFI aware.
Class 2: These Platforms support both UEFI and Legacy BIOS via CSM. Majority of platforms shipping today are Class 2 platforms. Class 2 platform with CSM enabled functions like a Class 1 platform. Here the UEFI BIOS firmware though inherently UEFI, provides no UEFI support and this is where the use of the term UEFI gets misleading sometime.
Class 3: These platforms boot purely through UEFI firmware without any Legacy BIOS support. Class 3 platforms do not have a Compatibility Support Module. Class 2 platform with CSM disabled functions like a Class 3 platform.
THE UEFI MODES

Boot Mode:
The User is responsible for defining the Boot Policy and Boot Configuration Data (BCD) in the Setup Mode. Both the Boot Policy Settings and the Boot Configuration Data are User chosen boot parameters, from List-options in the Boot Menu of the UEFI BIOS and stored in the NVRAM. The NVRAM is the common area for use by Firmware Vendors, OEMs, OS Vendors and even Users to store Firmware parameters.
The User has to set the Boot Policy as UEFI Boot or Legacy BIOS Boot in the Setup Mode which is the last topic of this section.
BCD comprises of the Boot List, Boot Order and Bootable Storage Types. The UEFI Boot List consists of Boot programs such as OS loaders, Device drivers, UEFI applications and optionally the EFI Shell. Boot programs are identified by their file location called Boot File Path. Thus the UEFI Boot List is a list of Boot File Paths arranged by the Boot Order Priority.
The UEFI 'Boot Programs' are still referred by the legacy term 'Boot Devices', as it inadvertently got inherited from the BIOS terminology, where firmware programs could only reside on devices in Option ROMs.
BCD also defines the allow/disallow boot permission to Removable Storage Types such as Optical Media, USB Flash, External Hard Drive and Network Drive.
The UEFI Boot List in the NVRAM provides a two stage boot process. The UEFI Boot Manager launches the bootloader from the boot list, and the bootloader then boots an OS loader from this boot list in NVRAM or from an OS list maintained separately by the bootloader in the ESP. This depends on the bootloader design of an OS.
The Setup Mode allows an user to arrange the boot order of programs or create a boot file path in the NVRAM. Similarly the bootloader also allows an user to modify the boot order of OSes. The first OS installed on a computer provides the Bootloader, which then acts as a nodal application for booting all OS loaders including that of other vendors.
In a Windows 8.1 UEFI PC, windows installs it bootloader named Windows Boot Manager (WBM) in the ESP of the Hard Drive having path ESP\EFI\Microsoft\Boot\Bootmgfw.efi and the Windows OS loader in the OS partition C:\Windows\System32\winload.efi. During installation, Windows automatically creates the Boot File Path of WBM in the NVRAM and OS loader file path in the WBM's OS list. The UEFI Boot Manager launches the WBM and the WBM boots the OS loader with highest priority.
Though the OS loader name winload.efi is common for all Windows edition (7, 8, 10-preview), nonetheless each loader have a distinct boot file path as each windows edition must be installed on separate partitions in a multi-Windows system. Microsoft allows other OS to be installed only when its OS loader is signed by Microsoft. This ensures that other systems does not interfere with the UEFI Policy established by Microsoft.
The WBM will display the Windows OS list for the user to choose an OS – only if there are multiple OS installed. Otherwise, WBM will automatically boot the default OS loader, failing which it will launch the Windows Recovery Environment from the Recovery Partition. Windows RE contains all the necessary tools for Repair / Recovery / Restore / Change start-up settings. The properties of the Windows Boot Manager and OS loader(s) can be seen by executing the command bcdedit in command prompt.
The UEFI Boot Manager identifies the Bootloader in removable storages like DVD or USB Flash by the default boot file path <Drive name>\EFI\BOOT\BOOTX64.EFI which is then automatically booted. The bootloader will launch the Shell which can either be a GUI dashboard or the command line EFI Shell. This default bootloader path is automatically appended to the UEFI Boot List when the removable storage type is allowed with boot permission in the BCD.
The default boot file path ESP\EFI\BOOT\BOOTX64.EFI in the ESP of the Hard Drive is used by OSVs and OEMs for different purposes. Some OSV use it as the default Bootloader path without defining a boot path in NVRAM, some use it to boot the EFI Shell ( by re-naming the SHELLX64.EFI as BOOTX64.EFI ) and Microsoft use this as a Fallback Bootloader ( by holding a copy of bootmgfw.efi renamed to bootx64.efi ), in case the Windows Boot Manager path in the NVRAM is lost or damaged. Conflict can arise in a multi-OS system, if more than one OS tries to stake claim of this default boot file path.
User Mode:
The UEFI provides an EFI Shell as a command line interface for executing platform commands, scripting, running UEFI utility programs and also performs as a bootloader by being able to boot OS loaders. In fact, the platform command set can perform all the platform functions except being able to disable the security policy of the platform. In the embedded version, the EFI Shell must be added explicitly to the UEFI Boot List to enable it as a boot program. It can then be set as the first boot program in the boot list for launching by the UEFI Boot Manager, when it is necessary to manually choose an OS loader / UEFI application at system start. It can alternatively be set to boot last as a remedy option, in case of a system failure. Once in the boot list, the EFI Shell can also be manually booted at System Start from the shortcut Boot Menu (Boot List) activated by a BIOS specified keystroke, and then selecting the embedded /built-in /internal EFI Shell from the boot list.
In Windows 8.1 UEFI PC, the Command Prompt in Windows RE is used to run firmware commands, scripts and utility programs. Once WinRE boots in, it takes control of the platform replacing UEFI. You can get into the Windows RE from within Windows 8.1 through Start > PC settings > Update and recovery > Recovery > to the right beneath Advanced Start-up, click Restart now. The PC restarts to launch the Windows RE from the Recovery Partition. Alternatively you can use the Recovery Pen Drive, created through the Control Panel Recovery applet, to boot into the Recovery Environment. From the initial recovery screen, navigate to Troubleshoot > Advanced options > Command Prompt. If Windows Boot Manager in the ESP fails to boot an OS loader, it will automatically launch the Windows RE from the Recovery Partition. The Command Prompt is capable of performing more advanced system maintenance and repair tasks.
It should be noted that the Command Prompt has two separate existence. One runs in the Windows OS environment (C:\Windows\System32\CMD.EXE) and the other runs from Windows RE as a firmware shell as mentioned in the preceding paragraph. The CMD.EXE can run programs in the OS partition but cannot run programs in the ESP of the Hard Drive. The Windows RE Command Prompt is meant to run the firmware commands and scripts integrated to the Windows PE OS. Unlike the Intel EFI Shell, Windows RE is not an UEFI program and not in ESP, and therefore it cannot be set as a boot program in the UEFI Boot List of NVRAM. Instead the Recovery Pen Drive can be used to boot Windows RE at system start. This has the added advantage of being used as a boot device in case of a hard drive failure.
Setup Mode:
The UEFI BIOS has varying capabilities depending on the motherboard make and model. The UEFI BIOS setup screen can be Menu driven by mouse or a Shell interface which needs to be drilled through layers. The setup mode can be invoked at system start by a processor interrupt call via user keystroke. In Windows 8.1 OEM computers, the UEFI BIOS Setup can be started only through the Windows RE, which can be accessed as described above. In the Recovery Environment, navigate to Troubleshoot > Advanced options > UEFI Firmware Settings > press the Restart button and the computer will load the UEFI BIOS setup screen on restart.

The Boot Policy in UEFI BIOS is implemented by Enable/Disable switches for UEFI Boot, (CSM/Legacy/BIOS) Boot and Secure Boot in the UEFI BIOS boot menu settings, which must be set according to the Partition Table on the Hard Disc Drive. The standard combinations are UEFI Boot on GPT partition and Legacy Boot on MBR partition. Secure Boot can optionally be coupled with UEFI Boot to allow only signed drivers to execute in the UEFI Firmware.
While Windows 7 has had support for the Unified Extensible Firmware Interface (UEFI), the standard method for booting remained as legacy BIOS. This is because Microsoft did not endorse UEFI as a partner program or projected Windows 7 as UEFI compatible, and most people were unaware of the existence of UEFI on platforms which emulated as Legacy BIOS.
This changes with Windows 8, with UEFI being the new standard for Platform Firmware and is mandated as part of Windows 8 certification requirement for OEM PCs manufactured under Windows 8 Logo program. Windows 8 continues to support Legacy BIOS for installation on PCs with MBR partition. MBR/GPT partition can be used when total disc space is less than 2TB. For space greater than 2TB, GPT partition is a must.
In a Windows 8 UEFI computer, the UEFI BIOS can be user configured for the following possible Boot scenarios:
(i) With UEFI Boot = enabled and Legacy Boot = enabled, the firmware will first attempt to boot through UEFI without secure boot, failing which it switches to Legacy BIOS boot. This configuration can be used for assembled computers with Dual OS of which one is UEFI compatible and the other is not.
(ii) With UEFI Boot = enabled and Secure Boot = enabled, the firmware permits only Secure UEFI boot, by validating the signature of all software components executing within UEFI. Booting will get terminated if signature validation fails at any point. This configuration is intended for Windows 8 laptops where the hardware remains permanently sealed.
(iii) With UEFI Boot = disabled and (CSM/Legacy/BIOS) Boot = enabled, the computer will boot into a BIOS environment. Meant for computers using MBR partition, like older PCs upgrading to Windows 8.
You can enable / disable Secure Boot with UEFI Boot. Legacy Boot will automatically get enabled, Either if UEFI Boot Or if Secure Boot is disabled. This is because Legacy Boot must become the default boot without UEFI Boot, and Legacy Boot must act as an alternative to the UEFI Boot without Secure Boot.
The choice for UEFI Boot OR Legacy Boot must be set prior to Windows 8 installation, depending on the MBR/GPT Hard Drive partition table to be used. After installation they must not be changed. Changing them will not allow the system to boot.
The EFI Shell / Command Prompt can also be used to configure the BCD and Boot Policy by running the platform boot configuration commands in User Mode.
To ascertain the type of Platform Firmware on a Windows 8 computer, open Run ( WinKey+ R ), type "msinfo32" and click OK. This opens the System Information window. Select System Summary (on the left panel) and check for the Items "BIOS Mode" and "Secure Boot State". The BIOS Mode value can be UEFI/Legacy, and the Secure Boot State value can be On/Off when UEFI Mode and Unsupported when Legacy Mode.
INSTALL Windows 8.1 on UEFI
UEFI BIOS boot settings is specific to an OS and must prelude to the OS installation. For UEFI Boot, it is essential that the Motherboard, Processor, HDD Partition Table and the OS conform to 64-bit operation. UEFI Boot will not be possible, if any of these component is not 64-bit compliant. Further if a DVD media is used for OS installation, the DVD drive must also be 64-bit capable.
The Motherboard is implicitly 64-bit if it has an UEFI BIOS ROM. Just need to ensure that a 64-bit processor is in place.
The Windows 8.1 installer media is now available for download - free of restrictions, from the Microsoft website (http://windows.microsoft.com/en-us/windows-8/create-reset-refresh-media) which can be installed with a product key that must be entered at the very start. The original method to update a PC from an earlier version of Windows to Windows 8.1 remains (http://windows.microsoft.com/en-in/windows-8/upgrade-assistant-download-online-faq). A 64-bit version is the one required for UEFI Boot.
Finally the Hard Drive must have GPT partition, which is actually a standard developed for UEFI of being 64-bit. Since BIOS boot is possible only with 32-bit MBR partition table, GPT partition allows BIOS boot by reserving its first sector with MBR type data called Hybrid MBR. Hybrid MBR allows you to address 2TB Hard Disk space and additional space beyond 2TB will be in GPT partitions which cannot be used by a BIOS based system. The only situation that demands Hybrid MBR partition scheme, is when a machine must support dual boot for a UEFI system alongwith a legacy BIOS system.
During installation, Windows creates a GPT EFI System Partition (ESP) for UEFI Boot Or a MBR System Partition (SP) for Legacy BIOS Boot. ESP/SP contains the Windows Boot Manager (WBM) and other firmware programs which are concealed and isolated in both the partition types. WBM in ESP/SP loads the Windows OS loader winload.efi / winload.exe respectively from the OS Partition.
The following table summarises the firmware possibilities:
| Platform bit |
Windows 8.1 installer bit |
HDD Partition Type |
UEFI BIOS Boot Setting |
Firmware Installation |
Boot Method |
| 64 | 64 |
GPT (64-bit) |
BIOS (16-bit) |
= Legacy BIOS |
BIOS > Hybrid MBR > WBM in SP > winload.exe |
| 64 | 64 |
GPT (64-bit) |
UEFI (64-bit) |
= UEFI (Standard) |
UEFI > WBM in ESP > winload.efi |
| 64 | 64 |
MBR (32-bit) |
BIOS (16-bit) |
= Legacy BIOS (Standard) |
BIOS > MBR > WBM in SP > winload.exe |
| 64 | 64 |
MBR (32-bit) |
UEFI (64-bit) |
UEFI on MBR is an invalid combination |
|
| 32 | 32 |
GPT (64-bit) |
UEFI (32-bit correspond to Windows bit) |
= 32-bit UEFI |
UEFI > WBM in ESP > winload.efi |
64-bit UEFI is the mainstream firmware for development into future. 32-bit UEFI systems is in phase-out state, and are no longer supported by many device and software vendors. However Windows 8 has support for 32-bit UEFI, but this needs to be ascertained when deployed with other device firmware and software programs.
-----
Ensure that the latest UEFI BIOS for the motherboard is installed. Open UEFI BIOS > Boot settings, Disable CSM/Legacy Boot, Enable both UEFI Boot and Secure Boot. While enabling Secure Boot, ensure to choose the command which loads Secure Boot database with the trust keys (PK, KEK, db, dbx) and the command which installs the Platform Key. If you do not find any of the above Boot switches in UEFI BIOS, then your motherboard isn't UEFI compatible. The exact procedure varies, as UEFI BIOS is specific to a motherboard make and hardware type. You must read the UEFI BIOS documentation carefully and follow the steps mentioned for UEFI configuration.
Insert the Windows 8 installation disc and boot the PC. Press the appropriate key to enter the UEFI BIOS setup and verify that the Secure Boot Key Databases and the Platform Key are installed. Ensure that the Optical Drive is set as the first device in the Boot Order. Re-boot and press any key to boot from the DVD disc for the installation process to begin. To boot from a Flash Drive, <USB Boot> and <Boot USB Devices First> options should be enabled, in the boot menu of the UEFI BIOS setup. The setting for enabling USB device boot has variations according to the firmware make.
As the Windows Installer boots, choose Custom Installation (advanced) > click Drive options (advanced) which will open the commands for managing partitions > Delete all partitions (if any) on the Hard Disc so that entire Drive(0) appears Unallocated > Select the Unallocated drive and click New (partition) > click Apply button next to the entire disk size displayed in a text box > click Next > click OK on the Dialog Box which prompts that Windows might create additional partitions. Windows 8 will create 4 partitions in GPT structure.
Partition 1: Recovery (300MB NTFS) contains the Windows RE tools to repair Windows or modify the firmware settings. As with all editions of Windows, this Windows RE partition must be in NTFS format.
Partition 2: System (100MB FAT32) contains the Windows 8.1 UEFI extensions - applications, device drivers, Windows Boot Manager files and other programs that are intended to be run before the operating system is booted. This partition is also
known as EFI System Partition or ESP. The contents of this partition are sequestered.
Partition 3: MSR (128 MB) Microsoft Reserved Partition is used by the Windows 8 OS and cannot be accessed by User.
Partition 4: Primary (min. 20 GB for Windows and 10 GB free space, NTFS) Windows OS partition. The partition size will depend on the capacity of your Disk (0).
Unallocated (Remaining Space) for User Data.
Windows having created these 4 partitions in GPT, is a definite precursor of UEFI been configured for the installation to follow.
Select the Partition 4: Primary and click Next for the Windows installation to begin. Follow the prompts and provide the necessary inputs for the installation to complete.

Note: In MBR/BIOS partition scheme, the Windows RE tools are included in the System Partition formatted in NTFS.
Finally one word of caution ! In an assembled Windows 8 UEFI computer, it is highly probable that some of the hardware devices will not work, as their Driver/ OptionROM are not Windows 8 UEFI compliant and therefore not in the Allowed Signature database. This stringent signature policy demands Windows 8 PC to be manufactured in a standardised process.
As an example, installing Windows 8.1 from a DVD on an UEFI Platform with Secure Boot will not be possible if the storage controller (driver) embedded in the Optical Drive Firmware is not signed and authenticated by the Platform. Starting Windows 8, Microsoft has also withdrawn native support to DVD firmware and programs, thereby shifting the entire DVD framework on to the DVD manufacturer.
In such a situation, the only alternative to get the PC working, is to disable the Secure Boot in the UEFI BIOS. Disabling the Secure Boot followed by re-enabling it, regenerates the trust keys in the signature database. This offers a possibility to add the trust key of a newly connected hardware device.
In fact, it is a better strategy to install Windows UEFI with Secure Boot disabled. It can subsequently be enabled after successful Windows UEFI installation, and ascertain the working of all Hardware Devices.
After installation you can verify the nature of Platform Firmware through Windows "System Information" ( Run> msinfo32 ). The "BIOS mode" value will show as UEFI.
The Future of UEFI: Microsoft is actively pursuing UEFI and Secure Boot as it holds the possibility of Laptops and Tablets becoming a thin client with the Windows operating system stationed in the cloud (Server). Windows 8.1 has already taken a step in this direction by facilitating document storage on OneDrive and integrating this on to the File Explorer. MS Office is made available online at www.Office.com, with a free to use edition called Office Online. Office Online is also linked to Outlook webmail user account. The Office Online icon is represented by a dotted square box on the top-left corner of Outlook.com mailbox. Documents created from Office Online gets saved in your OneDrive automatically, which can then be accessed from any device.
I hope you had the patience to read through a very detailed write-up.
Regards,
Sushovon Sinha
