
Technical Level:; Advanced
Objectives :
1. Adding compatible portable applications like Hwinfo64.exe or Diskinfo64.exe ( any one application only) these two applications are fully compatible
with the WinRE.wim file and WinPE.wim file (boot.wim)
2. Creating AddDiagnosticsToolToBootMenu.xml file with encoding as UTF-8
3. Creating WinREConfig.xml file with encoding as UTF-8
Tools needed:
1. Dism application which is builtin on windows 11
2. Diskinfo64.exe portable application which is included in CrystalDiskInfo8_16_4.zip file, CrystalDiskInfo8_16_4.zip can be downloaded from here
and unzip the file.
3. Delete the following file from this folder "CrystalDiskInfo8_16_4"
diskinfo32.exe
diskinfoA64.exe
Steps to be followed :
1. Create WinREConfig.xml using notepad, I created it for you, open the notepad application copy and paste the below lines, and save it as
WinREConfig.xml to desktop. Use encoding as UTF-8.
<?xml version="1.0" encoding="utf-8"?>
<!-- WinREConfig.xml -->
<Recovery>
<RecoveryTools>
<RelativeFilePath>Diskinfo64.exe</RelativeFilePath>
</RecoveryTools>
</Recovery>

2. Create AddDiagnosticsToolToBootMenu.xml using notepad, I created it for you, open the notepad application copy and paste the below lines,
and save it as AddDiagnosticsToolToBootMenu.xml to desktop. Use encoding as UTF-8.
<?xml version="1.0" encoding="utf-8"?>
<!-- AddDiagnosticsToolToBootMenu.xml -->
<BootShell>
<WinRETool locale="en-us">
<Name>Crystal Disk Information App</Name>
<Description>Checking SMART Status on SSD and HDD</Description>
</WinRETool>
</BootShell>

3. Assign a drive letter to the Windows recovery partition, if windows 11 is installed by using a windows bootable USB pen drive.
if the recovery partition is created in a different partition and not in the Windows partition.
recovery partition 4 on disk no 2
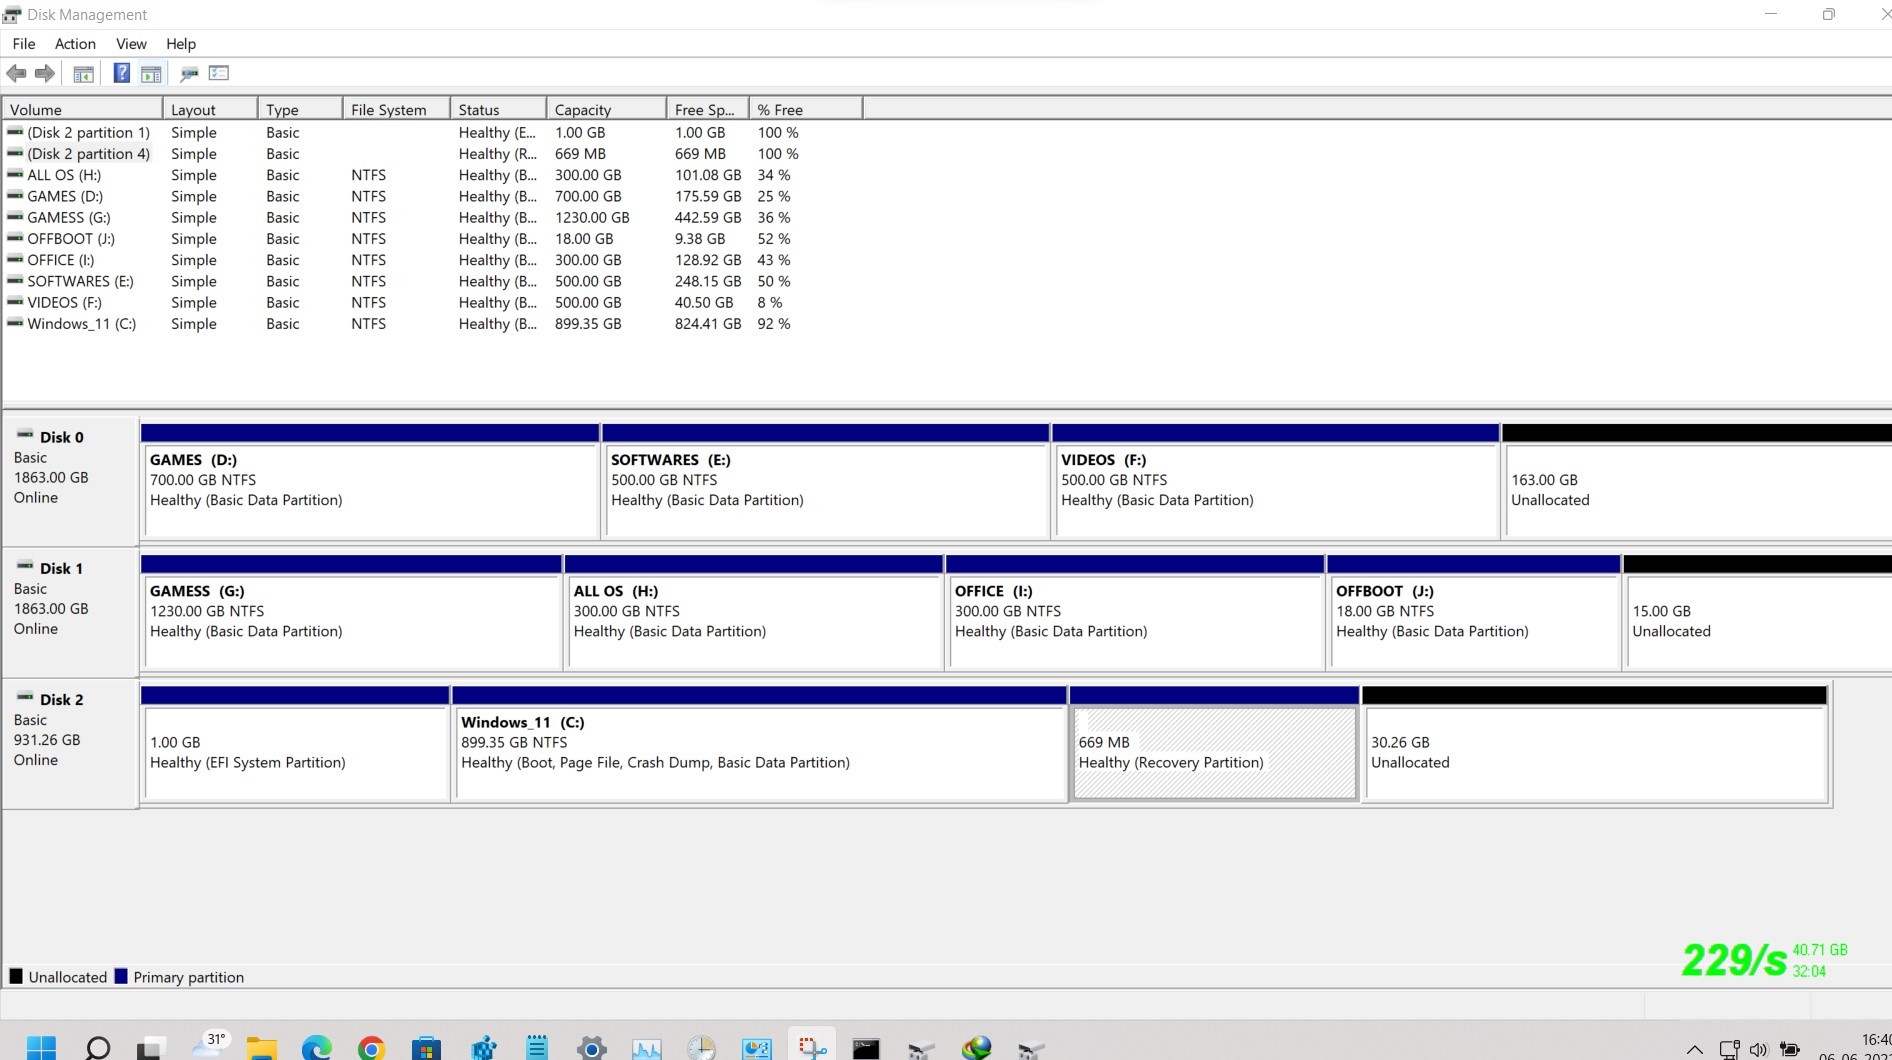
Before unhiding the recovery partition, this does not show in my computer.

Execute command prompt application with administrator rights
type diskpart and press enter
list disk
sel disk 0 ( select no 0, if you using only one disk)
list par
sel par 4 ( see that partition is hidden and its format type as NTFS )
assign letter=R
exit


5. Disable the Recovery partition by using the below command. Execute command prompt application with admin rights
Reagentc.exe /disable
Now the Recovery partition is showing on my computer
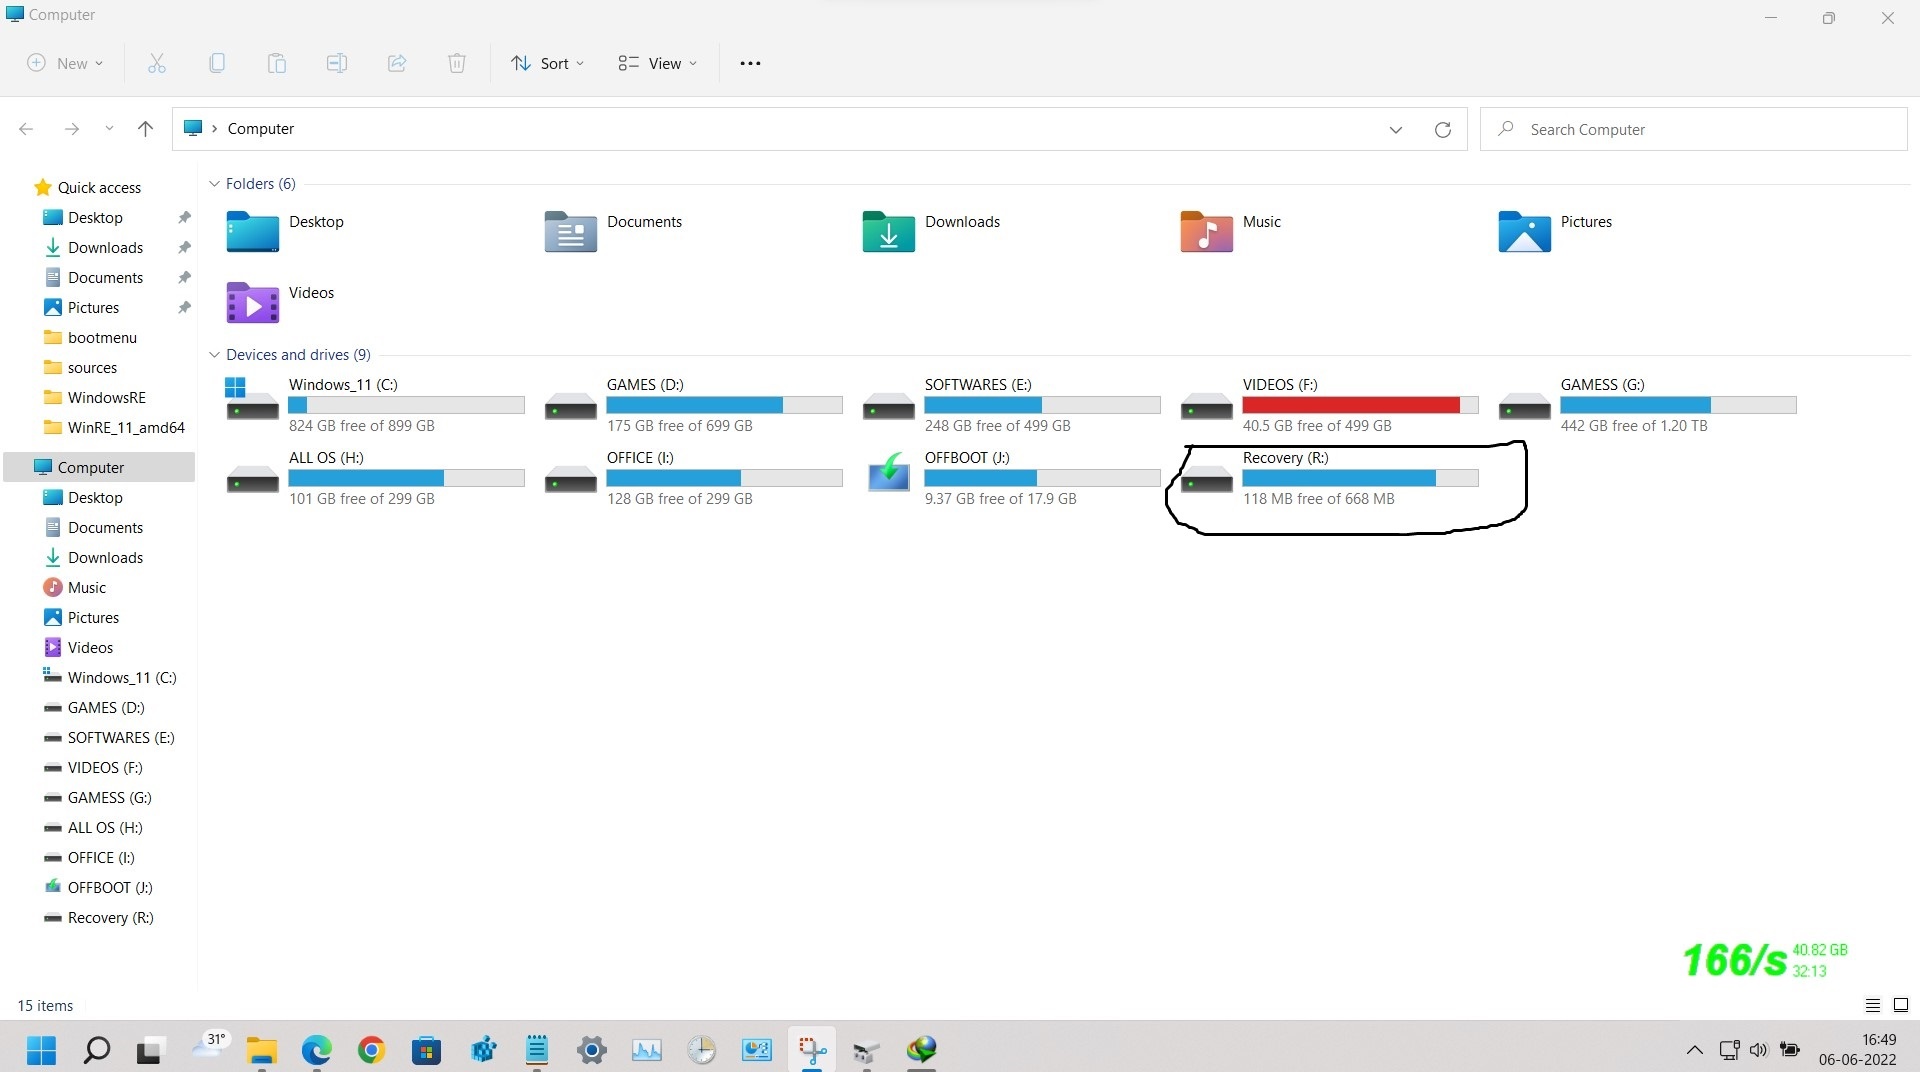
6. Unhide the contents of the Recovery partition. Execute command prompt application with admin rights
attrib -h -r -s /s /d R:\Recovery\*.*
attrib -h -r -s /s /d R:\Recovery\WindowsRE\*.*
7. Create a new folder "WinRE_11_amd64" in C:\
7a. Create a new folder "Temp" in C:\
8. Create a new folder "media" in C:\WinRE_11_amd64\
9. Create new folder "sources" in C:\WinRE_11_amd64\media\
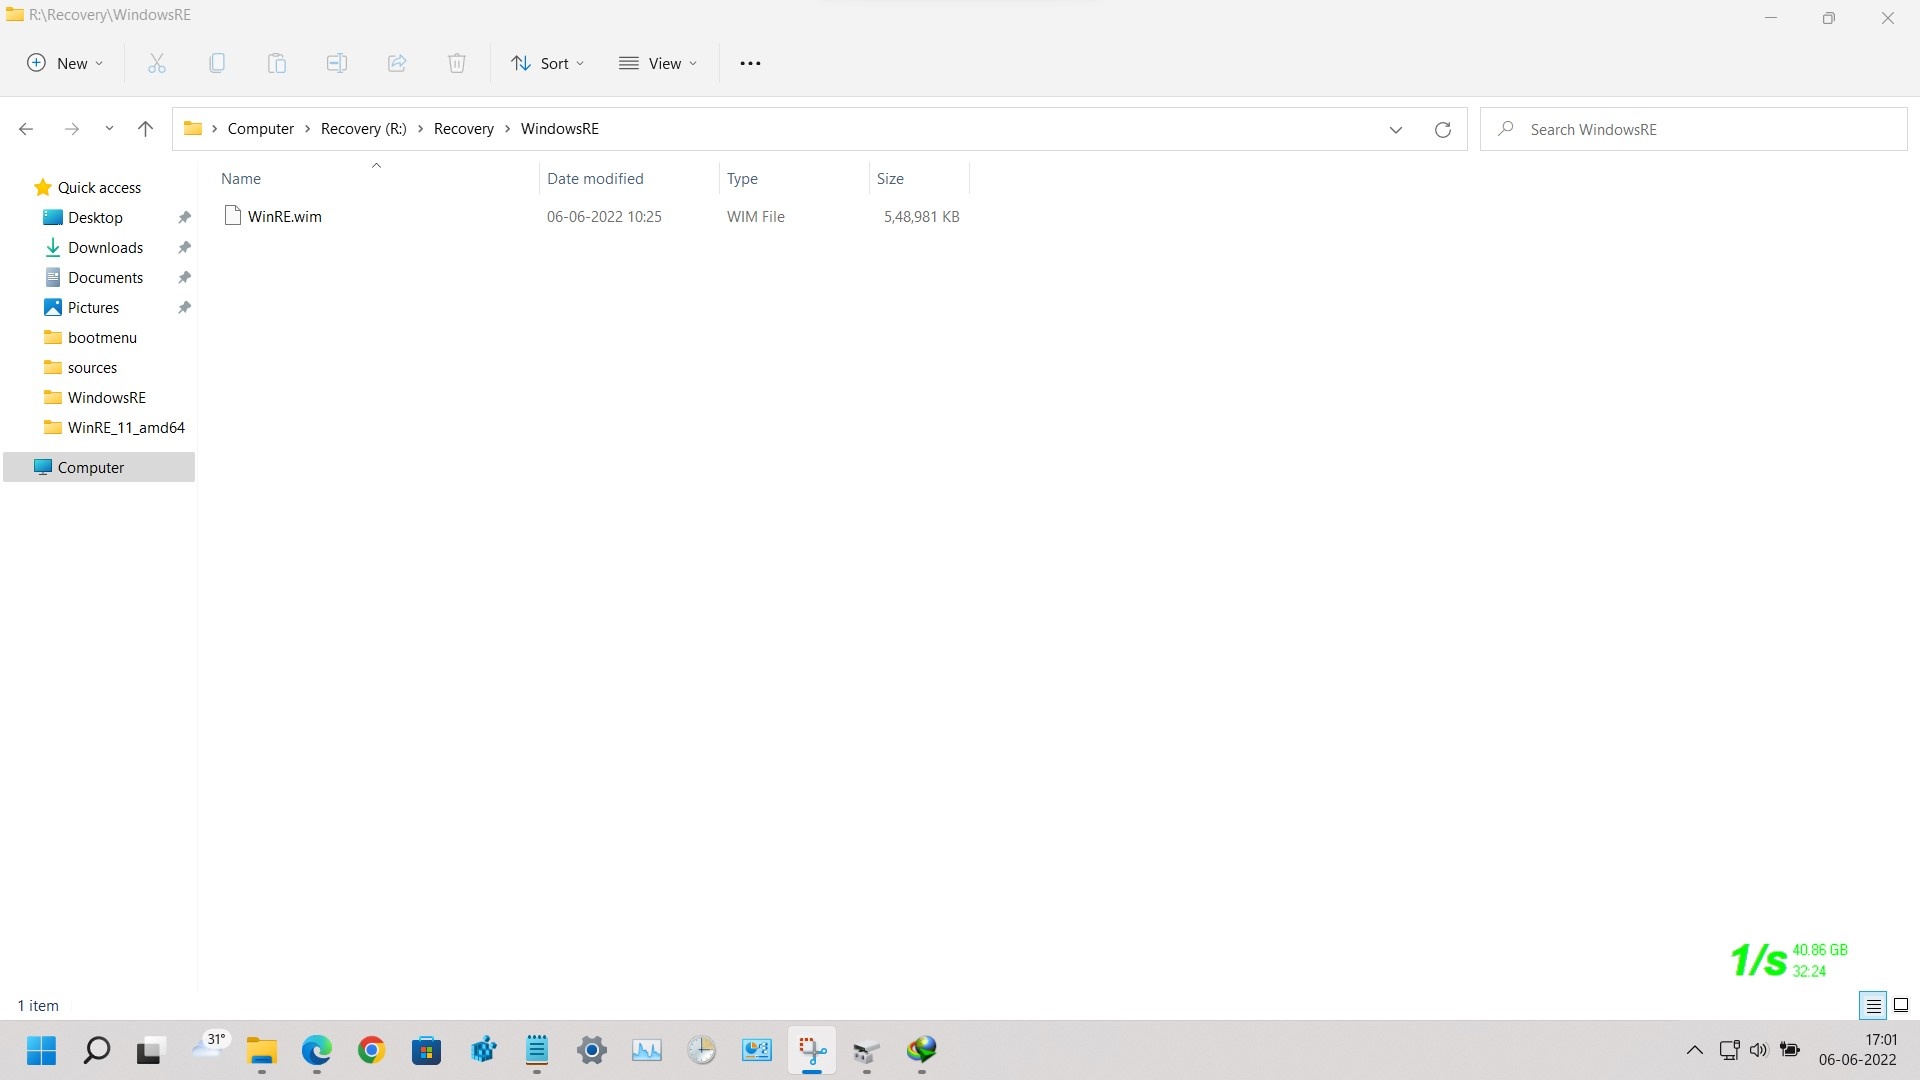
10. Copy the "WinRE.wim" file to C:\WinRE_11_amd64\media\sources\ and rename WinRE.wim to boot.wim
10a. For security purposes, backup this "WinRE.wim" file to the D: partition
11. Mount the "boot.wim" file. Execute command prompt application with admin rights.
Dism.exe /Mount-Image /ImageFile:"C:\WinRE_11_amd64\media\sources\boot.wim" /index:1 /MountDir:"C:\WinRE_11_amd64\mount" /Optimize /checkintegrity

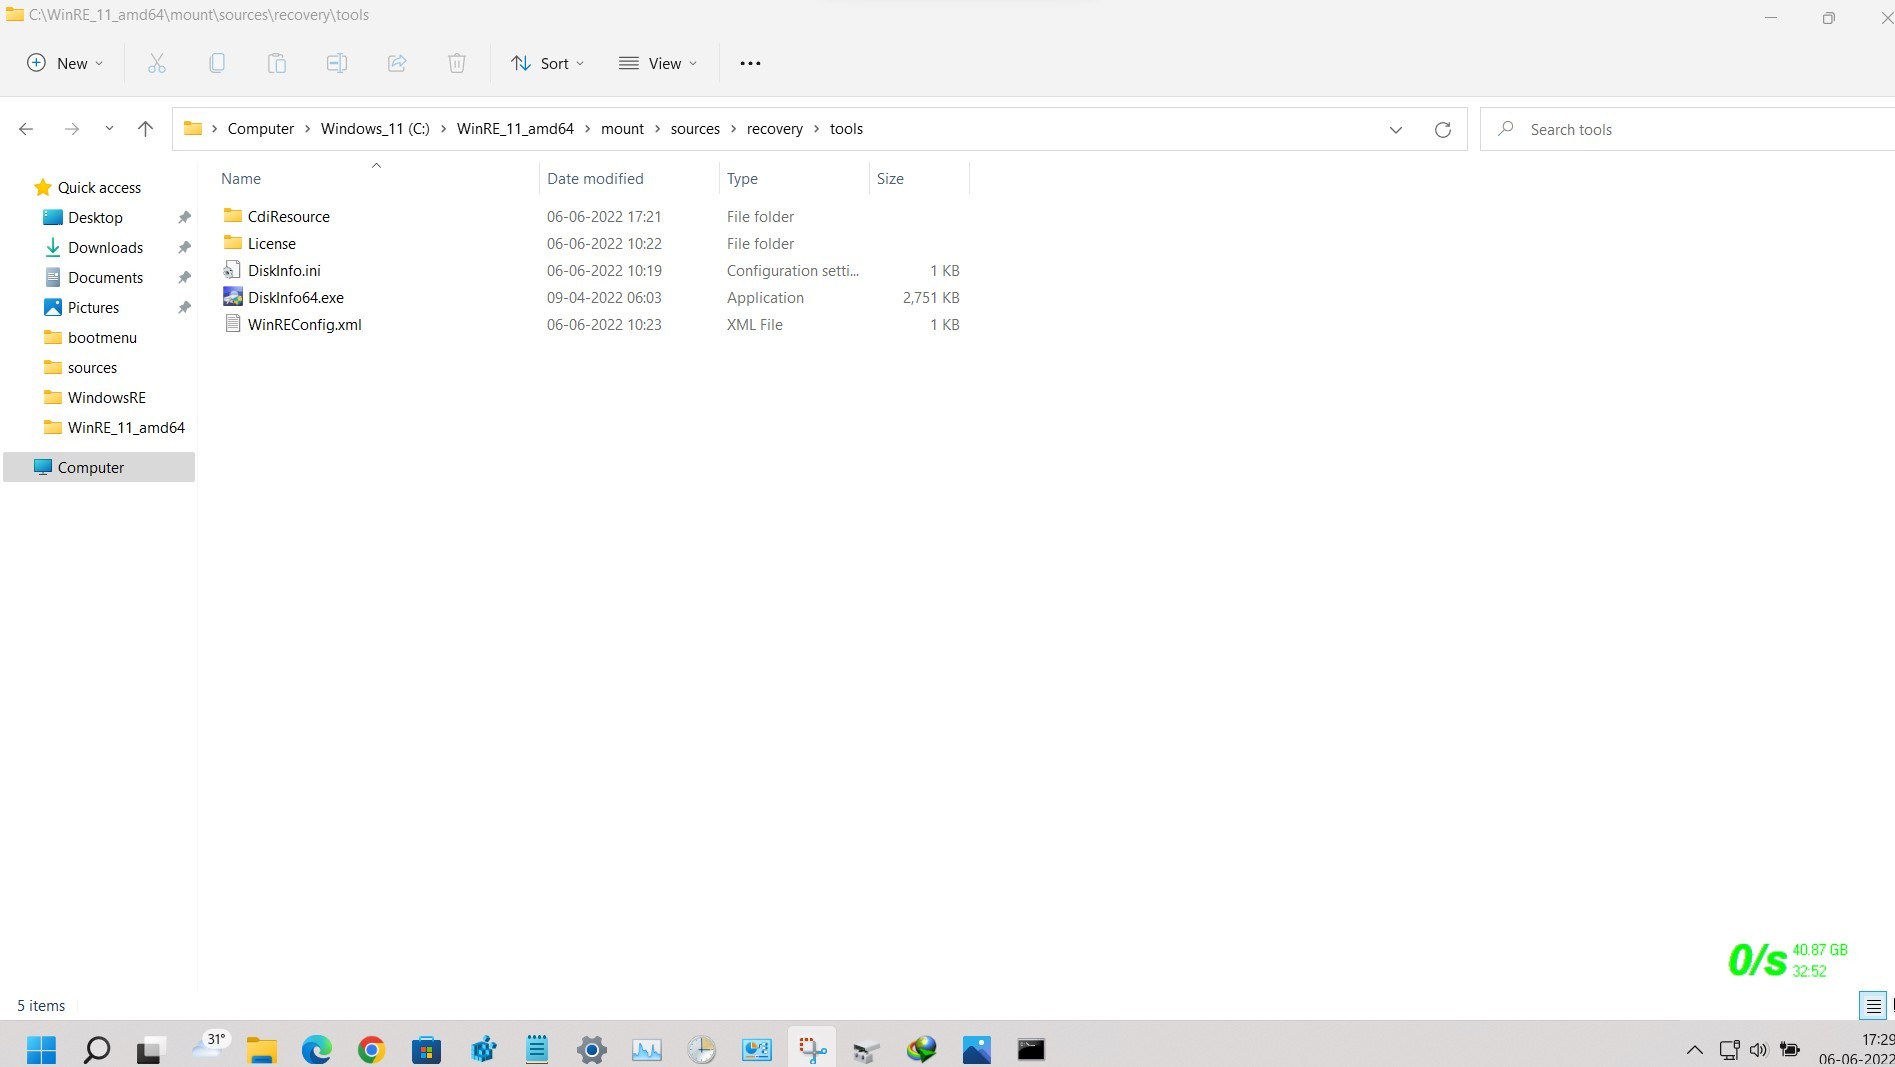
12. Create new folder "tools" to C:\WinRE_11_amd64\mount\sources\recovery\
13. Copy "WinREConfig.xml" file to C:\WinRE_11_amd64\mount\sources\recovery\tools\
14. Copy "CdiResource" folder to C:\WinRE_11_amd64\mount\sources\recovery\tools\
15. Copy "License" folder to C:\WinRE_11_amd64\mount\sources\recovery\tools\
16. Copy "Diskinfo.ini" file to C:\WinRE_11_amd64\mount\sources\recovery\tools\
17. Copy "Diskinfo64.exe" file to C:\WinRE_11_amd64\mount\sources\recovery\tools\
18. Reducing the size of the Components in "boot.wim" file
Dism.exe /Cleanup-Image /Image:C:\WinRE_11_amd64\mount /StartComponentCleanup /Resetbase /ScratchDir:C:\Temp
19. Set Target path to X:\
Dism.exe /image:"C:\WinRE_11_amd64\mount" /Set-TargetPath:X:\
20. Unmount "boot.wim" file.
Dism.exe /UnMount-image /mountdir:C:\WinRE_11_amd64\mount /commit

21. Cleanup Cleanup-MountPoints from all partitions
Dism.exe /Cleanup-MountPoints
Dism.exe /Cleanup-Wim
22. Cleanup Mounted points registry keys
Reg.exe delete "HKLM\SOFTWARE\Microsoft\WimMount\Mounted Images" /f

23. Exporting image with verification and with integrity from "boot.wim" file,
Dism.exe /Export-Image /SourceImageFile:"C:\WinRE_11_amd64\media\sources\boot.wim" /SourceIndex:1 /DestinationImageFile:"C:\WinRE_11_amd64\media\sources\boot2.wim" /bootable /checkintegrity
24. Deleting unexported "boot.wim" file.
Del "C:\WinRE_11_amd64\media\sources\boot.wim"
25. Rename "boot2.wim" to "boot.wim" and Renaming "boot.wim" to "WinRE.wim"
Ren C:\WinRE_11_amd64\media\sources\boot2.wim boot.wim
Ren C:\WinRE_11_amd64\media\sources\boot.wim WinRE.wim
26. Create a new folder "bootmenu" in R:\Recovery\
27. Copy "AddDiagnosticsToolToBootMenu.xml" file to R:\Recovery\bootmenu\

28. Delete the old "WinRE.wim" file from R:\Recovery\WindowsRE\ using the command prompt application
del "R:\Recovery\WindowsRE\WinRE.wim"
29. Copy "WinRE.wim" file from C:\WinRE_11_amd64\media\sources\WinRE.wim to R:\Recovery\WindowsRE\
30. Register "WinRE.wim" to Windows Recovery Partition by using the Reagentc.exe application. Close all running applications in all partitions, temporarily disable windows defender and close all opened folders.
Execute command prompt application with admin rights.
Reagentc.exe /SetReImage /path R:\Recovery\WindowsRE /target C:\Windows
Reagentc.exe /SetBootShelllink /Configfile R:\Recovery\BootMenu\AddDiagnosticsToolToBootMenu.xml
Reagentc.exe /Enable /target C:\Windows
Reagentc.exe /Info /target C:\Windows

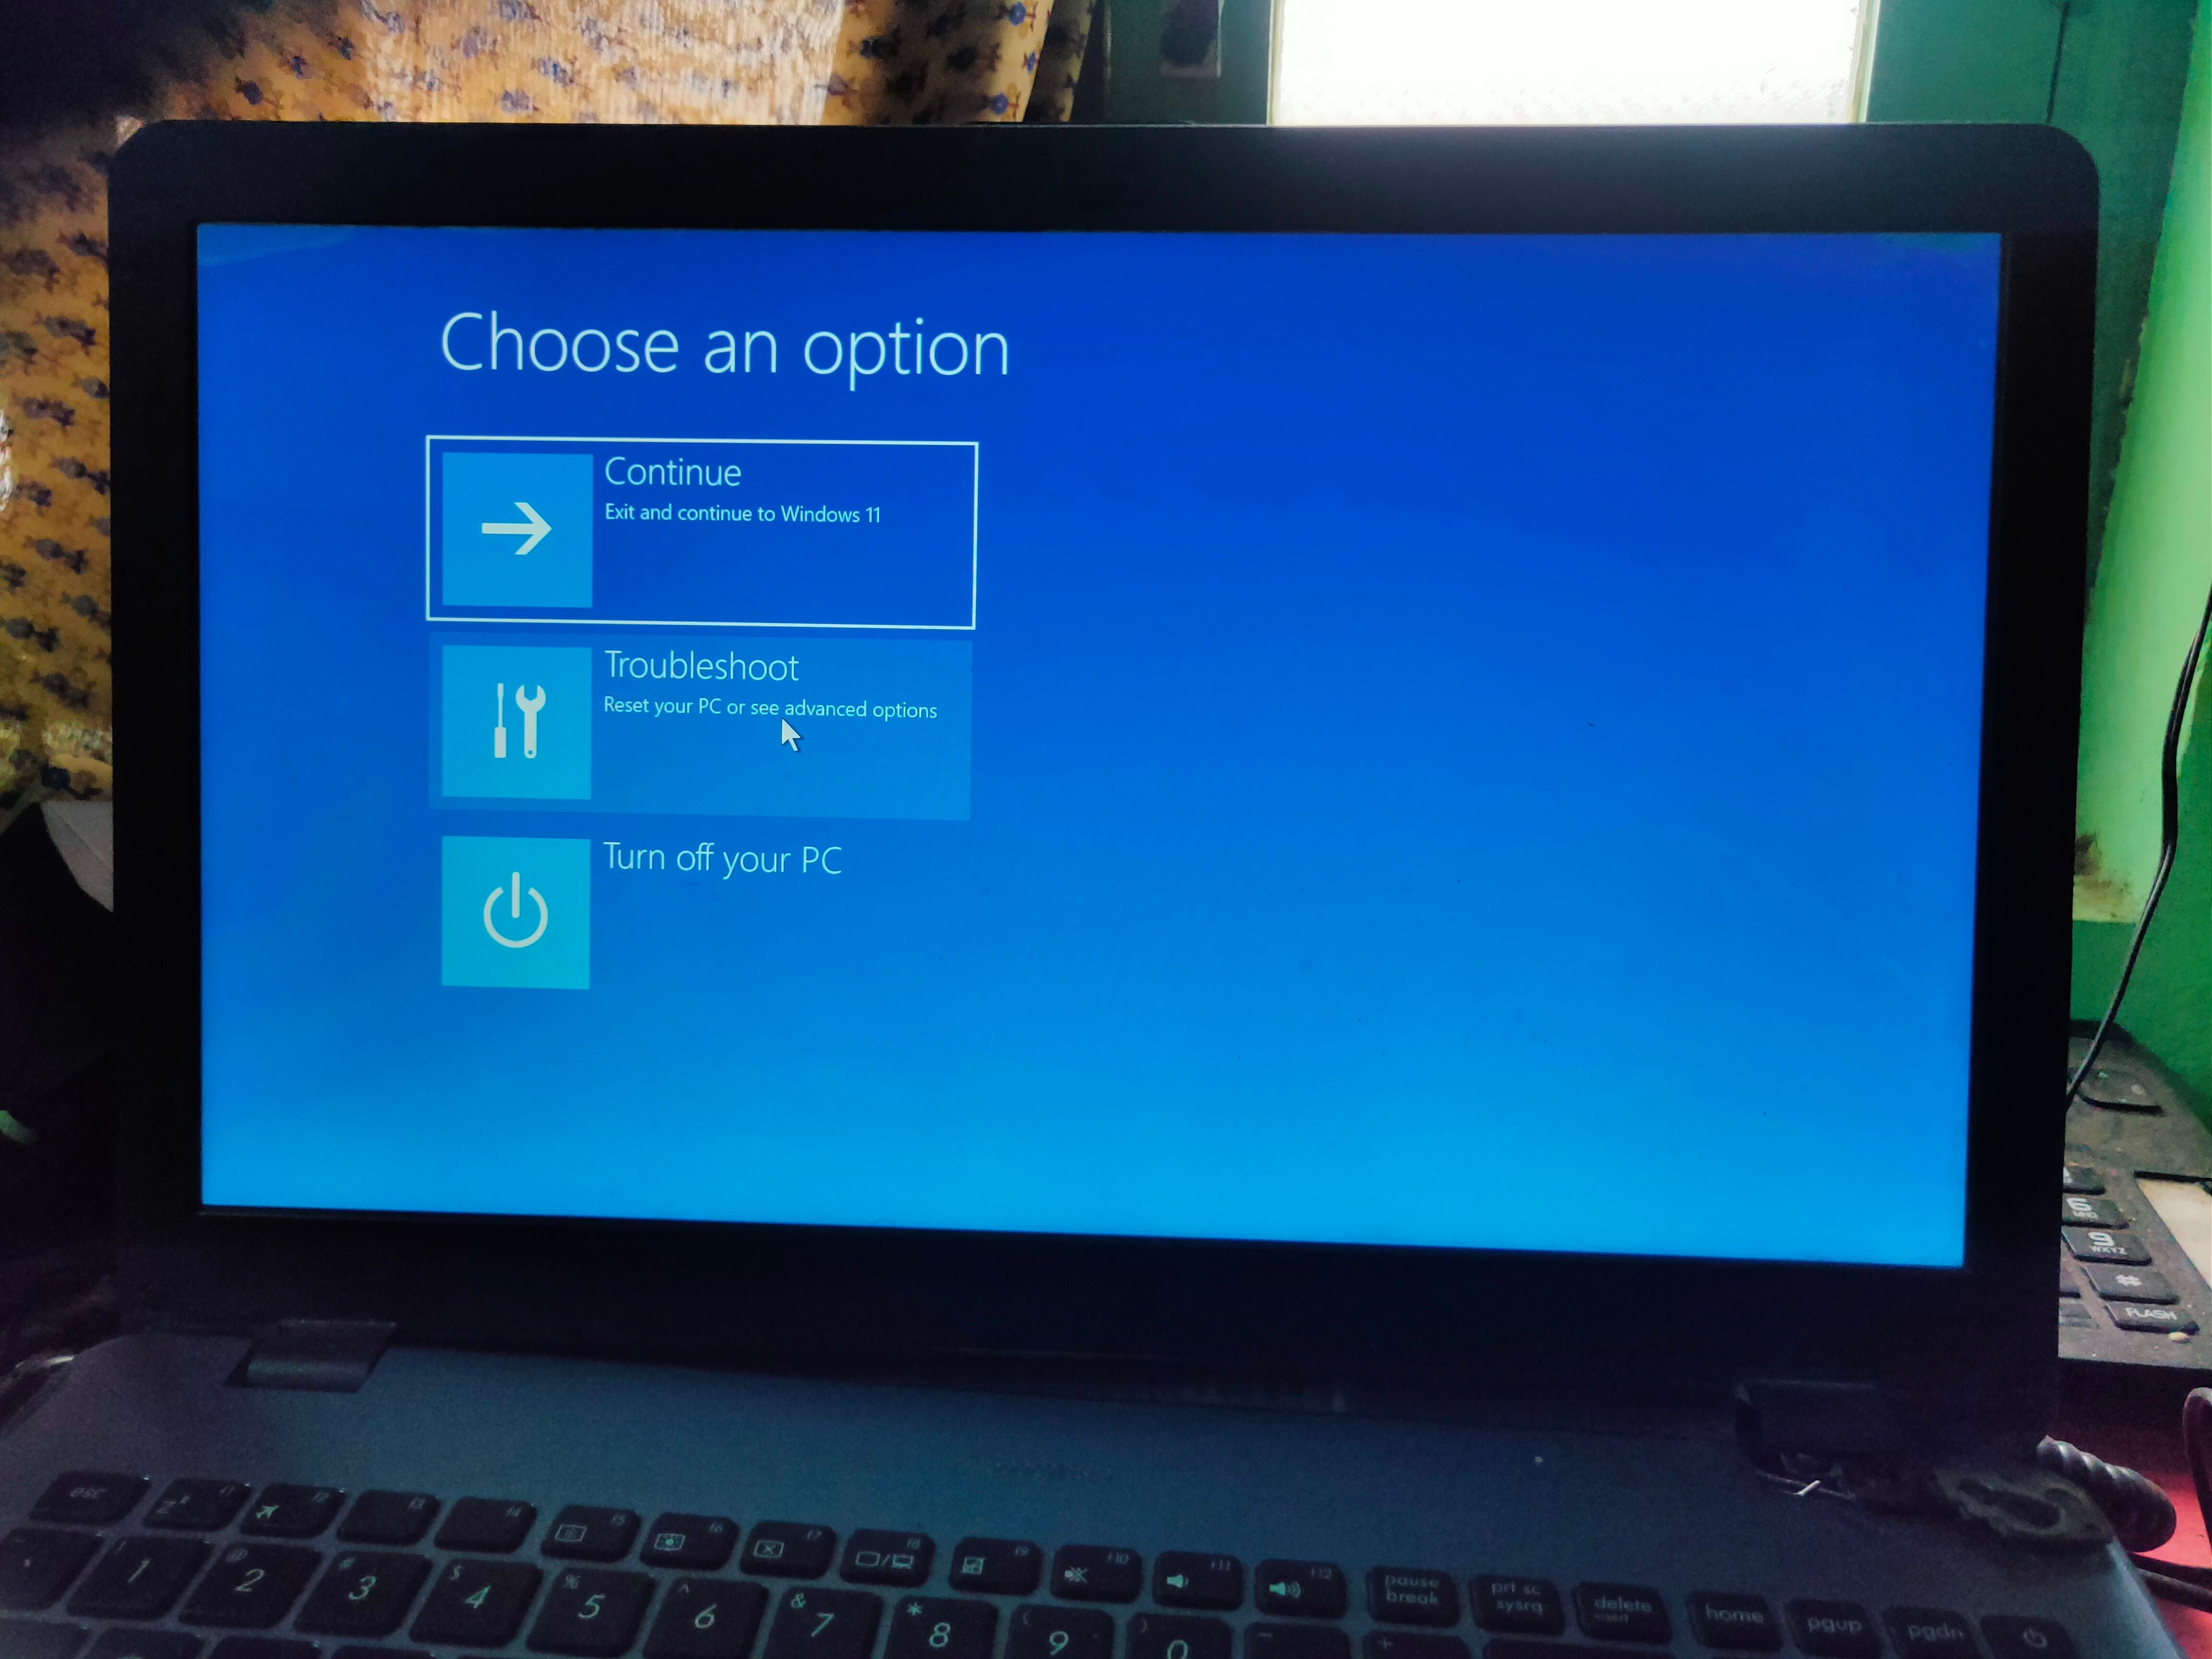
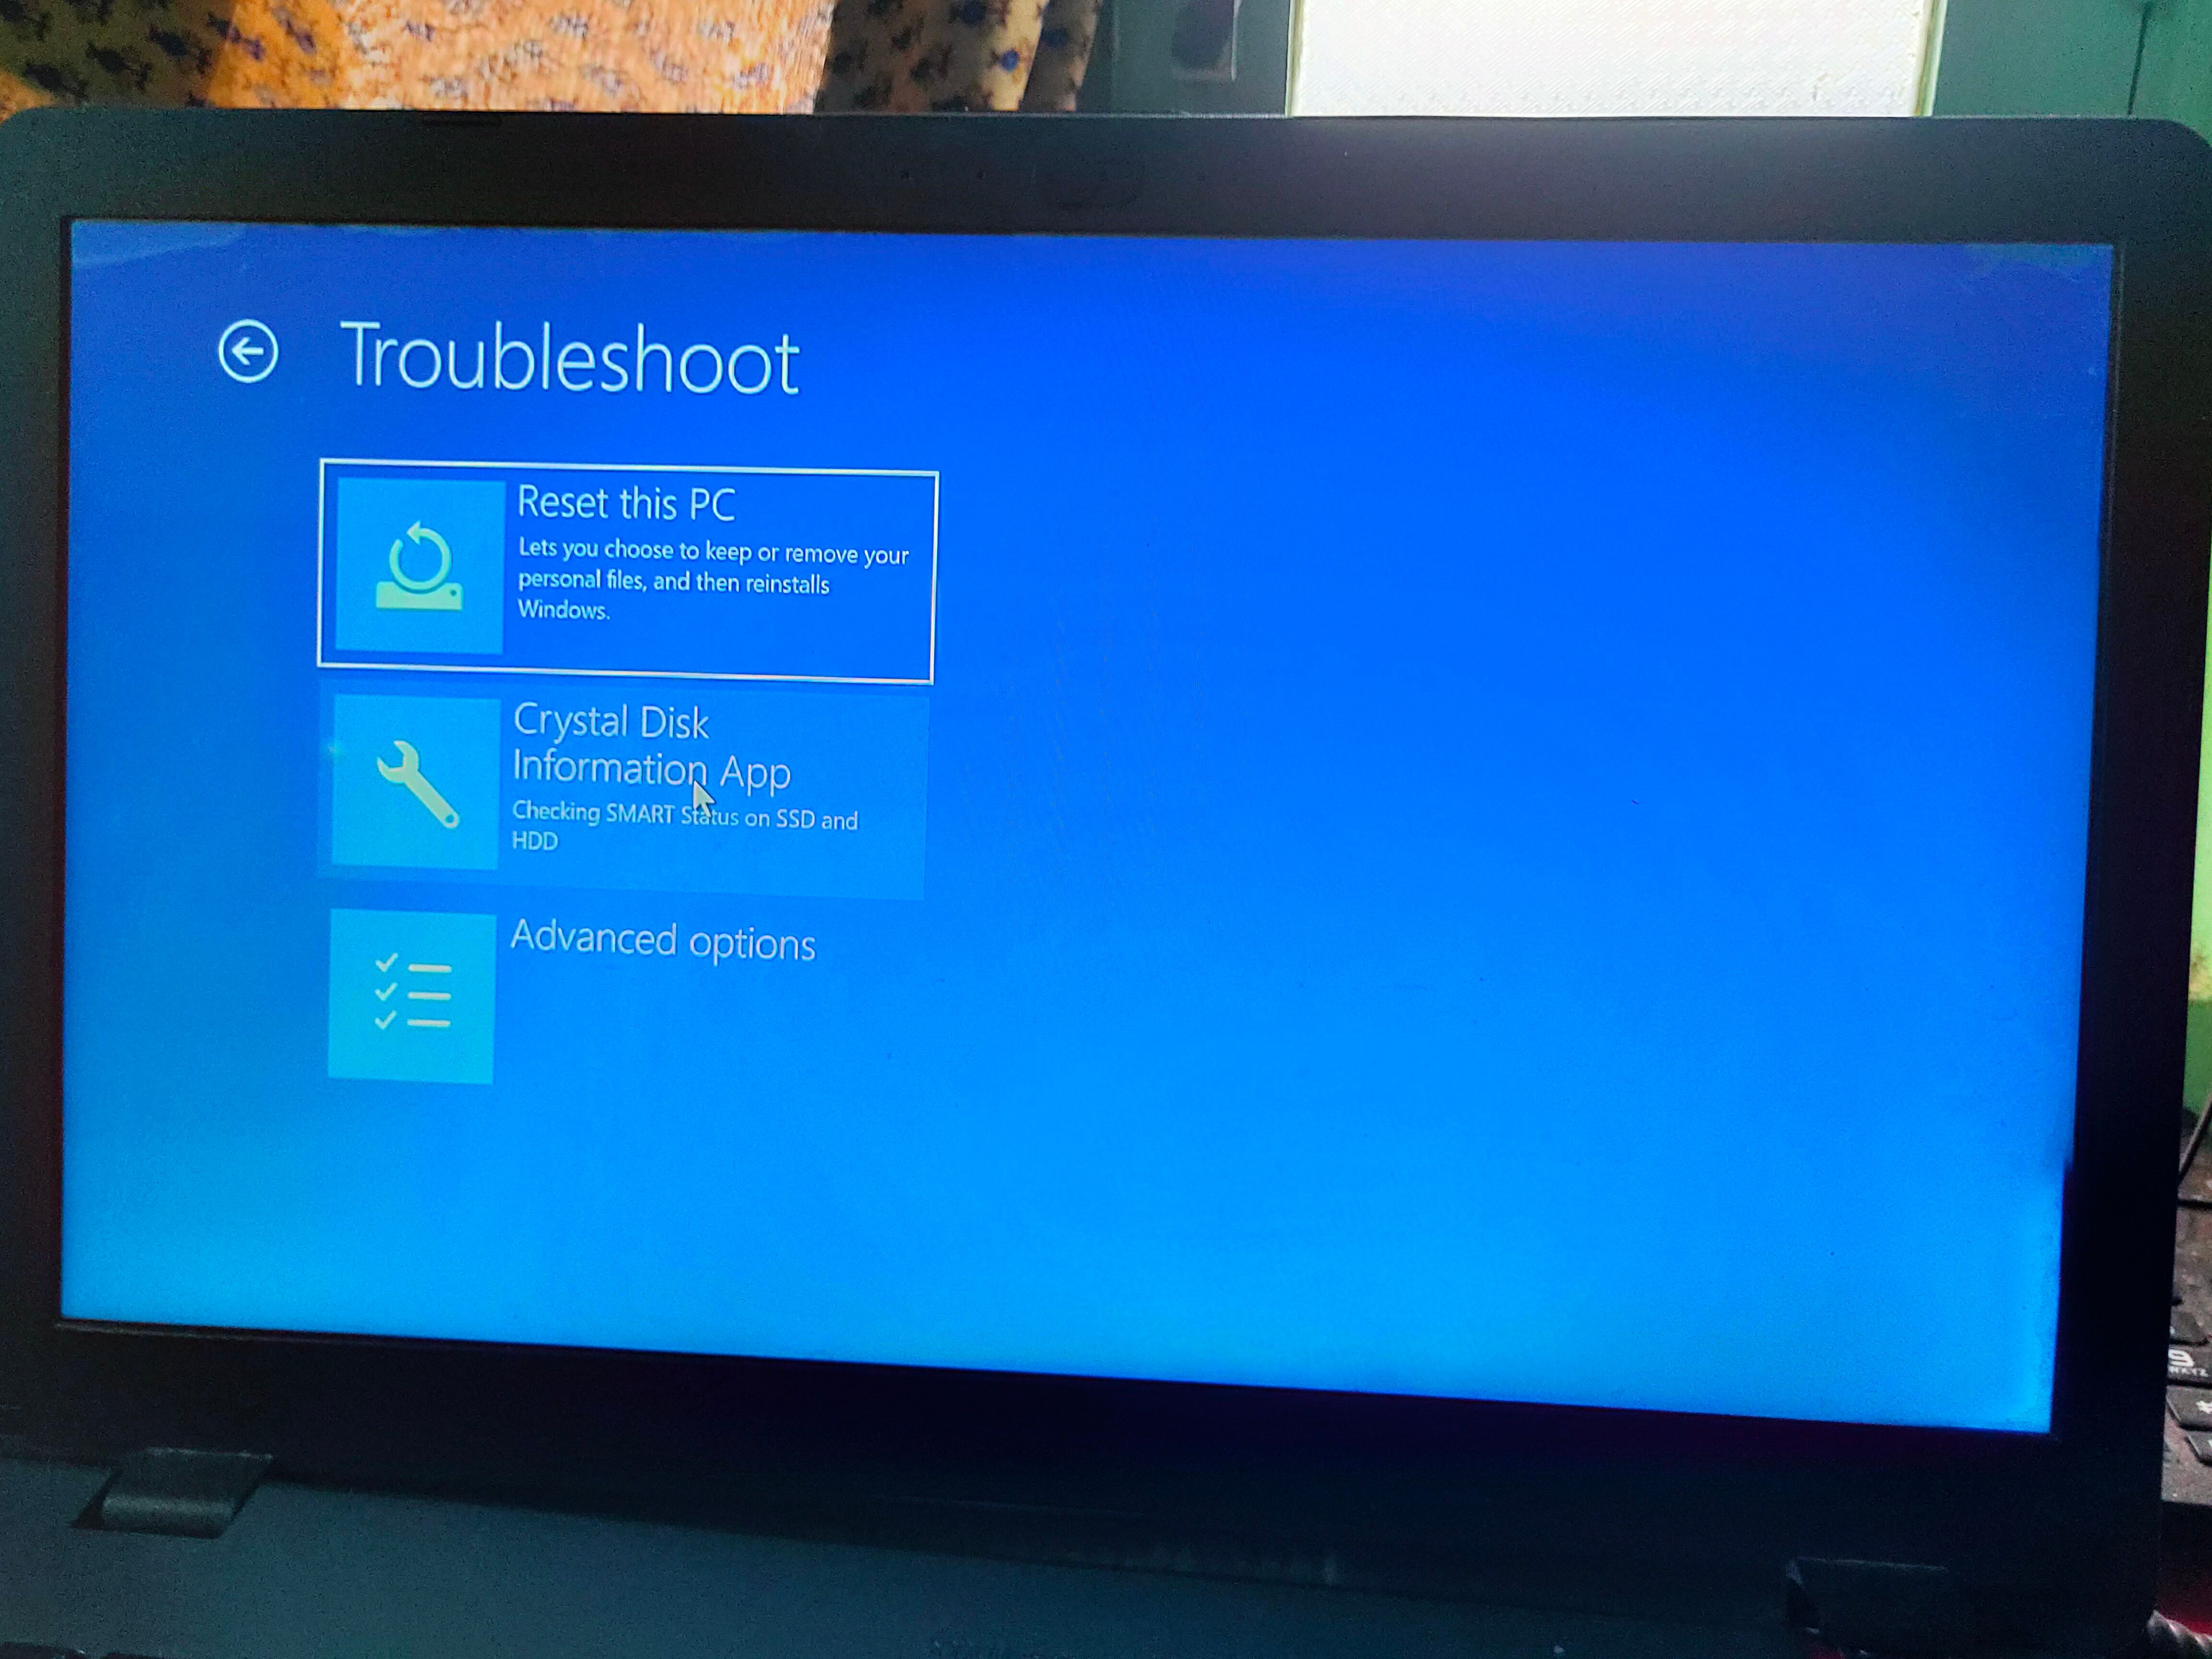
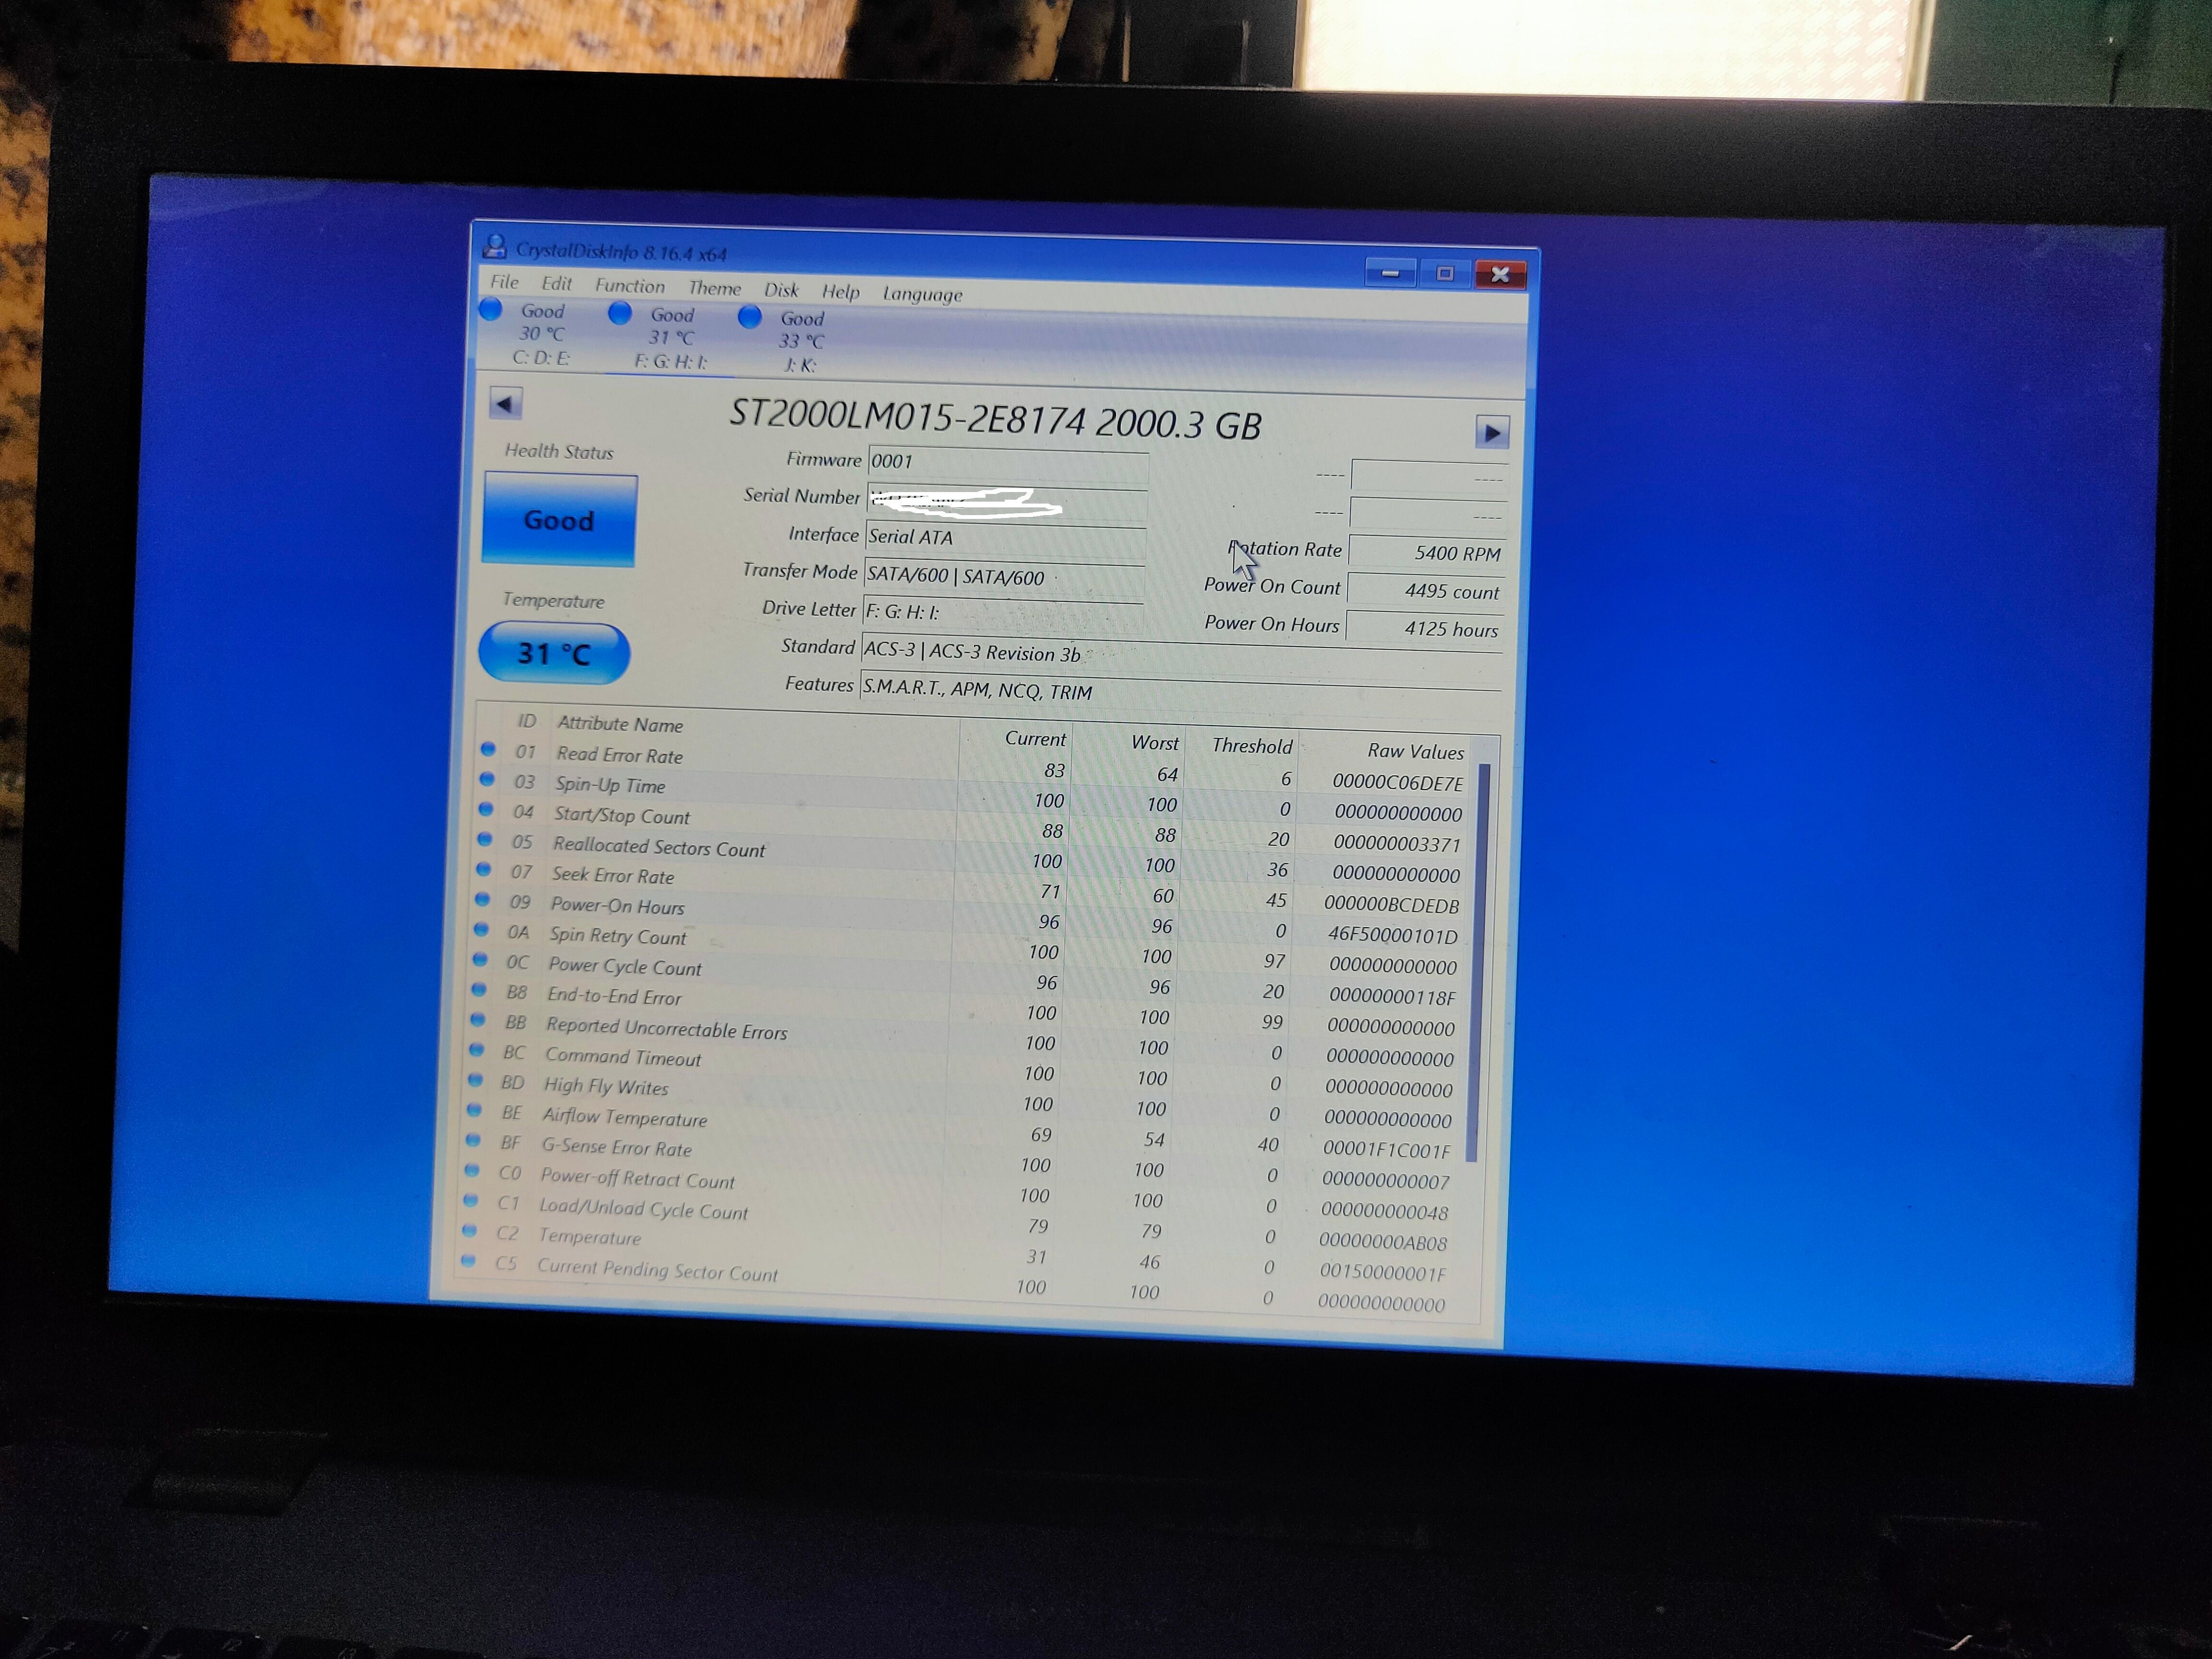
To test the modified WinRE.wim file, Click on the Settings icon, then click on System, then on Recovery, click on Advanced startup

Windows OS will boot into Recovery Environment mode.
I tested on my Windows 11 laptop, screenshots of testing


End Task.
Sources are taken from::
Reference link::
Thanks for reading my article.
If any user finds this post useful means, then share this post with windows users and then give UPVOTES to me.