
Summary
For up to 10 days after you upgrade to Windows 10 (or up to 30 days if you installed an older version of Windows 10), you can choose to go back to your previous version of Windows using the “go back” feature in the recovery settings. This will keep your personal files, but it'll remove apps and drivers installed after the upgrade, as well as any changes you made to settings.
This article provides a walkthrough and details for uninstalling Windows 10.
Details
Important: Before attempting to use the “go back” feature to uninstall Windows 10, you’ll need to:
-
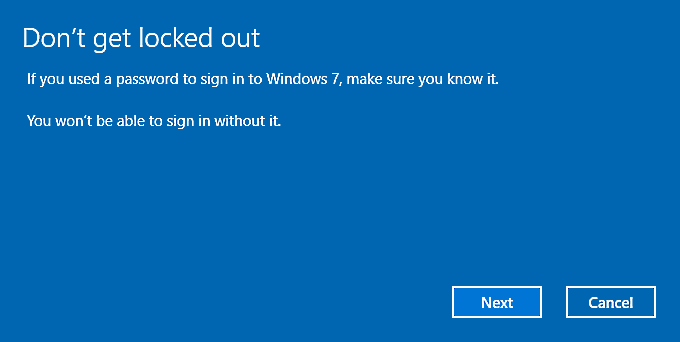
Know the password you used to sign in to Windows 7 or Windows 8.1 (if you used one).
-
Have the USB drive you used to upgrade to Windows 10 (if you used one).
-
Back up any files you may have saved since upgrading to Windows 10 to an external drive or network location. When you choose to go back to your previous operating system, it will remove any apps or drivers installed after the upgrade, as well as any changes you made to settings.
-
Remove any user accounts you added after upgrading to Windows 10
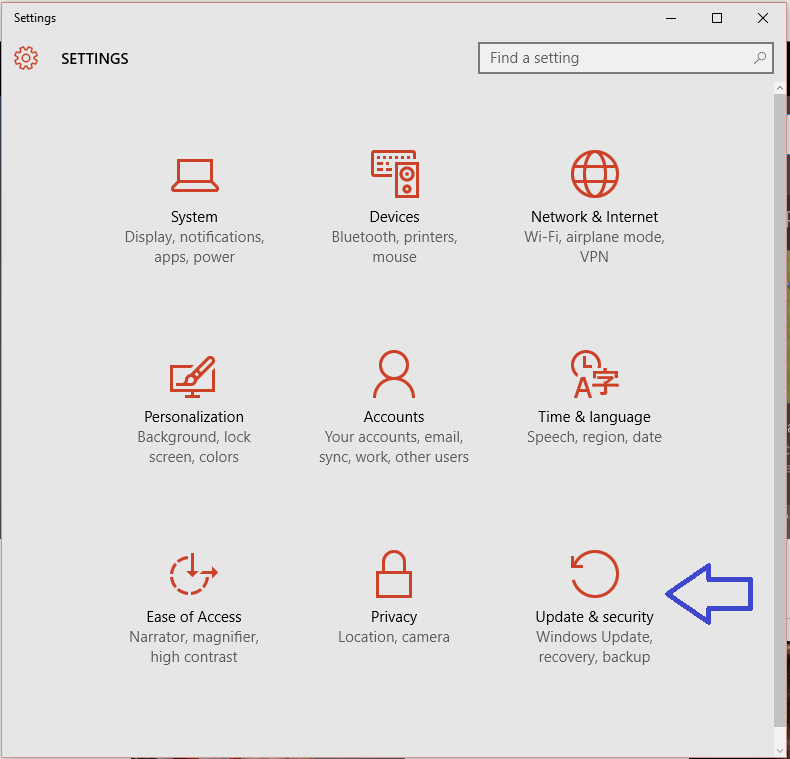
To go back to your previous version of Windows:
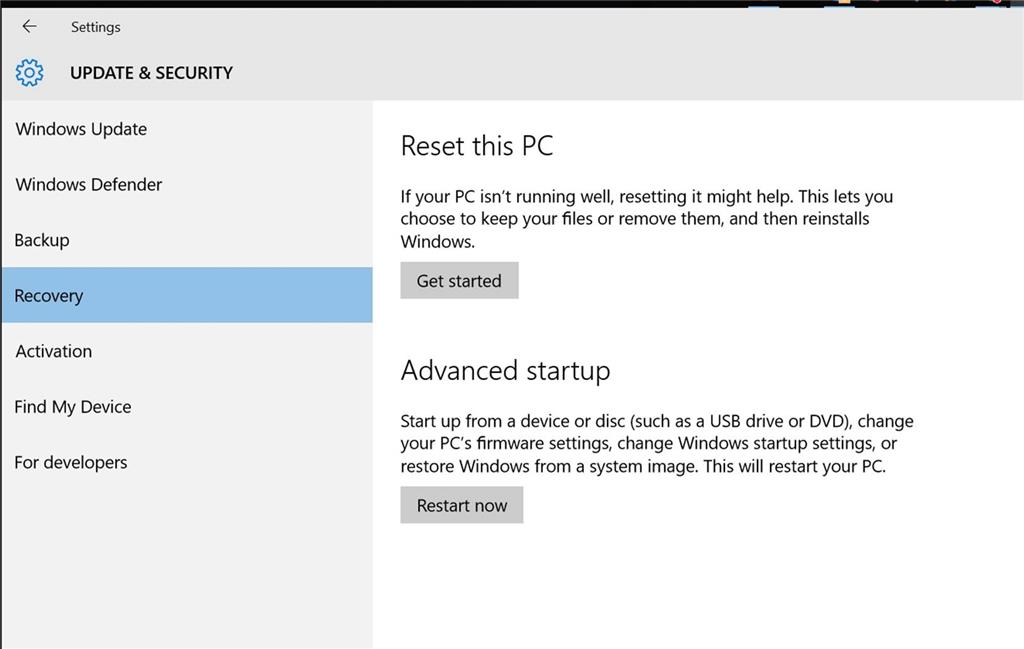
- Open Settings and select
Update & security.
- Select the Recovery tab and then the "Get started" button under the "Go back" option.
Note: If more than 10 days have elapsed since you upgraded to Windows 10, the "Go back" option will be grayed out. If you don't see a "Go back" option, please skip to the "I don't see a 'go back' option in Recovery settings" section at the end of this article.
- You'll then see a short questionnaire. Please select one or more options to tell Microsoft the reason(s) why you're going back. Click
Next when you're ready to continue.
- You'll then see a prompt to make sure you've installed the latest updates for Windows 10.
When you select Check for updates, it will launch Windows Update. If this doesn't fix the problems you're having with Windows 10 and you still want to uninstall, you'll need to restart the "go back" process from the beginning of these steps.
Select No, thanks when you're ready to continue.
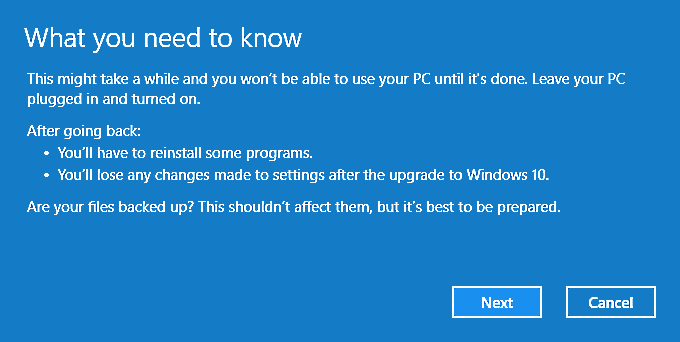
- You'll then see a few warnings. Click Next
through these screens to continue.
- When you're ready, select Go back... to start the recovery process.
- When completed, you will be returned to your previous version of Windows. If you're returning to Windows 8.1, some apps that came Windows, like Mail and People, might not work anymore. To fix them, reinstall the apps from the
Store.


I don’t see a “go back” option in Recovery settings:
When you open the Recovery settings, you may not see a “go back” option.
This may occur if:
-
The version of Windows 10 you have is earlier than version 1607 and more than a month has elapsed since you installed Windows 10.
-
You reset your PC since you installed Windows 10.
-
You performed a clean install of Windows 10.
-
You are not running Windows 10 in an administrator account.
-
You ran Disk Cleanup and chose to "Clean up system files" or chose to delete "Previous Windows installation(s)".
-
You otherwise deleted either the C:\Windows.old or the C:\$Windows~bt folder.
If go back isn’t available:
-
Check to see if you can restore your PC to factory settings. This will reinstall the version of Windows that came with your PC and remove personal files, apps and drivers you installed, and any changes you made to settings. Go to Settings > Update & security > Recovery > Reset this PC > Get started and look for Restore factory settings.
-
If you have a product key for your previous version of Windows, use the media creation tool to create installation media for Windows 8.1 or Windows 7, and use it to do a clean install. A clean install removes all your apps and personal files, so make sure you create a backup of any files you want to keep before performing the clean install.
