How can I force an update to Windows 11 version 23H2

I have a Windows 11 PC but it is 'stuck' on version 21H2.


Edition Windows 11 Home

Version 21H2

Installed on ‎24/‎05/‎2022

OS build 22000.2538

Experience Windows Feature Experience Pack 1000.22001.1000.0

I have just tried forcing an update to 23H2 and all goes well initially. The file is downloaded, verified, installed, checks for updates but then gives the error message "We couldn't update the system reserved partition". After cancelling it carries out a 'clean up' and reports "something went wrong" with the error code 0xc1900201 and tells me to contact Microsoft support for help

I have tried a couple of times with the same result. Reading the Microsoft support articles I have found that it is possible my System Reserved partition may not have enough space. The article I read https://support.microsoft.com/en-us/topic/-we-couldn-t-update-system-reserved-partition-error-installing-windows-10-46865f3f-37bb-4c51-c69f-07271b6672ac#:~:text=The%20System%20Reserve%20Partition%20(SRP,and%20can%20fill%20it%20up. gives a method to delete the files in the fonts folder in this partition but it only refers to Windows 10.. Can I safely use this same method with Windows 11 (with great care!) or is there any other procedure I can follow.

* Please try a lower page number.

* Please enter only numbers.

* Please try a lower page number.

* Please enter only numbers.

Hi ian newton2,


Welcome to Microsoft Community.


I am sorry that you are having problems with the Windows 11 update. To resolve the issue with updating to version 23H2,

You can refer to the method of deleting files in the fonts folder in this partition in “We couldn’t update system reserved partition” error installing Windows 10 - Microsoft Support

In addition, you can try the following:

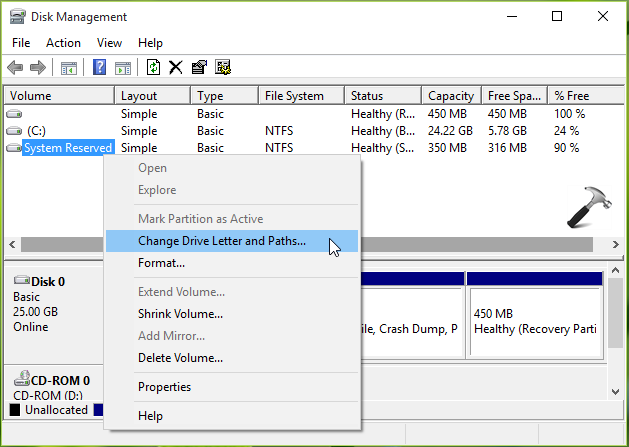
1. On your existing Windows installation, press Windows 键 + R and put diskmgmt.msc in Run dialog box to open Disk Management. Locate the System Reserved Partition and right click it, select Change Drive Letter and Paths option.

FIX - This PC Cant Run Windows 10 - We Couldn't Update The System Reserved Partition

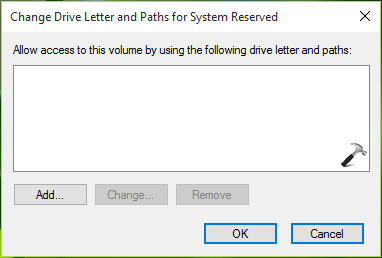
2. Then click Add on Change Drive Letter and Paths for System Reserved window:

FIX - This PC Cant Run Windows 10 - We Couldn't Update The System Reserved Partition

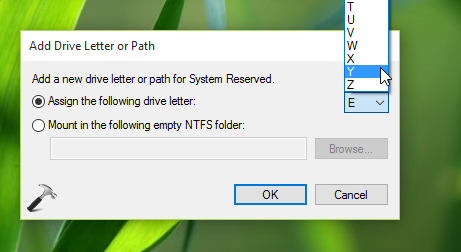
3. In the Add Drive Letter or Path, select Y from drop down against Assign the following drive letter option. In this way, we’ve assigned Y: as temporary drive letter to SRP and the partition can now be viewed via File Explorer. Minimize the Disk Management utility.

FIX - This PC Cant Run Windows 10 - We Couldn't Update The System Reserved Partition

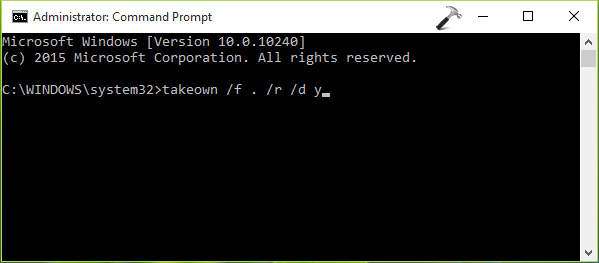
4. Next, open administrative Command Prompt and type following command, press Enter key then:

takeown /f . /r /d yCOPY

FIX - This PC Cant Run Windows 10 - We Couldn't Update The System Reserved Partition

The command execution may take some time, so keep patience.

5. Now once command mentioned in previous step successfully executed, type following command and hit Enter:

icacls . /grant administrators:F /tCOPY

FIX - This PC Cant Run Windows 10 - We Couldn't Update The System Reserved Partition

This command will also take some time to complete execution, so please bear with it and wait for a while.

6. Moving on, type command once previous command is executed:

attrib -h -s -r bootmgrCOPY

FIX - This PC Cant Run Windows 10 - We Couldn't Update The System Reserved Partition

7. Finally, type this command followed by Enter key:

chkdsk Y: /F /X /sdcleanup /L:5000COPY

FIX - This PC Cant Run Windows 10 - We Couldn't Update The System Reserved Partition

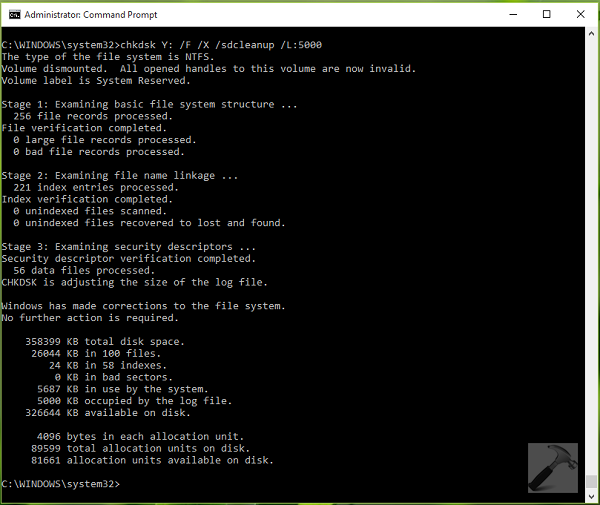
You can now close Command Prompt.
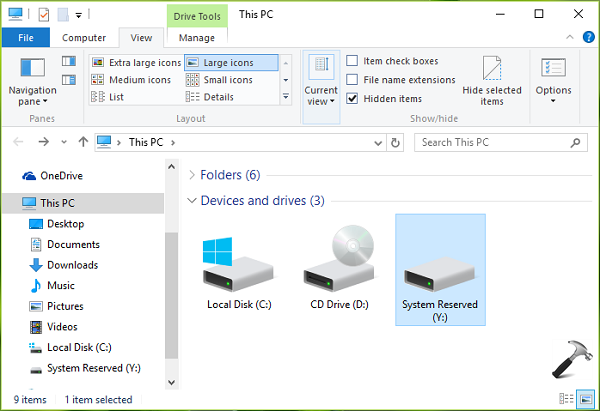
8. Open File Explorer by pressing Windows 键 + E and locate the System Reserved partition drive i.e. Y: drive. Make sure you checked Hidden items option under View tab of File Explorer‘s ribbon.

FIX - This PC Cant Run Windows 10 - We Couldn't Update The System Reserved Partition

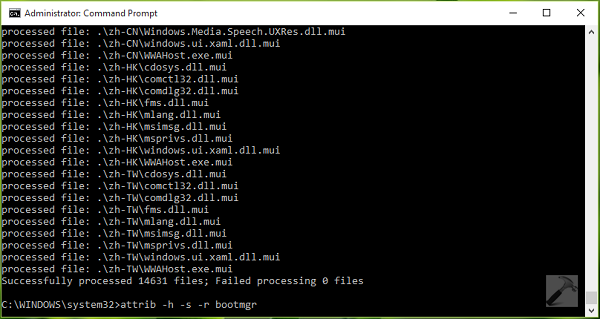
Inside Y: drive, you may find a folder named Boot. In Boot folder, you’ll have various language folders like en-US, en-GB etc. etc. You have to permanently delete (using Shift+Delete shortcut) all of those language folders except en-Us folder.

Now you can try to upgrade to Windows 10 and this should work.

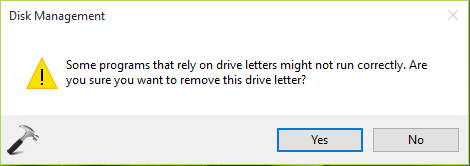
9. Once you upgraded to Windows 10, come to Disk Management utility (step 1) and Remove the temporary drive letter under Change Drive Letter and Paths for Y: (System Reserved) window:

FIX - This PC Cant Run Windows 10 - We Couldn't Update The System Reserved Partition

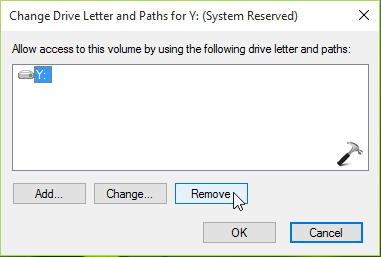
Lastly, provide you confirmation with selecting Yes option here:

FIX - This PC Cant Run Windows 10 - We Couldn't Update The System Reserved Partition


Thank you for your patience and understanding, if you have any questions, please feel free to leave us a message.


Best regards

Brandon | Microsoft Community Support Specialist

Was this reply helpful?

Sorry this didn't help.

Great! Thanks for your feedback.

How satisfied are you with this reply?

Thanks for your feedback, it helps us improve the site.

How satisfied are you with this reply?

Thanks for your feedback.

Please follow the steps listed under "Windows 10 with GPT partition" in that article. It should work in Windows 11 as well.

______________________________________________________________________________________________________
Ramesh, Windows Shell MVP 2003-2012.
If this post resolves your issue, pls mark it as an Answer.

Was this reply helpful?

Sorry this didn't help.

Great! Thanks for your feedback.

How satisfied are you with this reply?

Thanks for your feedback, it helps us improve the site.

How satisfied are you with this reply?

Thanks for your feedback.

Please follow the steps listed under "Windows 10 with GPT partition" in that article. It should work in Windows 11 as well.

Thank you for confirming this. I have tried (twice) now using this method without success. It all appears to be proceding well and completes the checking for updates process but then reports "Something went wrong". The error code now given is 0xc0000005.

How should I now procede?

Was this reply helpful?

Sorry this didn't help.

Great! Thanks for your feedback.

How satisfied are you with this reply?

Thanks for your feedback, it helps us improve the site.

How satisfied are you with this reply?

Thanks for your feedback.

Hi Brandon

Thank you for your response. I haven't attempted this process as yet as throughout you are referring to Windows 10. I already have Windows 11 v21H2 installed and am trying to update to 23H2 as originally described. Should I still try your suggested method? I have tried the method of deleting fonts without success but am now getting error code 0xc0000005 when it fails to update

Was this reply helpful?

Sorry this didn't help.

Great! Thanks for your feedback.

How satisfied are you with this reply?

Thanks for your feedback, it helps us improve the site.

How satisfied are you with this reply?

Thanks for your feedback.

Brandon
Further to my earlier reply I attempted the first step in your procedure but the option to change the drive letter is greyed out so is not possible

Was this reply helpful?

Sorry this didn't help.

Great! Thanks for your feedback.

How satisfied are you with this reply?

Thanks for your feedback, it helps us improve the site.

How satisfied are you with this reply?

Thanks for your feedback.

So the previous error "We couldn't update the system reserved partition" is gone, which is good news.

1. Please clean boot Windows using msconfig.exe. See How to perform a clean boot in Windows - Microsoft Support.

2. Uninstall 3rd party antivirus and firewall products.

3. Mount the 22H2 or the 23H2 ISO and run setup.exe.

If the Setup fails, please share the following log file on OneDrive.

  • C:\$WINDOWS.~BT\Sources\Panther\setupact.log

(How-To: Share OneDrive files and folders - Microsoft Support)

______________________________________________________________________________________________________
Ramesh, Windows Shell MVP 2003-2012.
If this post resolves your issue, pls mark it as an Answer.

Was this reply helpful?

Sorry this didn't help.

Great! Thanks for your feedback.

How satisfied are you with this reply?

Thanks for your feedback, it helps us improve the site.

How satisfied are you with this reply?

Thanks for your feedback.

Hi ian newton2,


Welcome to Microsoft Community.


This error means memory access violation. Please use another USB drive and create another installation media.
Check your RAM modes (voltage, frequency, timings) are in compliance with numbers in the motherboard compatibility list for your RAM model.
Try RAM modules one by one.


Thank you for your patience and understanding, if you have any questions, please feel free to leave us a message.


Best regards

Brandon | Microsoft Community Support Specialist

Was this reply helpful?

Sorry this didn't help.

Great! Thanks for your feedback.

How satisfied are you with this reply?

Thanks for your feedback, it helps us improve the site.

How satisfied are you with this reply?

Thanks for your feedback.

Brandon
Many thanks for your assistance. After I sent the previous message last night I decided to try one more time and for no apparent reason Windows 11v23H2 installed without issue. I'm sure that following your guidance cleared whatever the problem was! I'm very happy now and the underlying issue I was having under Windows 11 21H2 has also been resolved as my eresearch had suggested it would. (Specifically that the microphone was unavailable to use when using WhatApp, though all rights and privact settings were correctly assigned and it worked fine with other Apps)

Was this reply helpful?

Sorry this didn't help.

Great! Thanks for your feedback.

How satisfied are you with this reply?

Thanks for your feedback, it helps us improve the site.

How satisfied are you with this reply?

Thanks for your feedback.

Ramesh
Many thanks for your assistance. After I sent the previous message last night I decided to try one more time and for no apparent reason Windows 11v23H2 installed without issue. I'm very happy now and the underlying issue I was having under Windows 11 21H2 has also been resolved as my research had suggested it would. (Specifically that the microphone was unavailable to use when using WhatApp, though all rights and privact settings were correctly assigned and it worked fine with other Apps)

Was this reply helpful?

Sorry this didn't help.

Great! Thanks for your feedback.

How satisfied are you with this reply?

Thanks for your feedback, it helps us improve the site.

How satisfied are you with this reply?

Thanks for your feedback.

Hi Ian,

Excellent. Thanks for the update.

Glad the issues are sorted.

Regards,

______________________________________________________________________________________________________
Ramesh, Windows Shell MVP 2003-2012.
If this post resolves your issue, pls mark it as an Answer.

Was this reply helpful?

Sorry this didn't help.

Great! Thanks for your feedback.

How satisfied are you with this reply?

Thanks for your feedback, it helps us improve the site.

How satisfied are you with this reply?

Thanks for your feedback.

* Please try a lower page number.

* Please enter only numbers.

* Please try a lower page number.

* Please enter only numbers.


Question Info


Last updated May 18, 2024 Views 23,640 Applies to: