
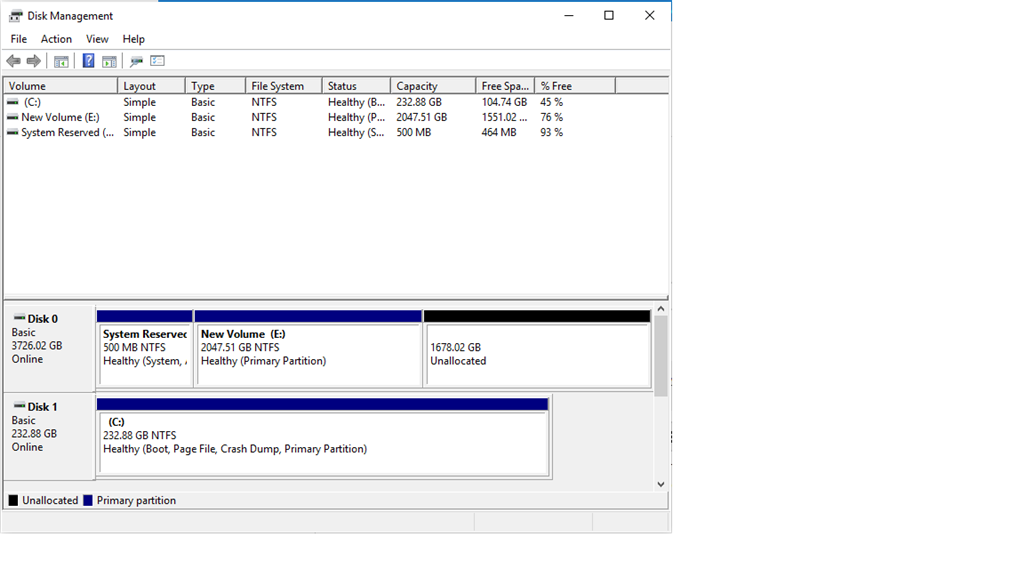
I just recently built my computer from parts I purchased from Micro Center. When I installed everything and installed windows 10 it worked like a champ. I went to set up my 4TB hard drive and when I went into the disk management it only allowed me to use
half of the drive and it specifies the other half as "unallocated" but when i right-click on it to allocate it, it only lets me click "properties" or "help." the computer works great and have not had any problems with it except for only being able to use
half my drive, someone please help.
February 11, 2025
Windows 10 Top Contributors:
EP
Hard drive half-recognized
This thread is locked. You can vote as helpful, but you cannot reply or subscribe to this thread.
Report abuse
Details (required):
Thank you.
Reported content has been submitted
Answer
Hi,
Thank you for posting on Microsoft Communities.
I will be glad to help you with the issue you have with the computer. I understand the frustration when things don't work the way it should.
Computer describes any physical space on a hard drive that doesn't belong to a partition as unallocated. This means that no programs can write to the space.
When setting up new computers, the system installation will ask you to partition your unallocated space. This represents the space on your hard drive that has not been assigned a drive letter. Without allocation, you can't use the space on the drive. In some cases, existing computers will also have unallocated space. In Windows, the Disk Management control panel provides tools for allocating this space.
To allocate the unallocated space as a usable hard drive in Windows, follow these steps:
Right click "This PC", select "manage", then select "disk management. Right-click the unallocated volume.
-
Choose New Simple Volume from the shortcut menu.
The New Simple Volume Wizard appears.
-
Click the Next button.
-
Set the size of the new volume by using the Simple Volume Size in MB text box.
The size is already preset to equal the entire disk capacity, which is recommended. If you need to set it to a smaller size, do so. The remaining space on the drive continues to be unallocated.
-
Click the Next button.
Windows lets you assign the drive a letter, or you can mount the drive on an NTFS volume as a folder. Or, you can do neither, depending on how you fill in the wizard.
-
(Optional) Choose a letter for the new volume.
My advice is to use the letter that’s provided.
-
Click the Next button.
-
Ensure the option Format This Volume with the Following Settings is chosen.
-
Ensure that the NTFS format is chosen.
-
Click the Next button.
-
Click the Finish button to create the new volume.
-
Windows prepares the disk by formatting it, laying down the tracks (or parking spaces) for the files. The amount of time taken to complete the operation depends on the size of the volume. Larger disk drives take longer to format.
-
The display in the Disk Management console shows the drive being formatted; you can watch its progress in the Status column at the top center of the window. The drive isn’t assigned its new letter until after it’s formatted.
-
When the operation is complete, you can close the Disk Management console.
The newly created disk drive appears in the Computer window. It’s immediately available for use.
Hope this information is helpful. Please post in case you have any further issues, we are happy to help you further.
Thank you.
Report abuse
Details (required):
Thank you.
Reported content has been submitted
6 people found this reply helpful
·Was this reply helpful?
Sorry this didn't help.
Great! Thanks for your feedback.
How satisfied are you with this reply?
Thanks for your feedback, it helps us improve the site.
How satisfied are you with this reply?
Thanks for your feedback.
Question Info
Last updated February 8, 2025 Views 3,243 Applies to:
- Windows
- /
- Windows 10
- /
- Devices & drivers
- /
- PC