
Unable to access internet
Report abuse
Thank you.
Reported content has been submitted
I HOPE IT HELPS, GOOF LUCK.
Example: Changing DNS server settings on Microsoft Windows 7
- Go the Control Panel.
- Click Network and Internet, then Network and Sharing Center, and click Change adapter settings.
- Select the connection for which you want to configure Google Public DNS. For example:
- To change the settings for an Ethernet connection, right-click Local Area Connection, and click Properties.
- To change the settings for a wireless connection, right-click Wireless Network Connection, and click Properties.
- Select the Networking tab. Under This connection uses the following items, select Internet Protocol Version 4 (TCP/IPv4) or Internet Protocol Version 6 (TCP/IPv6) and then click Properties.
- Click Advanced and select the DNS tab. If there are any DNS server IP addresses listed there, write them down for future reference, and remove them from this window.
- Click OK.
- Select Use the following DNS server addresses. If there are any IP addresses listed in the Preferred DNS server or Alternate DNS server, write them down for future reference.
- Replace those addresses with the IP addresses of the Google DNS servers:
- For IPv4: 8.8.8.8 and/or 8.8.4.4.
- For IPv6: 2001:4860:4860::8888 and/or 2001:4860:4860::8844
The Google Public DNS IP addresses (IPv4) are as follows:
- 8.8.8.8
- 8.8.4.4
The Google Public DNS IPv6 addresses are as follows:
- 2001:4860:4860::8888
- 2001:4860:4860::8844
________________________________________________________________________
1. IPConfig is a tool built into Windows, that displays all current TCP/IP network configuration values and refreshes Dynamic Host Configuration Protocol DHCP and Domain Name System DNS settings. You can access this tool via the command line. If you have a bad IP address, then renewing your IP address this way may help solve your internet problems.
Type cmd in start search and press Ctrl-Shift-Enter. If you wish, just out of curiosity, you may type ipconfig and hit Enter, to view the status of the computer’s Internet Protocol or IP address.
Type ipconfig /release to let go of the current IP address.
Next type ipconfig /renew to obtain a new IP address.
If you get an error Message When You Run the “Ipconfig /Renew” Command see KB810606.
If you recurrently face this problem, then you can have it renewed on every start-up, by creating the following .bat file and placing it in your startup folder.
Open notepad and type:
ipconfig /release
ipconfig /renew
Save it as, say, iprenew.bat file.
2. Frequently, internet connection problems can also be traced to a corrupted DNS cache. Resetting or Flushing this cache is an easy fix to many of these problems. This is how to clear the DNS cache in Windows 7 or Vista.
ipconfig /flushdns
You should be able to see a confirmation dialog window:
Windows IP Configuration. Successfully flushed the DNS Resolver Cache.
Next type ipconfig /registerdns and hit Enter.
This registers any DNS records that you or some programs may have recorded in your Hosts file.
Just in case you are interested, to view the complete syntax for this command type ipconfig /help and hit Enter!
3. The Network & Internet Diagnostic & Repair Tool in Windows 7 & Vista will help you identify the potential issues preventing network connectivity, and it automatically takes appropriate steps toward correcting them. If a computer on the network loses Internet connectivity, you can graphically see which connection is down and then use Network Diagnostics to help determine the cause of the problem and find possible solutions.
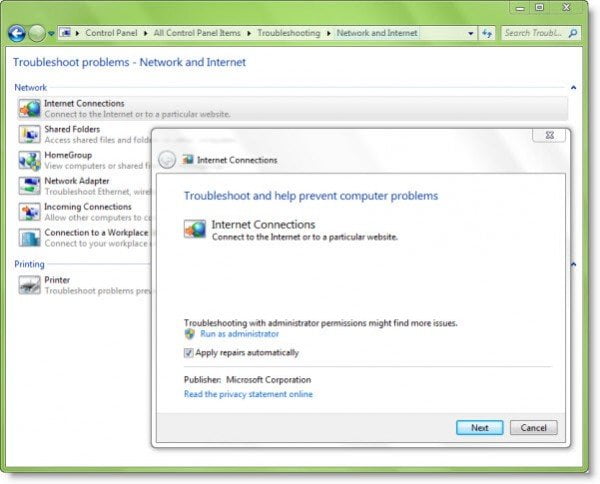
To access it, open Control Panel > Network & Sharing Center. In the lower part, click on Troubleshoot Problems. From the windows which opens, you can select Internet Connections or any other issue you want to troubleshoot and repair.
--------------------------------------------------------------------------------------------------------


 ) glows blue when the Bluetooth or WiFi communication devices are turned on. If the computer has both Bluetooth and WiFi and
one of them is turned off or the device is disabled, the light glows amber. The indicator light does not glow at all when power to the device is turned off. Use the HP Wireless Assistant software to enable or disable the individual wireless functions.
) glows blue when the Bluetooth or WiFi communication devices are turned on. If the computer has both Bluetooth and WiFi and
one of them is turned off or the device is disabled, the light glows amber. The indicator light does not glow at all when power to the device is turned off. Use the HP Wireless Assistant software to enable or disable the individual wireless functions.-
Completely shut down the computer. Click Start
 , and then click
Shut Down .Figure 2: Shutting down the computer
, and then click
Shut Down .Figure 2: Shutting down the computer
-
Unplug the power to the wireless router and to the cable or DSL modem.Figure 3: Unplugging the power cord from the back of a router

-
Wait at least 30 seconds before continuing.
-
Reconnect the power to the modem and allow it to re-establish a connection to the ISP. If the modem has indicator lights, wait until the lights indicate a connection.
-
If using a separate wireless router, reconnect the power to the router and allow it to re-establish the connections to the modem and other components.
-
After the modem and router have finished making connections, turn on the computer.
-
Click the Network Connection icon
 in the notification area and click
Connect next to the name of the wireless network. If the network name is not displayed, click the Refresh
in the notification area and click
Connect next to the name of the wireless network. If the network name is not displayed, click the Refresh button to scan for wireless network signals.
-
No error message is displayed, but there is no Internet connection:Right-click the Network Connection icon in the notification area, and then click
Troubleshoot problems . Windows Network Diagnostics checks for problems. Figure 4: Troubleshoot problems

-
The Network Connection icon is missing in the notification area:
-
Click Start
 , and then type
network and sharing in the Search box. Click Network and Sharing Center in the results.Figure 5: Opening the Network and Sharing Center from the Start menu
, and then type
network and sharing in the Search box. Click Network and Sharing Center in the results.Figure 5: Opening the Network and Sharing Center from the Start menu
-
In the Network and Sharing Center, click the yellow exclamation symbol
 or the red X
 in the Network status area to run Windows Network Diagnostics.Figure 6: Network status
-
-
Click Start , and then type
network and sharing in the Search box. Click Network and Sharing Center in the results.Figure 7: Opening the Network and Sharing Center from the Start menu
-
Click Troubleshoot problems .Figure 8: Troubleshoot problems
 The Network and Internet Troubleshooter opens.
 -
Click Internet Connections to test the Internet connection.Figure 9: Network and Internet Troubleshooter

-
Follow the instructions to check for problems.
-
If the problem is resolved, you are done.If the problem continues, return to the Network and Internet Troubleshooter and click Network Adapter to test the adapter.
-
Click Start , and then type
network and sharing in the Search box. Click Network and Sharing Center in the results.Figure 10: Opening the Network and Sharing Center from the Start menu
-
In the Network and Sharing Center window, click Set up a new connection or network .Figure 11: Set up a new connection or network

 NOTE:Do not click Connect to a network . If the problem is an incorrect password or key index, this option reconnects with the wrong information.
 -
In the Choose a connection option window, select Manually connect to a wireless network , and click Next .Figure 12: Manually connect to a wireless network

-
Type the required wireless network information, and then click Next .
-
Network name
-
Security type - Must be the same security as set in the wireless router.
-
Encryption type
-
Security Key
-
Select Start this connection automatically
-
Select Connect even if the network is not broadcasting
Figure 13: Network information NOTE:If the wireless network already exists, when prompted, select Use the existing network . The information just entered replaces the previous values that are causing the connection problem.
 -
-
Click Close .Figure 14: Successfully added network

-
Click the Network Connection icon in the notification area, click the name of the new network, and then click
Connect .
-
Check your cable or DSL modem for disconnected cables or wires. Make sure the power cable is connected and the lights are on.
-
Make sure that the wireless router is connected to the power adapter and modem. Make sure the lights are on.
-
Reseat all the cables and power cords.
-
Click the Network Connection icon in the notification area and click
Connect next to the name of the wireless network. If the network name is not displayed, click the Refresh button to scan for wireless network signals.
| For the wireless network adapter to operate properly, you must perform two separate actions: turn on the power to the wireless device, and then enable the device to send and receive signals. |
) glows blue when the Bluetooth or WiFi communication devices are turned on. If the computer has both Bluetooth and WiFi and
one of them is turned off or the device is disabled, the light glows amber. The indicator light does not glow at all when power to the device is turned off. Use the HP Wireless Assistant software when you want to enable only one of the two wireless functions
(Wireless LAN or Bluetooth). ), or Off (
 ) in the Windows notification area. However, the computer can be set to not display in the icons in the notification area.
-
Click Start , enter
wireless assistant into the search field, and then select HP Wireless Assistant from the list.If HP Wireless Assistant is not installed, either:
-
Click to download the latest version of HP Wireless Assistant .
-
-
Verify the status of the installed wireless devices. They should all be on.
-
Click Properties to open the Settings window.
-
Select the Show Wireless Assistant icon in the notification area option, and then click Apply . The icon displays in the system tray area.
), the wireless LAN device icon (
), and the network connection icon ( ).
).-
Click Start , enter
mobility into the search field, and then select Windows Mobility Center from the list.
-
On the Windows Mobility Center window, this graphics shows the Wireless Network is Wireless off . Click Turn wireless on to turn on the device.
 Your wireless network device(s) are now turned on via Windows Mobility Center.
-
Click Start , and then type
network and sharing in the Search box. Click Network and Sharing Center in the results.Figure 16: Opening the Network and Sharing Center from the Start menu
-
In the Network and Sharing Center, click Change adapter settings .The Network Connections window opens.
-
Check the status of the wireless network connection. If the network is disabled, right-click the connection, and then click Enable .Figure 17: Enable network
 It might take a few seconds to enable the connection.
-
Click Start , and then type
Device Manager in the Search box. Click Device Manager in the results.Figure 18: Opening Device Manager from the Start menu

-
Double-click Network adapters .Figure 19: Device Manager

-
Check the status of the wireless LAN hardware.If the icon next to the hardware has an arrow (
 ), the hardware is disabled. Right-click the name of the hardware, then click
Enable .Figure 20: Enable the wireless LAN hardware
), the hardware is disabled. Right-click the name of the hardware, then click
Enable .Figure 20: Enable the wireless LAN hardware NOTE:If the wireless LAN hardware is not listed, click Action , then click Scan for hardware changes . If the hardware is still not listed, restart the computer, then return to Device Manager. Windows 7 automatically detects hardware and installs drivers upon system startup.
-
Click the Network Connection icon
 in the notification area see if any wireless networks are connected.
If the computer is connected to an incorrect network, click the name of the network, then click Disconnect . Click the name of the correct network, then click Connect .Once the computer is connected to the correct network, check for Internet access. If the computer does not have Internet access or has limited access, go to Connect the computer directly to the network router using an Ethernet cable .
in the notification area see if any wireless networks are connected.
If the computer is connected to an incorrect network, click the name of the network, then click Disconnect . Click the name of the correct network, then click Connect .Once the computer is connected to the correct network, check for Internet access. If the computer does not have Internet access or has limited access, go to Connect the computer directly to the network router using an Ethernet cable .
-
Move the computer closer to the router (if needed) and connect an Ethernet cable from one of the available ports on the router to the network port on the computer.
-
Right-click the Network Connection icon in the notification area, and select
Network and Sharing Center .
-
Select Change adapter settings .Figure 21: Change adapter settings

-
Check the status of the Local Area Connection .
-
If the wired network, or the wireless network, is Disabled , right-click the connection, and click Enable . It might take a few seconds for the connection to become enabled.
-
Click the Back button
 to return to the Network and Sharing Center.
-
If the Network and Sharing Center window shows connections from the computer to the network router, and from the router to the cable or DSL modem, click the Internet
 icon to open a Web browser and view a page on the Web. The router is configured.
 -
If the Network and Sharing Center window shows connections from the computer to the network router, but not from the router to the Internet, the router might not be configured correctly. See Reset and reconfigure the router .
-
If the network router cannot connect to the Internet, and you have installed programs that required making changes to the firewall settings, refer to router manufacturer Help files for information on restoring the router to the factory default conditions.
-
-
After you have verified the direct wired connection to the Internet, turn on the power to the wireless device, disconnect the Ethernet cable from the computer, and manually setup a new connection to the wireless network (see Manually connect to the wireless network ).
-
Enter the default IP addresses for the router into the URL address field on the browser. The following list provides default IP addresses for several routers.
-
3Com : http://192.168.1.1
-
D-Link : http://192.168.0.1
-
Linksys : http://192.168.1.1
-
Netgear : http://192.168.0.1
NOTE: These IP addresses are provided for informational purposes only. -
-
When the home page for the router displays, you might need to type a password to perform configuration tasks. See the User Guide for model specific information.NOTE:Most manufacturers allow you to reset the router to a default factory condition and then open router configuration screens.
-
When you have administrator access to the router, change the router's default name, sometimes called an SSID, to a name that is different from other routers in your area.
-
Set up wireless encryption (WEP) or Wi-Fi Protected Access (WPA), to prevent other computers from connecting to your home network.
-
Enter a network access password, sometimes called a passphrase. Make sure to pick a password that is easy to remember, such as a phone number that you dial often or a phrase that is familiar.
Report abuse
Thank you.
Reported content has been submitted
Was this reply helpful?
Sorry this didn't help.
Great! Thanks for your feedback.
How satisfied are you with this reply?
Thanks for your feedback, it helps us improve the site.
How satisfied are you with this reply?
Thanks for your feedback.
Question Info
Last updated April 21, 2025 Views 2,238 Applies to: